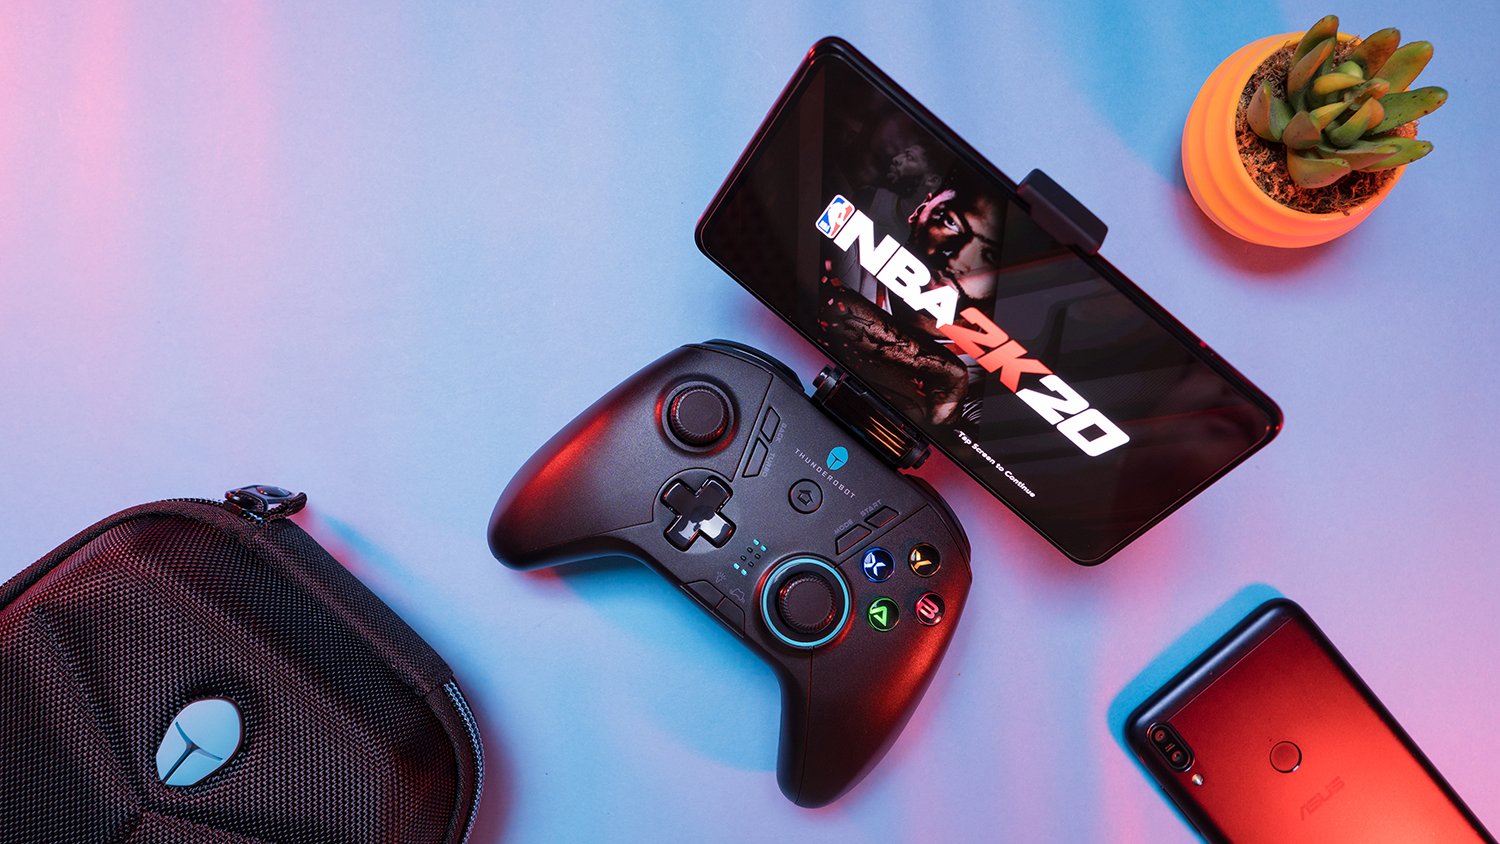
Today, we’re going to do an unboxing and review of the Thunderobot G50 Multiplatform Wireless Game Controller. Now, probably like you, honestly, it’s also my first time hearing about this brand Thunderobot and if you know me guys, I like reviewing products that only have a few reviews online, because I know a lot of you are also looking out for these products. With that said, we got a quite interesting product here and I’d say right of the gate that this is one of the best budget game controlers I’ve ever used and probably the only game controller you’ll ever need. Wanna know why? let’s get into it!
MY EARLY BREAKDOWN
Pros: Multiplatform compatability, Can be used in any mobile game, Highly customizable app, Replaceable face plate, Tactile buttons, Phone holder included in the package
Cons: Left joystick touching the edges of the cutout
SPECIFICATIONS
Model: Thunderobot G50
Interface: Bluetooth 5.0/2.1 and Wired USB Type C
Compatability: Windows 10, Mac OC, Nintendo Switch, iOS
Gyroscope: Six-Axis
Joystick: Manufacturer by ALPS
Vibration Motors: Dual
LED Backlight: Face Buttons and Right joystick ring light
Power: DC 5V, 500mA
Working time: About 8 hours
Charging time: About 2 hours
Weight: 206g (w/o bracket)
Working distance: 10m max (33 inches)
WHAT’S IN THE PACKAGE
Alright, guys, so right here I have the packaging for the Thunderobot G50 game controller. It is compatible with windows, Mac OS, and it also supports Bluetooth 2.1 and 5.0 and it is also compatible with Nintendo switch, Android and of course, IOs devices.
In front, we have a preview of the product and it looks like it follows the X-Box controller layout which I personally prefer.
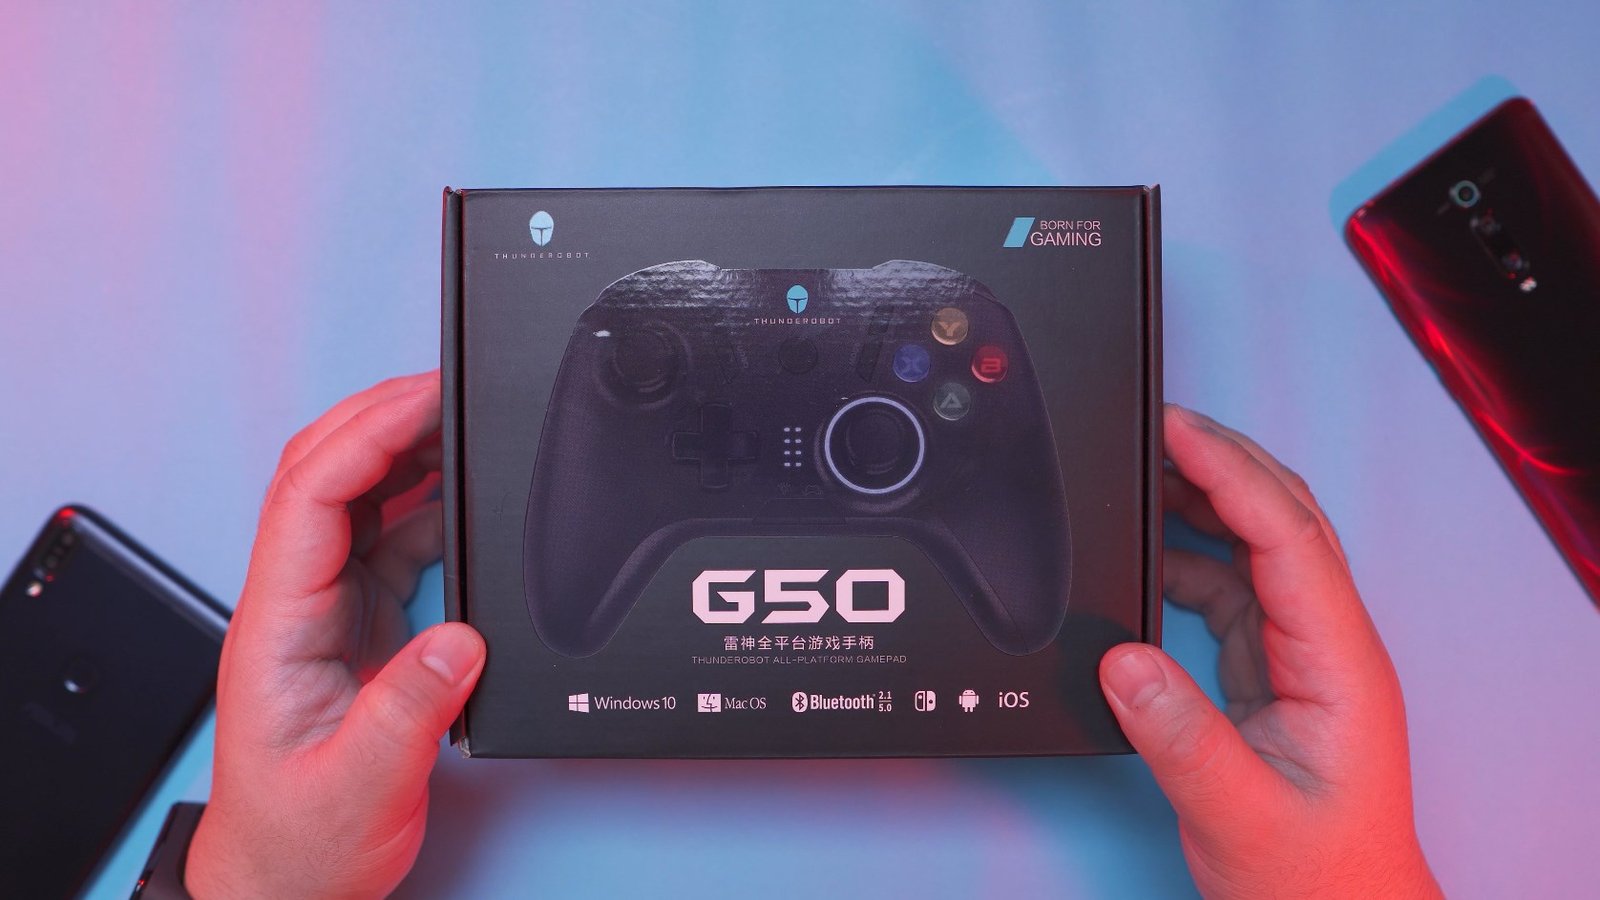
At the top, we just have another preview of the product,

And then on the side, we just have the Thunderobot logo,

And then on the other side, the same thing, a thunderobot branding.

And then on the other side we have the specific model name as well as the serial number.

Now, at the back of the box, we have the key features as well as another preview of the product with a phone holder attached to it.

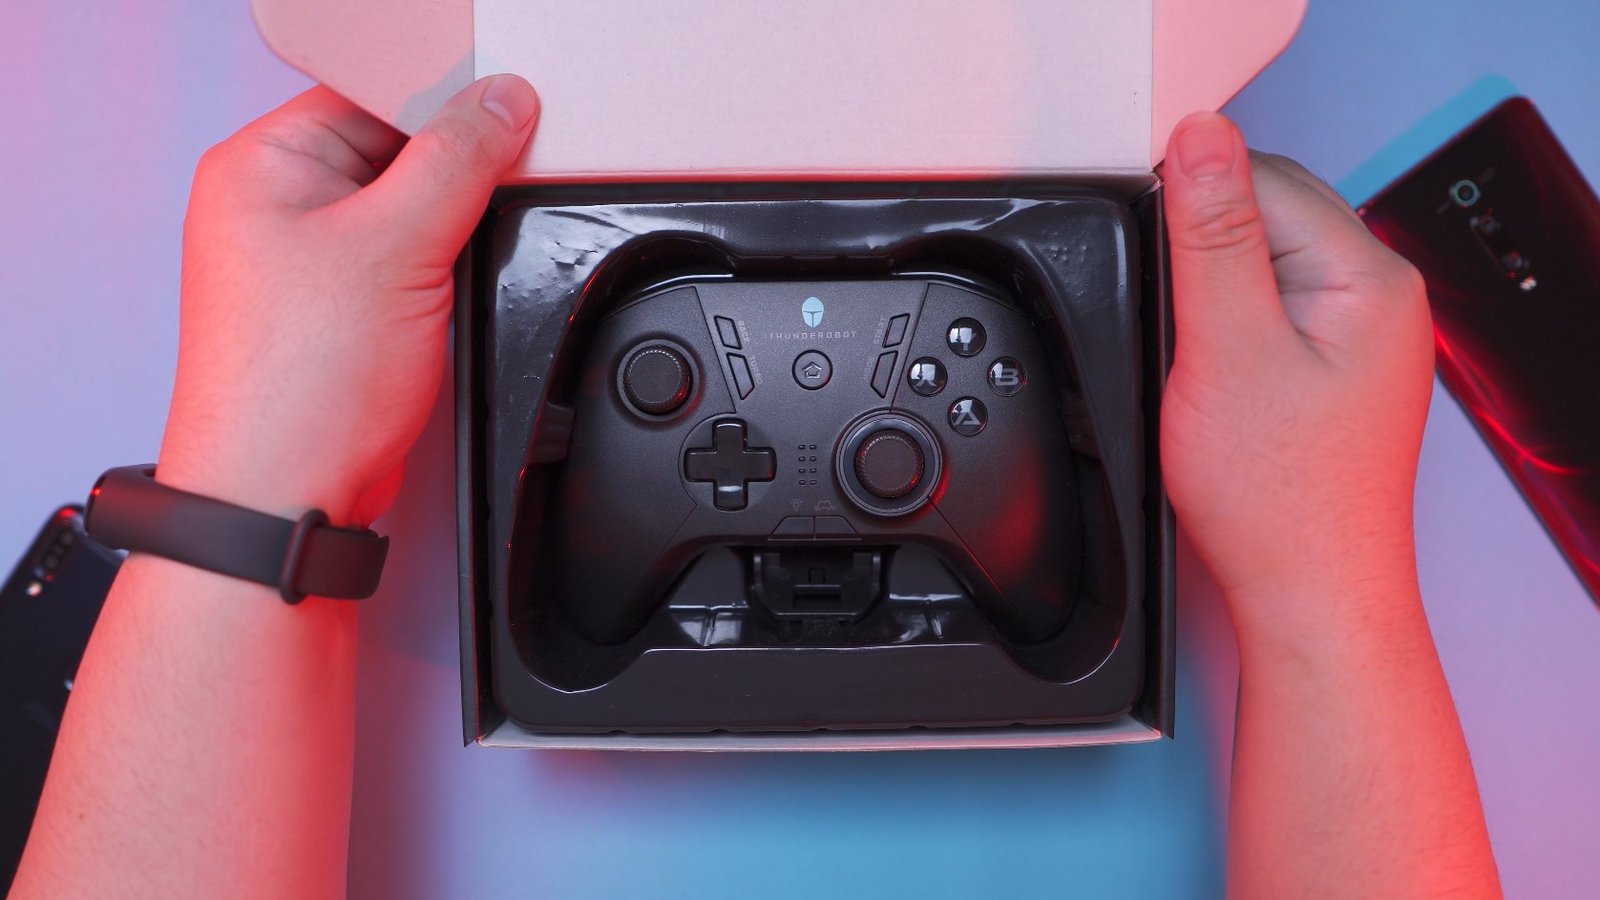
Alright, so first thing that’ll greet you is the Thunderobot G50 controller itself,
Then inside the box, we have a USB Type C cable for both data and charging.

We also have a small Q.C pass paperwork right here,
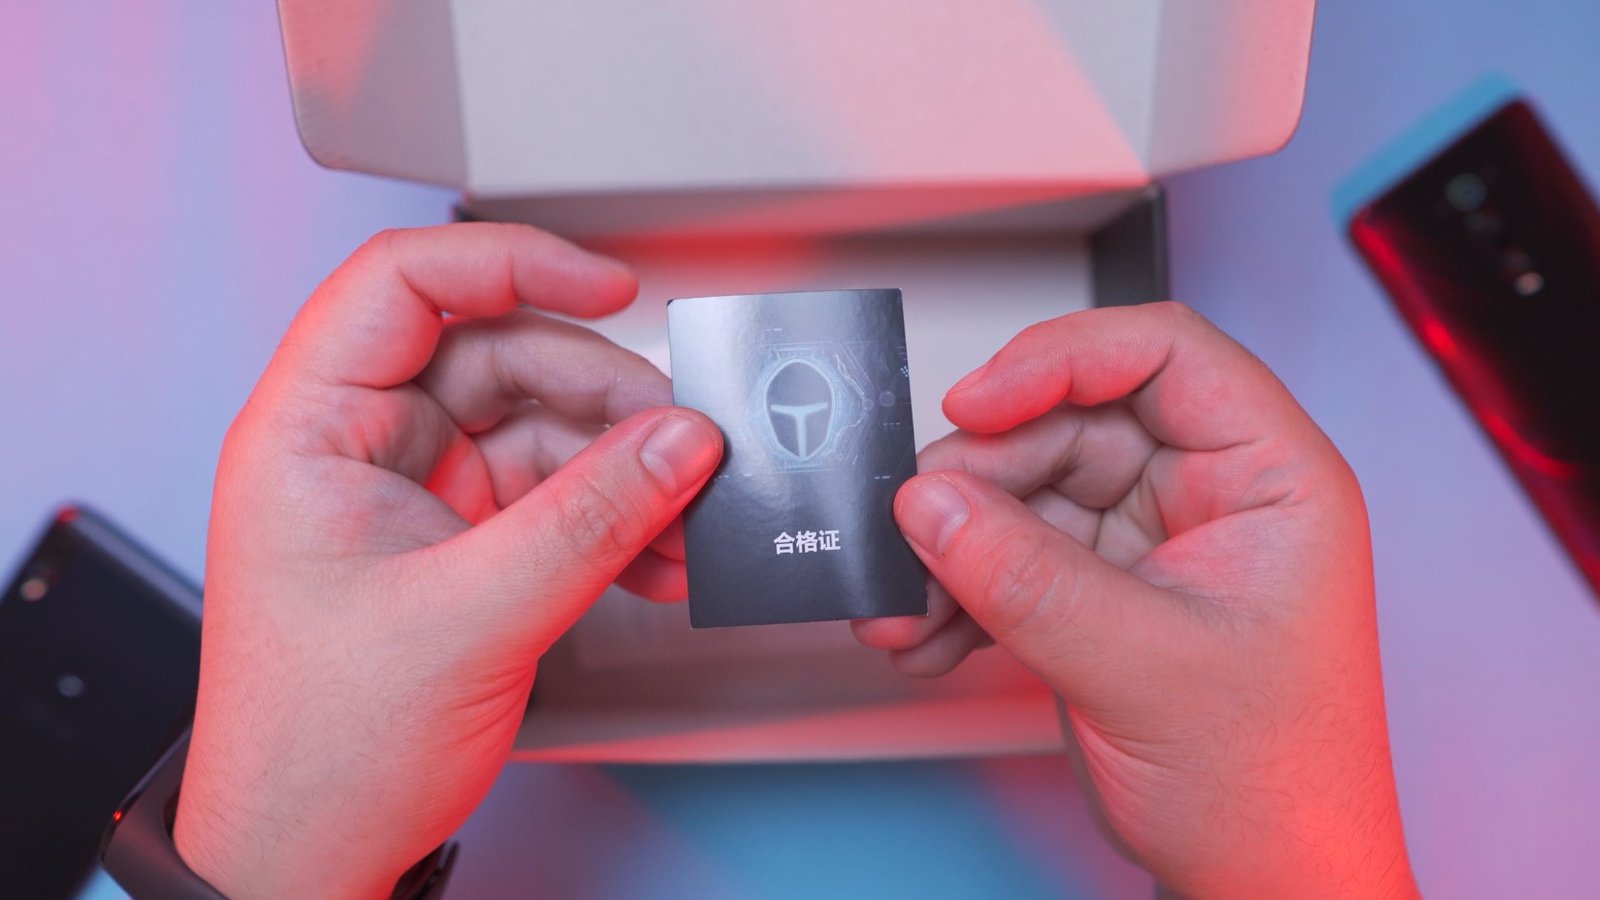
A possible warranty card, and the user manual which unfortunately is only written in Chinese, but don’t worry, here’s the online English version.

So again inside the plastic packaging, we have the controller, and then underneath it, we have a phone holder with a thunderobot logo at the center.

This is actually pretty cool guys, it has a snapping mechanism to keep it in an angle while you’re using it as well as snapping it close when not being used.

Finally, we have here the Thunderobot G50 controller itself.
FULL REVIEW
Design, Construction and Parts Overview
At first look and touch it looks really nice, the quality seems to be quite decent and it has this nice textured finish that I appreciate. And for a controller with a lot of features, it is also lightweight at only around 204g.

However, It does have some slight squeaking sounds when you press hard on it and I’ll show you why later but for the most part, build quality is pretty decent, all the buttons are tactile and satisfying to press and no mushy or sticky buttons at all which is very important.
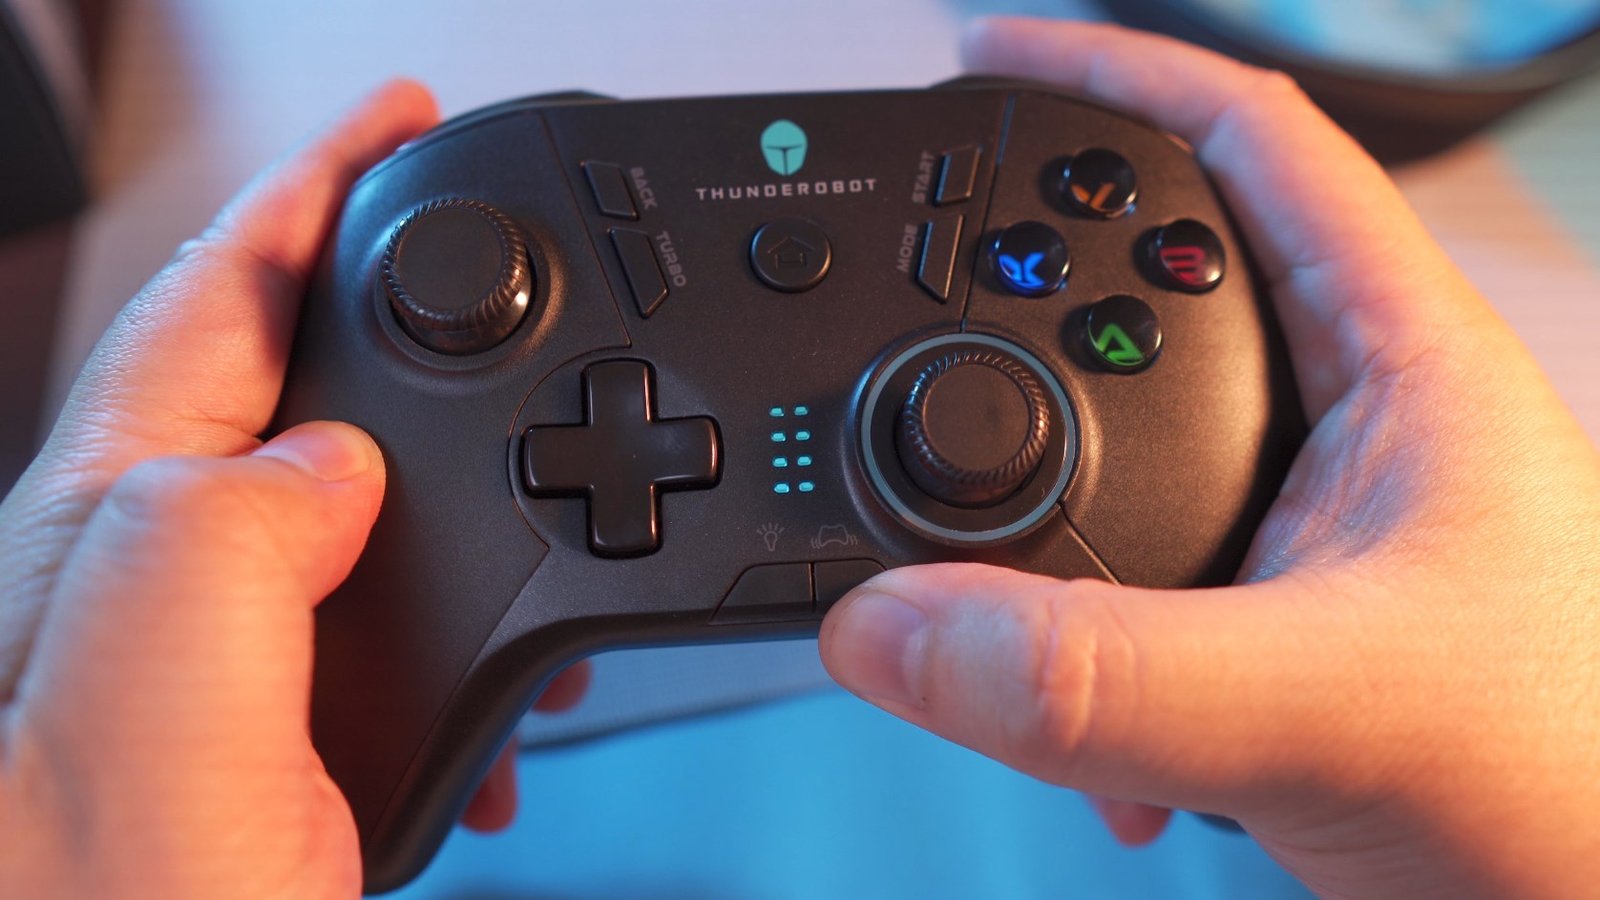
Layout
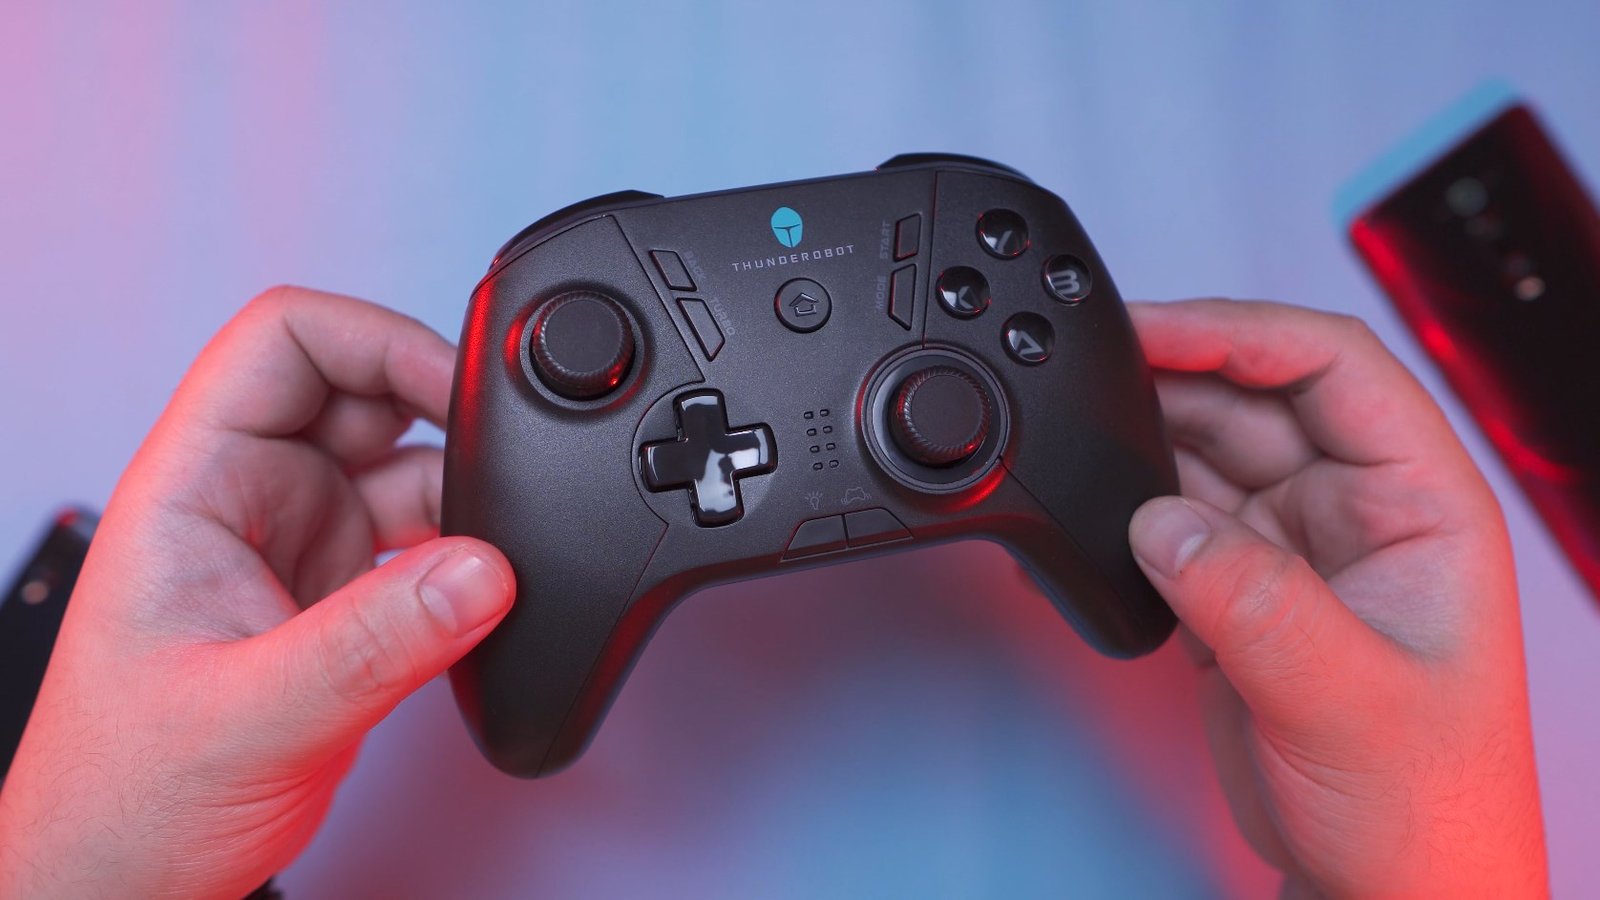
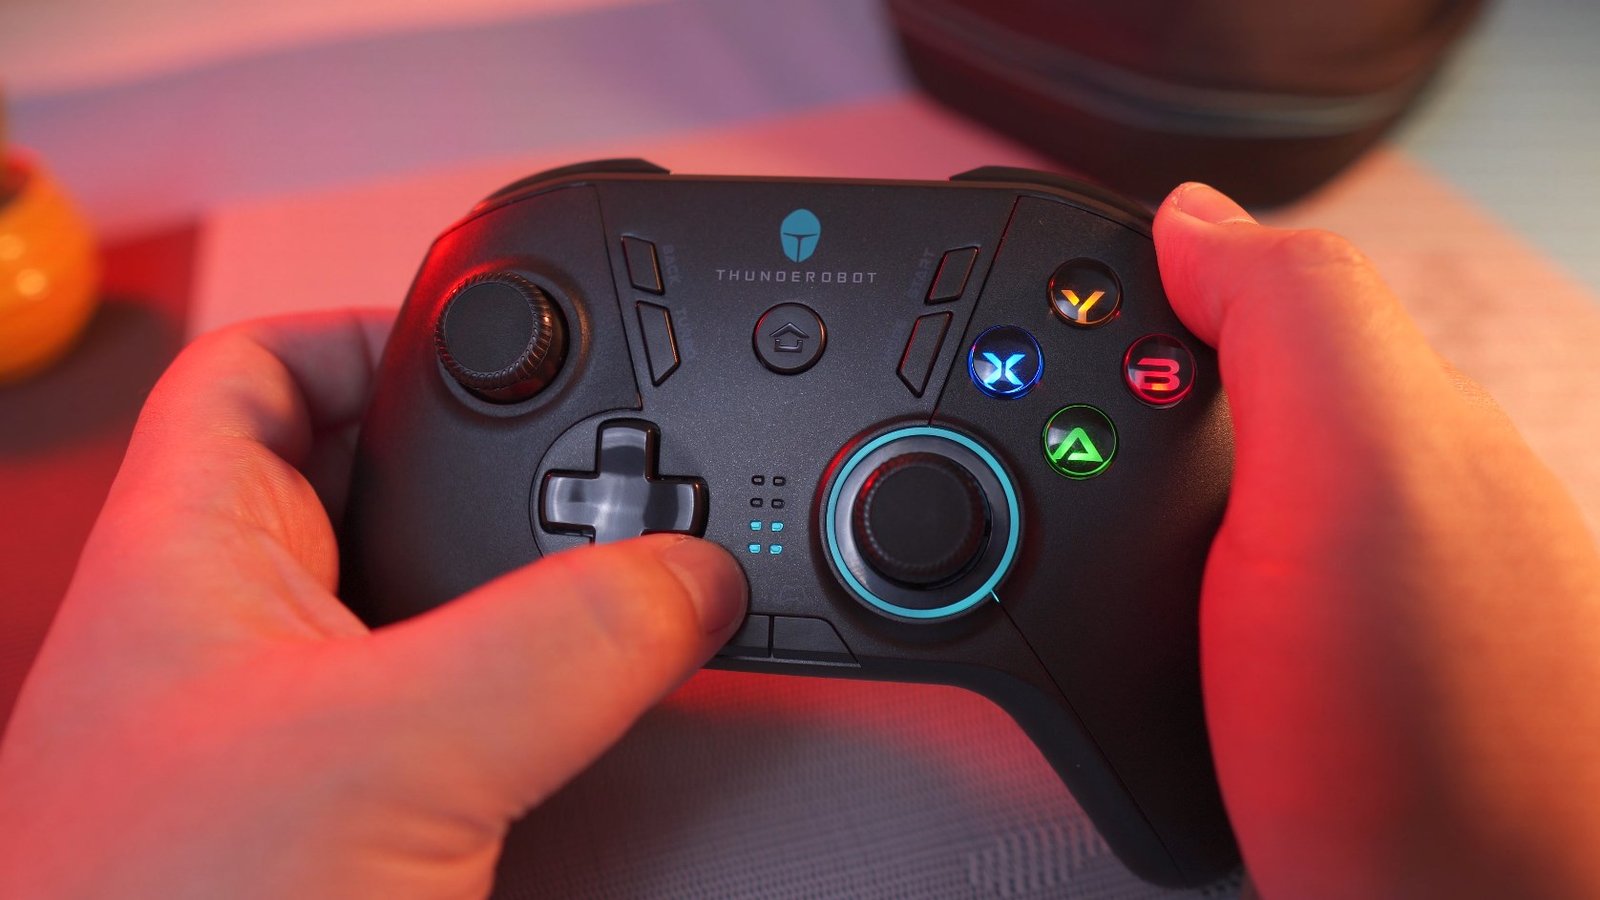
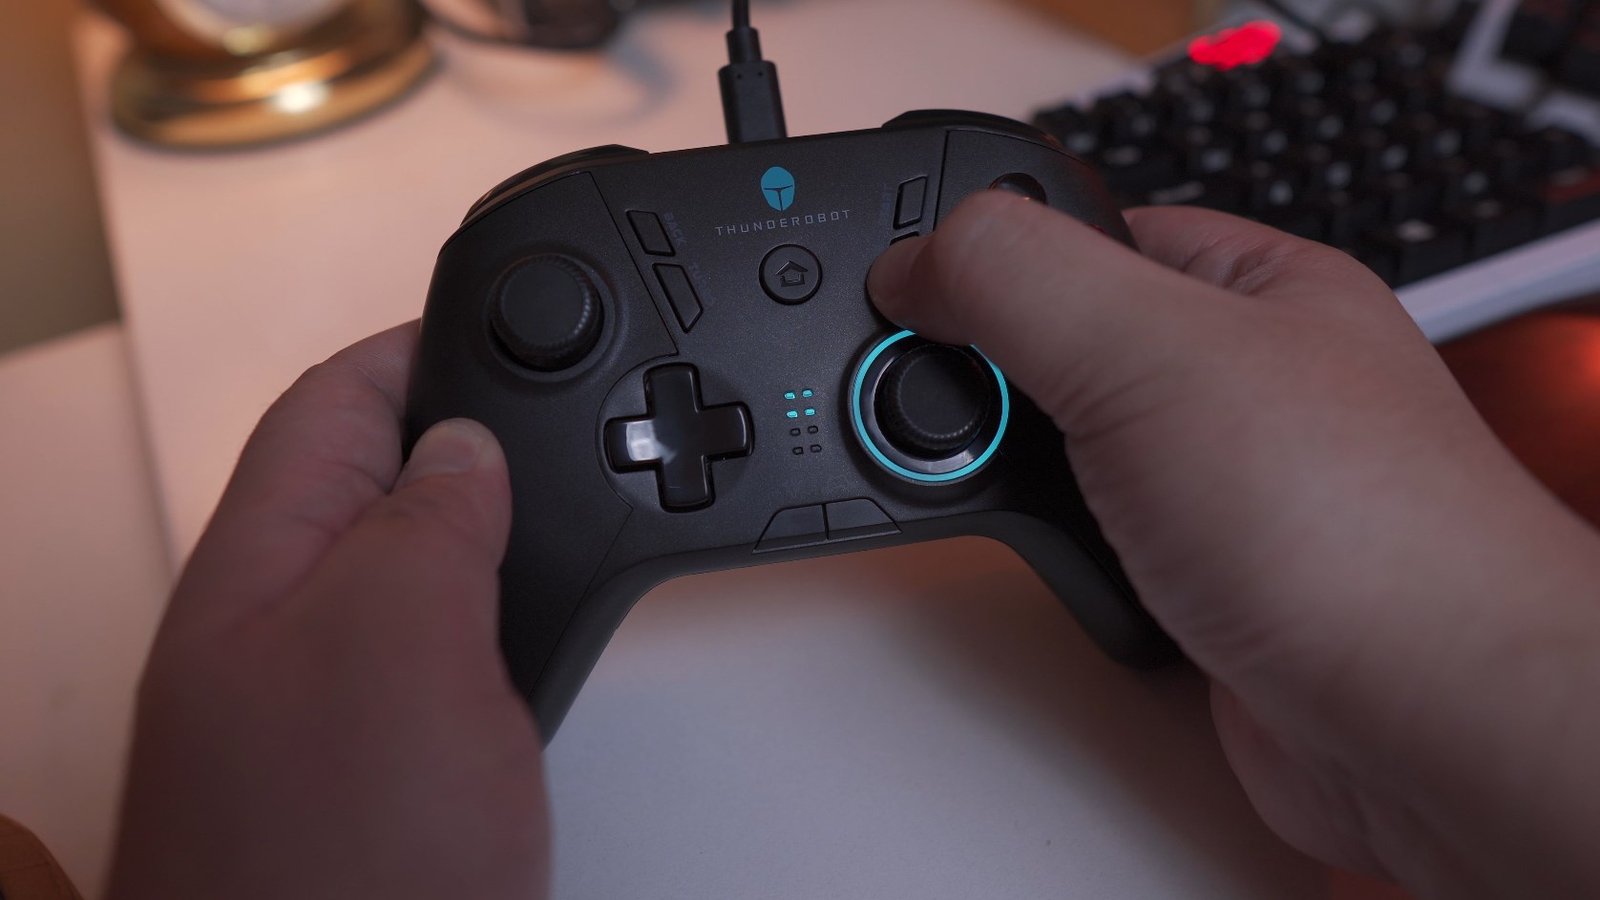
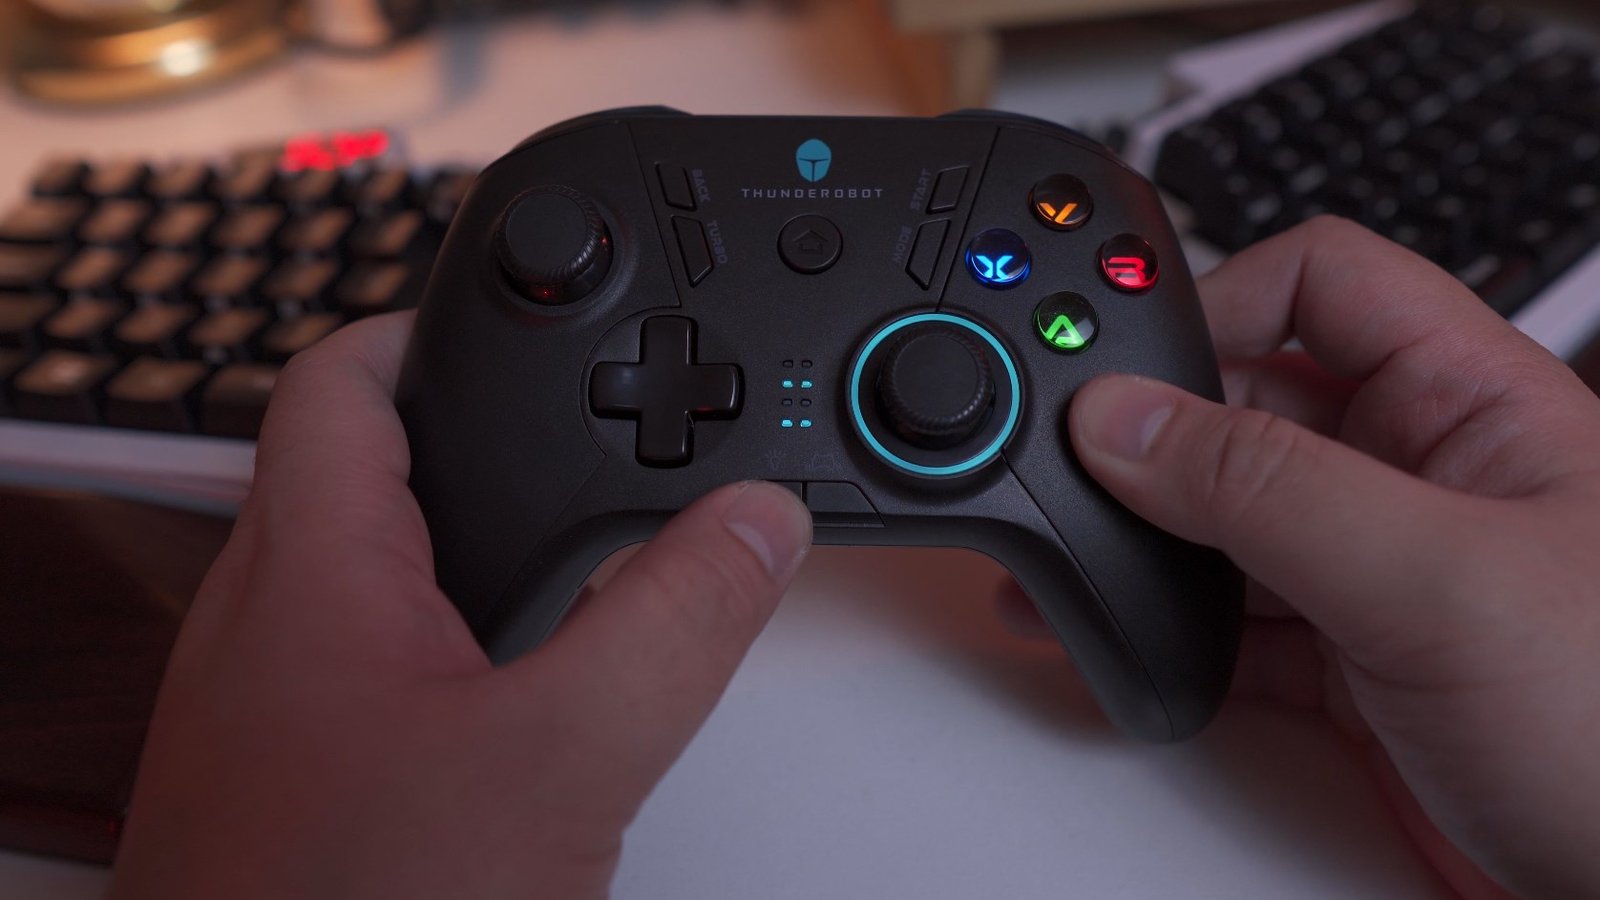
In terms of the layout, like I said earlier, it resembles the X-Box controller layout which I personally prefer. So at the center we have the home button that also doubles as a power button,
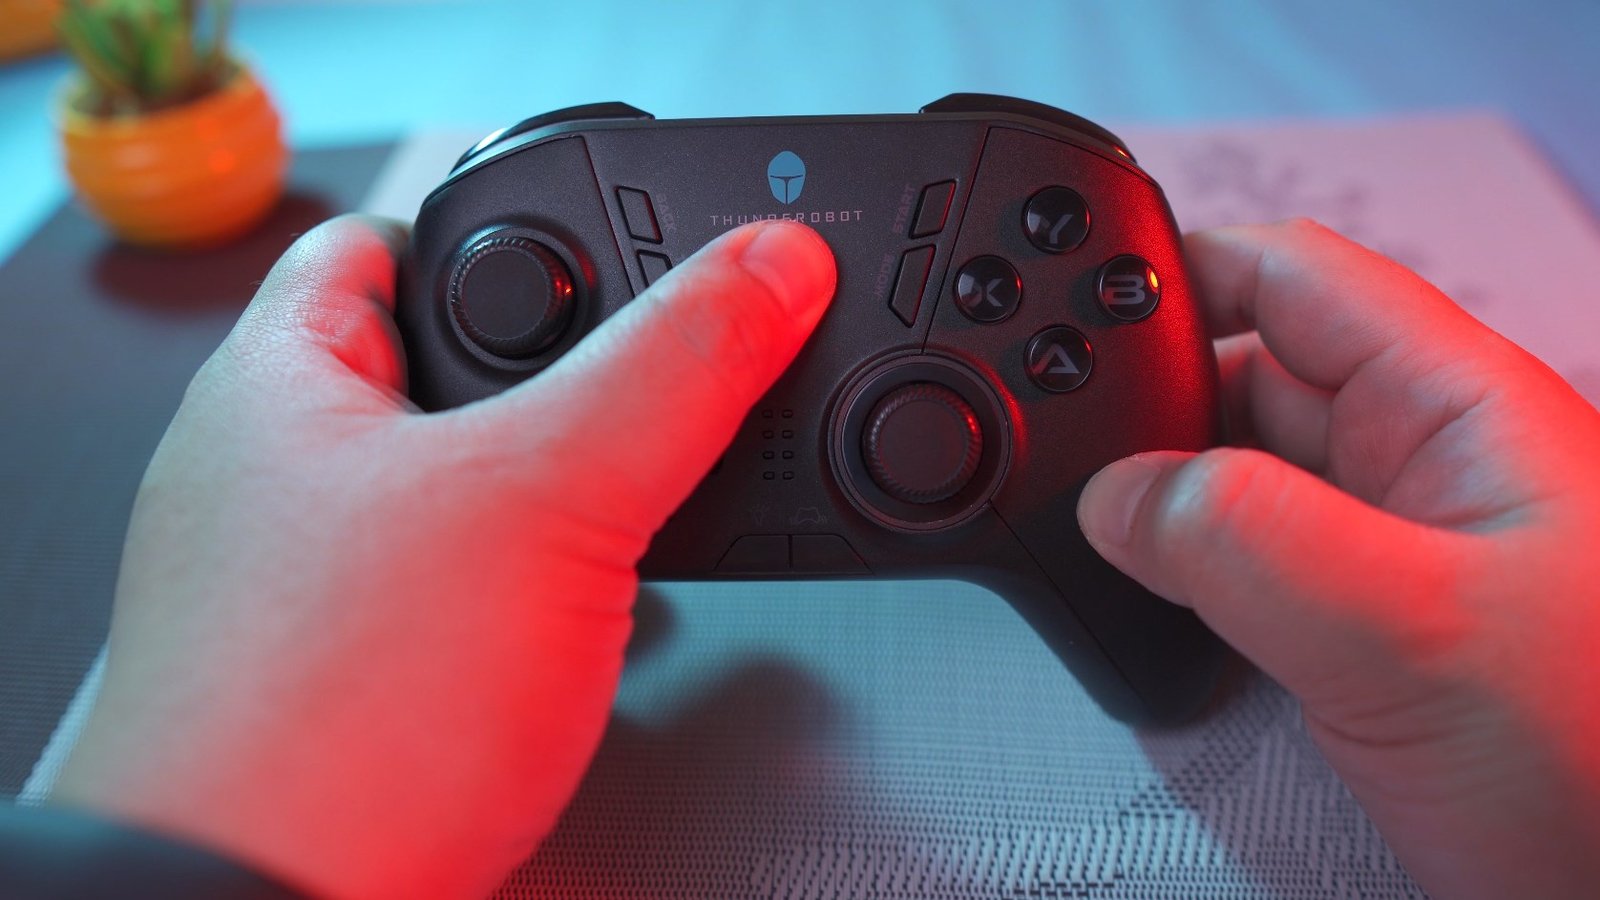
And then we have the left and right joysticks, the D-pad, ABXY face buttons, back, turbo mode, and the start button.

We also have a thunderobot logo above the home button.

And then at the bottom, we have the LED indicators for channels and vibration levels.

And then on the lower center, we have the brightness adjustment button as well as the vibration adjustment button right beside it.

What I like about this is that it has this nice textured pattern that should help with the grip,

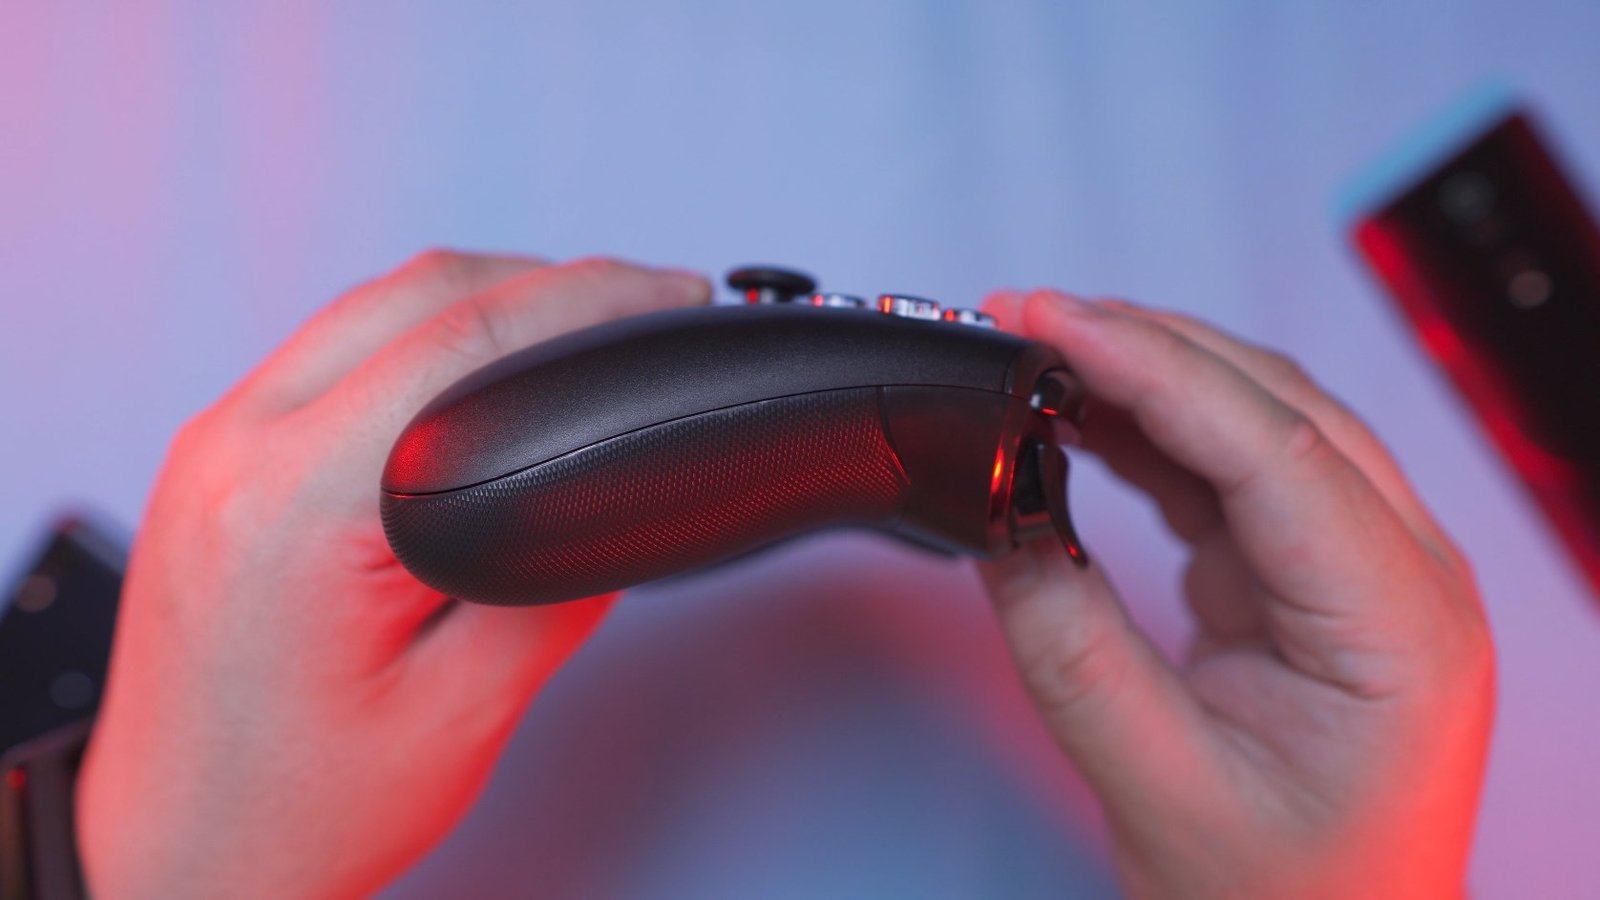
Now, here’s the profile of this controller so that you can have a better understanding of its shape.


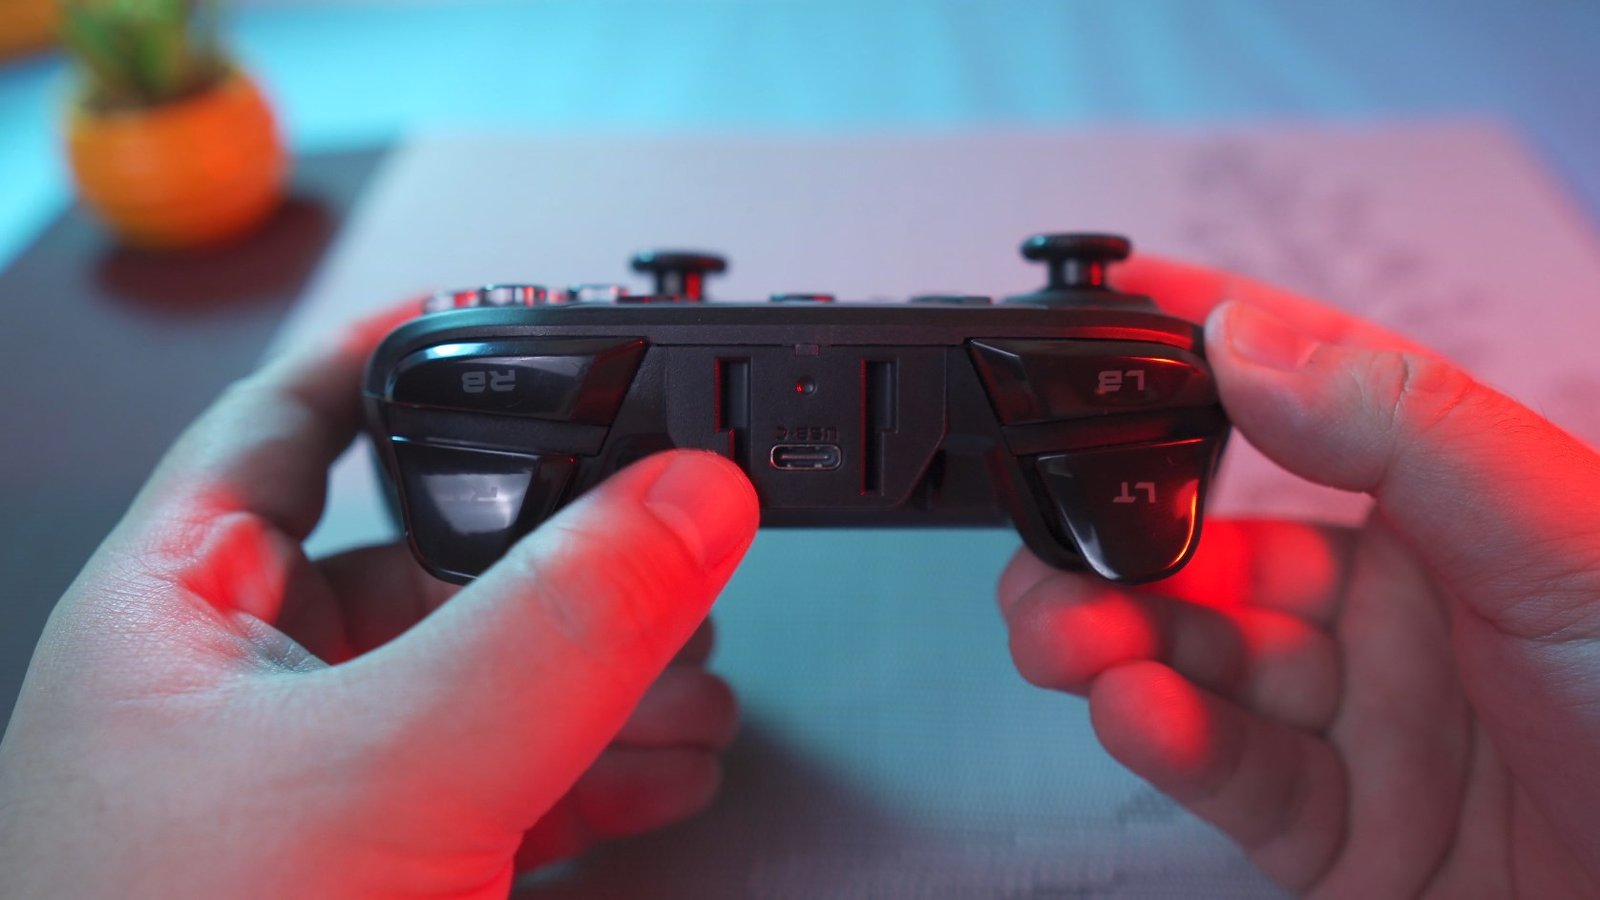
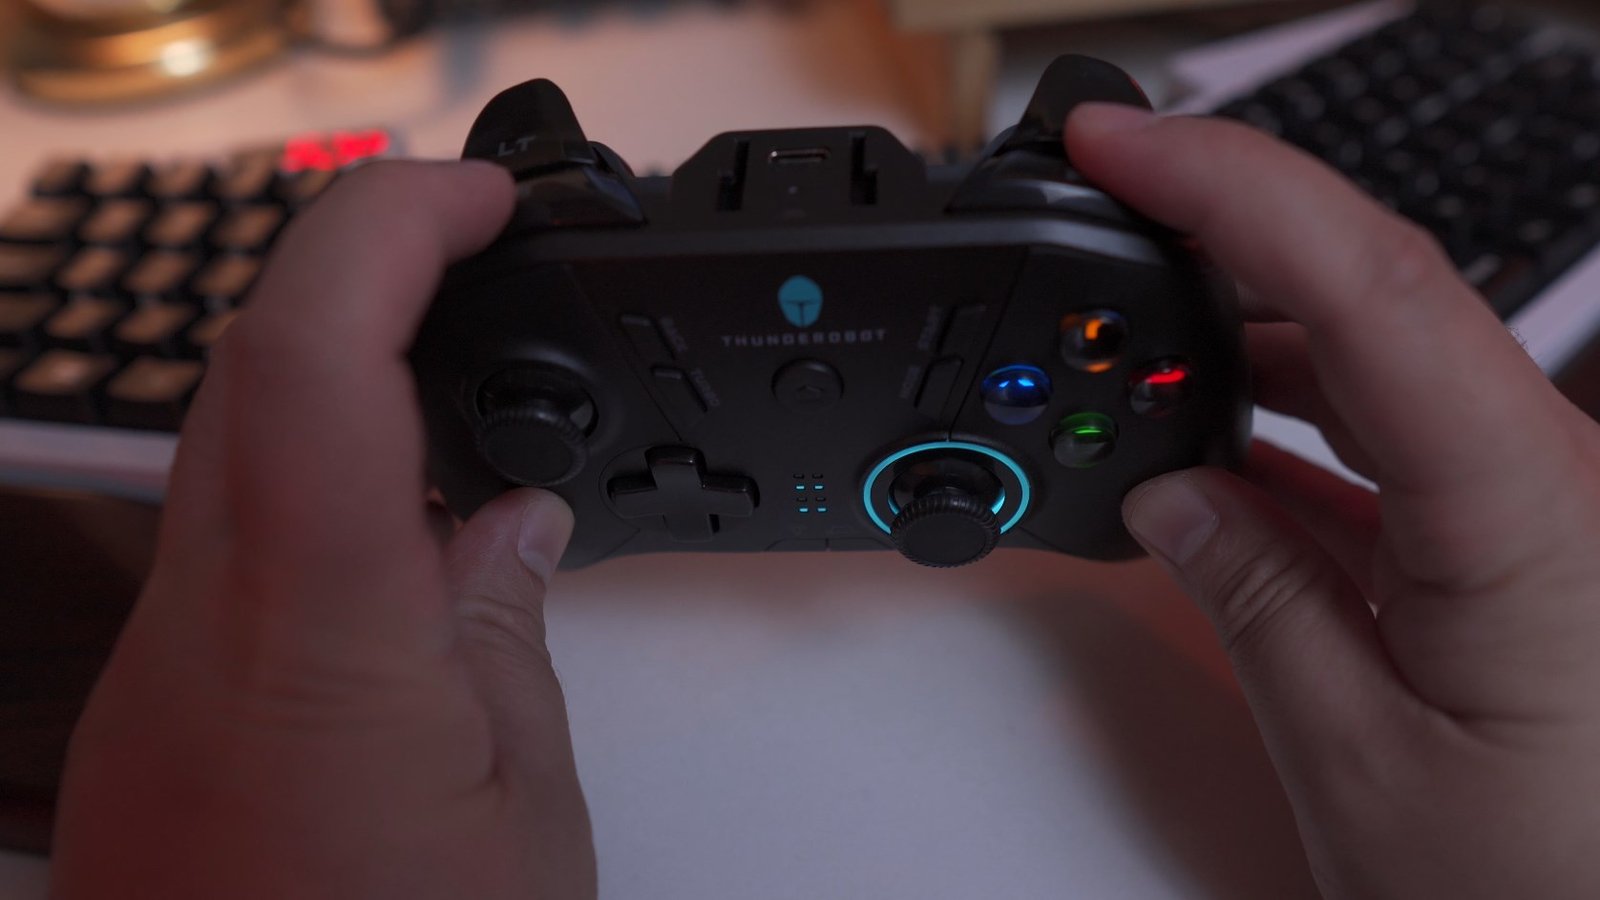
At the backside, we have the left and right shoulder buttons as well as the left and right triggers.

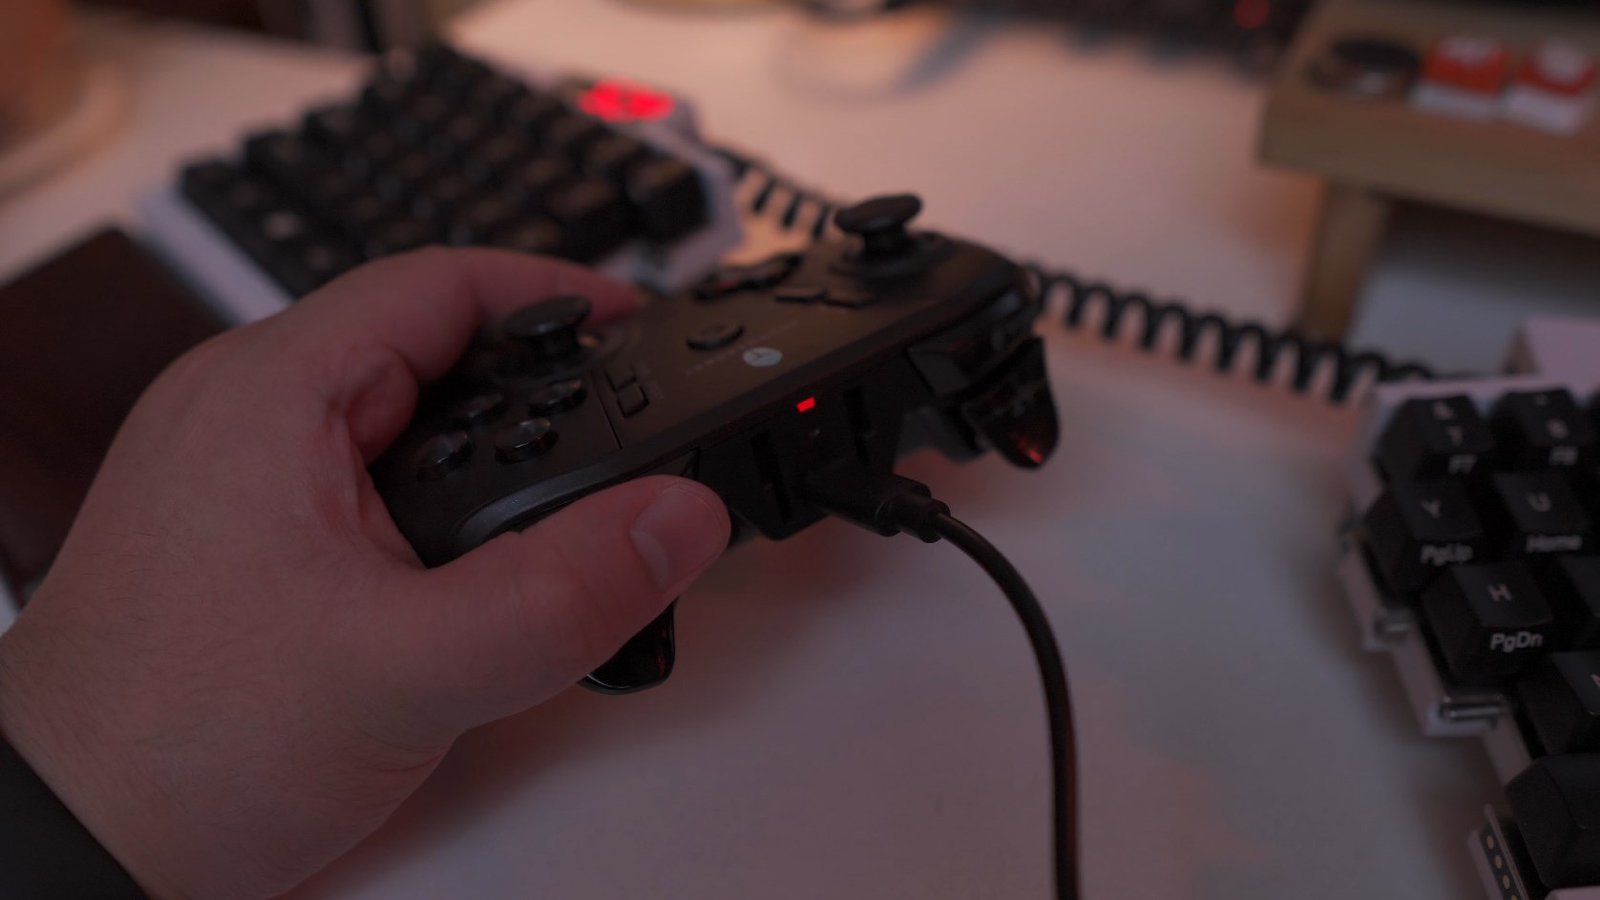
We also have here the USB Type C port and the Charging LED at the center as well as the slots for the included phone holder.
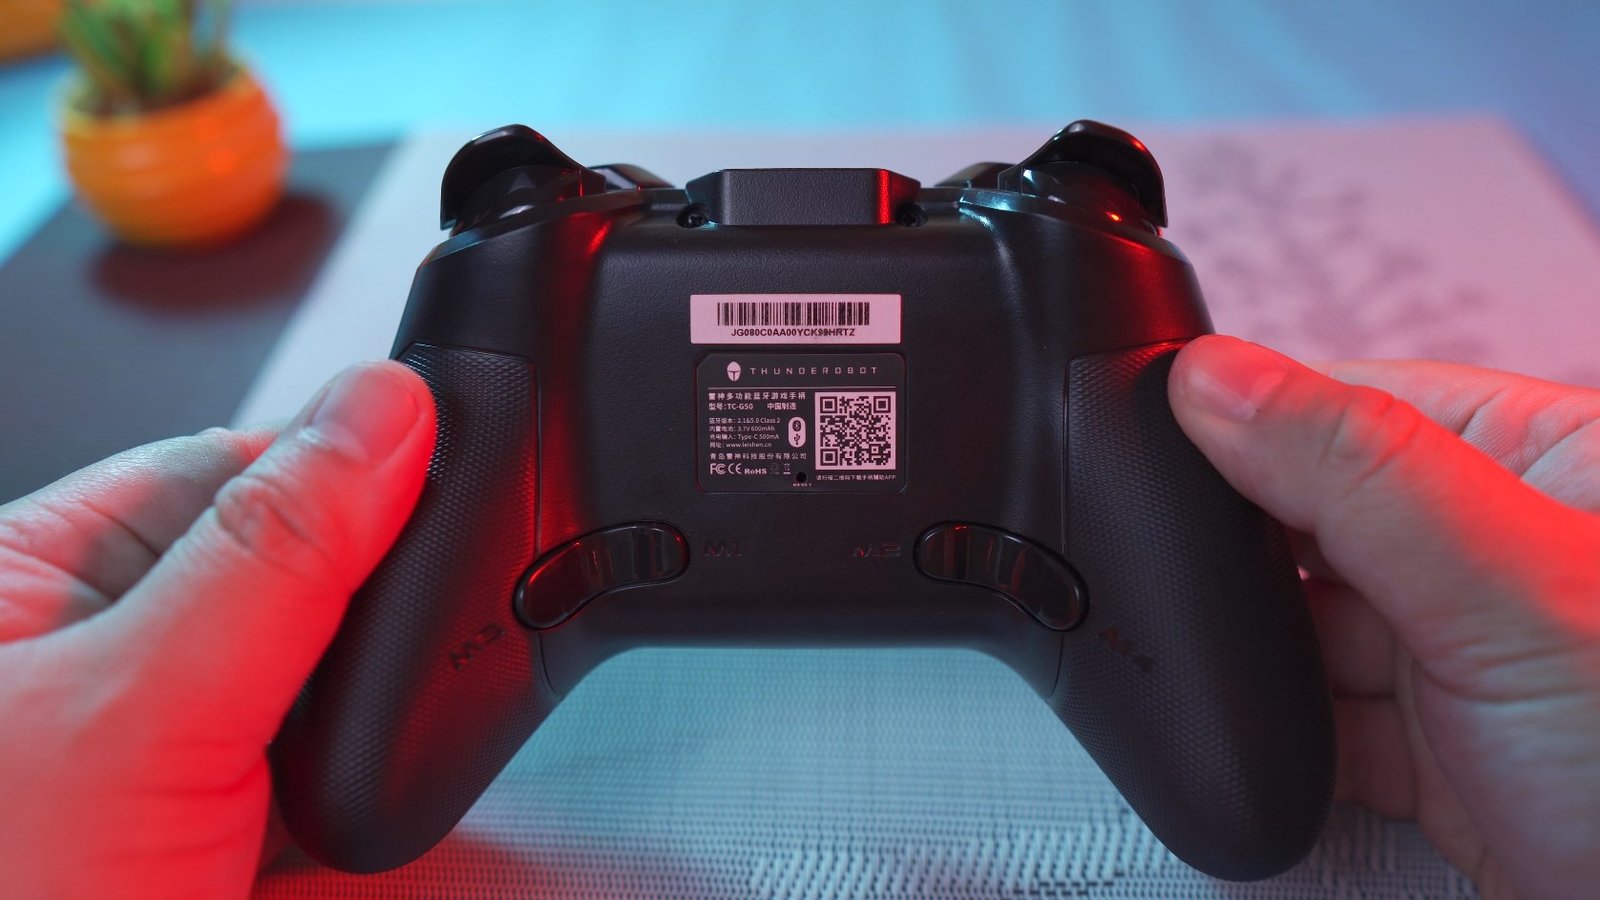
And lastly, at the back, we have the technical information, serial number as well as a reset pinhole. We also have 4 extra programmable buttons that we’re going to discuss later.
In terms of comfort, I don’t have any problems with it, all the buttons are easily reachable and the shape matches perfectly with my hands, no issues whatsoever.
Overall, I really like the design, layout, and buttons of this game controller but stick around to see how it will actually perform across multiple platforms.
Accessories
Moving on, let’s check out the accessory that are included and can be picked up for this controller.
First, we have the phone holder, And attaching it to the controller itself is pretty straightforward, you just have to slide it in and you’re good to go. Like I said earlier it has this satisfying snapping mechanism to make it stay in position.
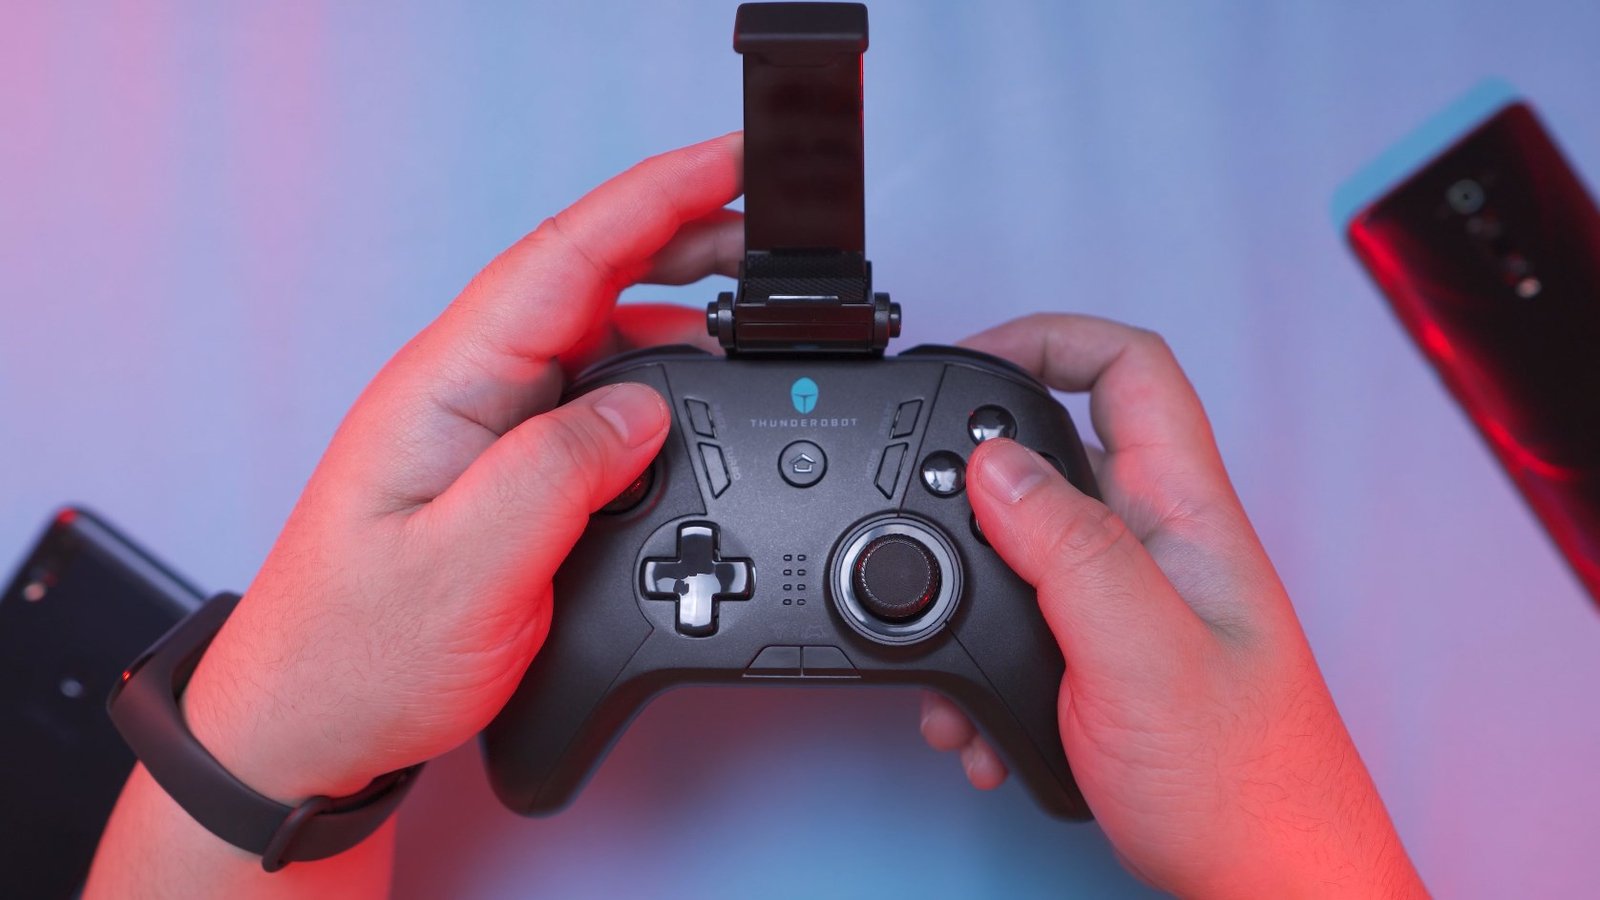
This phone holder can retract and can hold mobile phones in the 58-100mm width range. And as you can see, my Xiaomi Mi 9T Pro with Xundee beetle case fits ok and definitely usable but I feel like the width of the holder itself could have been a little bit wider so that you’ll have more confidence on swinging the controller without worrying about your phone falling down. Without the phone case, however, it should be fine.

Another accessory that you can get for this controller is this nice pouch right here (sold separately),
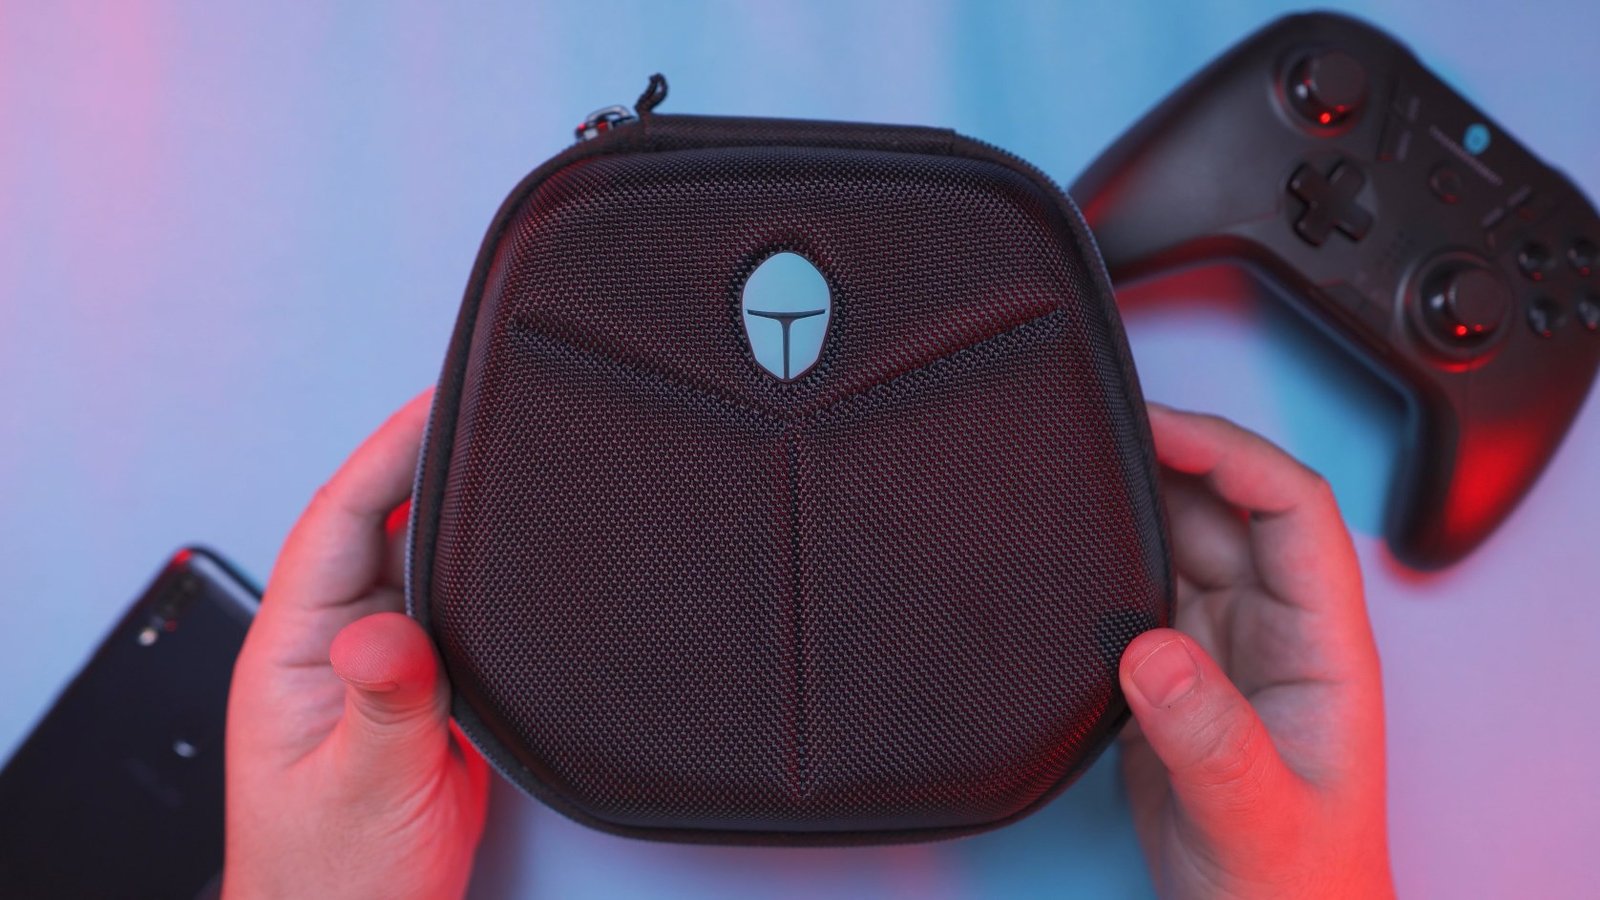
The quality is decent, semi-hard case with precise contours inside to hold the controller and the phone holder properly. This will prevent the controller from damage and accidentally powering it on while in transit.

It also has this pouch for cables and whatnot. The stitching is not perfect but it should serve its purpose well.

Alright, guys, let’s dig in deeper with the features of the Thunderobot G50 and again, like we always do, we should leave no information behind.
Multiplatform Compatability
Let’s start with the multiplatform compatibility of this game controller.
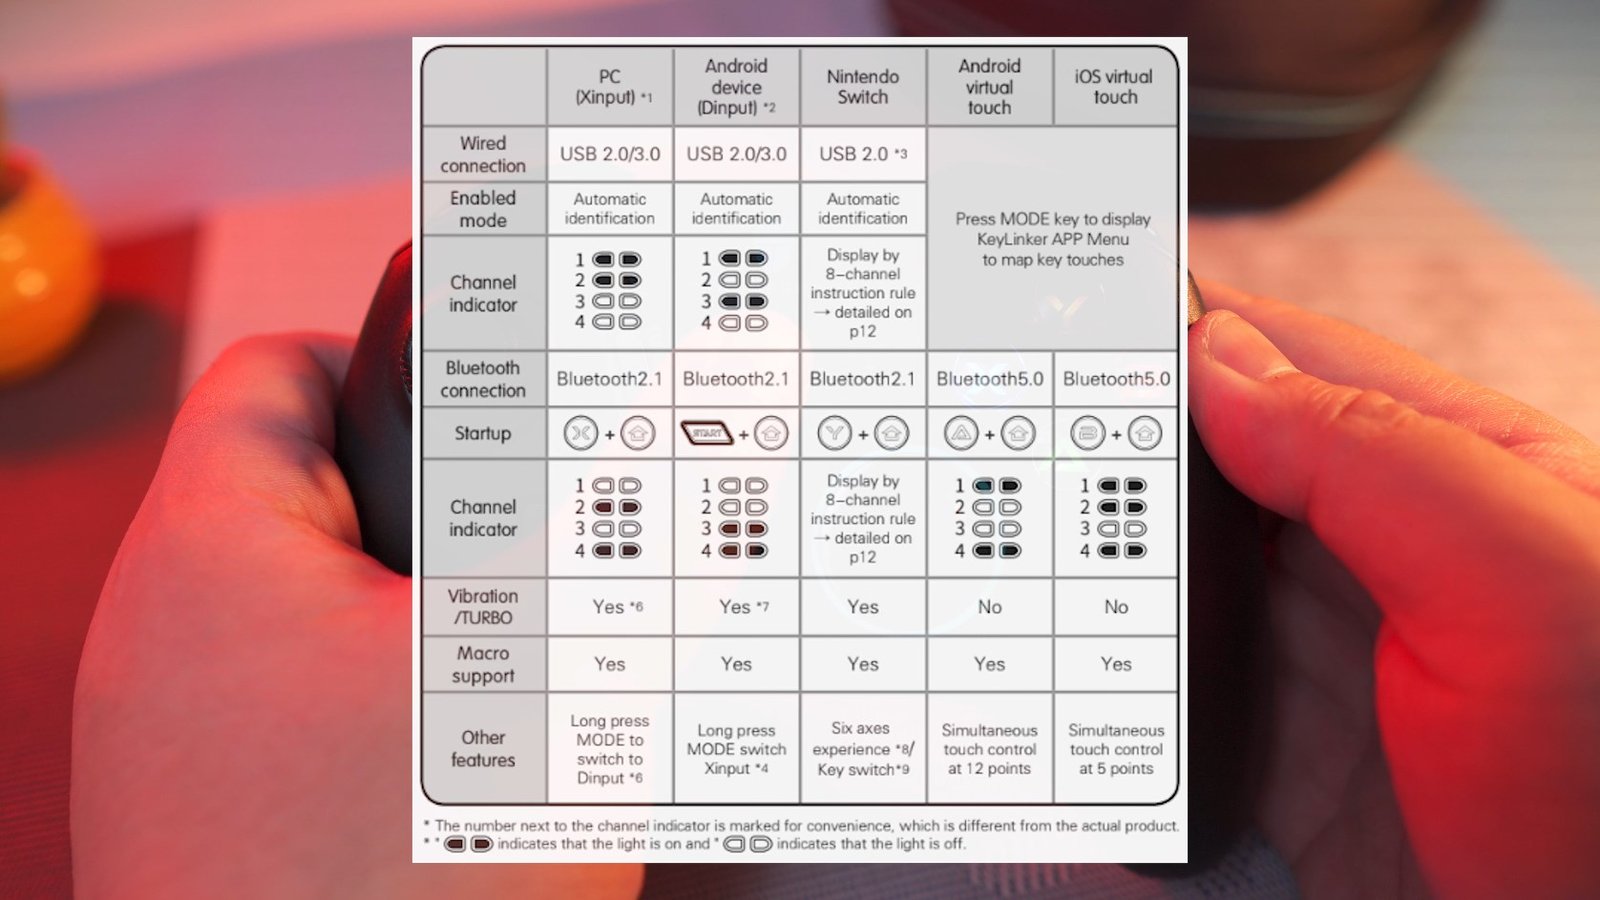
Like I said earlier, this controller is compatible with Windows, Mac OS, Nintendo switch, Android and iOS devices.
So for PC which is Xinput mode, you just have to press X + Home for a few seconds,

And the channel indicator should light up.

Unfortunately, to change the mode you have to turn off the controller and turn it on again, Next for Android native input which is Dinput, press Start + Home,

The channel indicator should change as you can see here,
Next, same process, for Nintendo Switch, press Y + Home,

And then for Android virtual touch, I’ll explain to you later what that is, you have to press A+home button.

And lastly, for iOS devices, press B+home for a few seconds.

Now once you’ve already paired your device, you can actually just press home next time and it will automatically connect to your last connected device.
Bluetooth Pairing
Speaking of paired device, to pair this controller to your mobile phone or any other device you just have to press home + the corresponding button, and then it will turn on and will go automatically to pairing mode indicated by the flashing channel indicator, open Bluetooth settings on your other device and you should see either Thunderobot G50 or GamepadX, pair it and you’re good to go.

Same goes with pairing the controller to your PC but just different key combination which is X + home which is the native Xinput mode or the input mode for X-Box controller, pair it and you’re good to go,
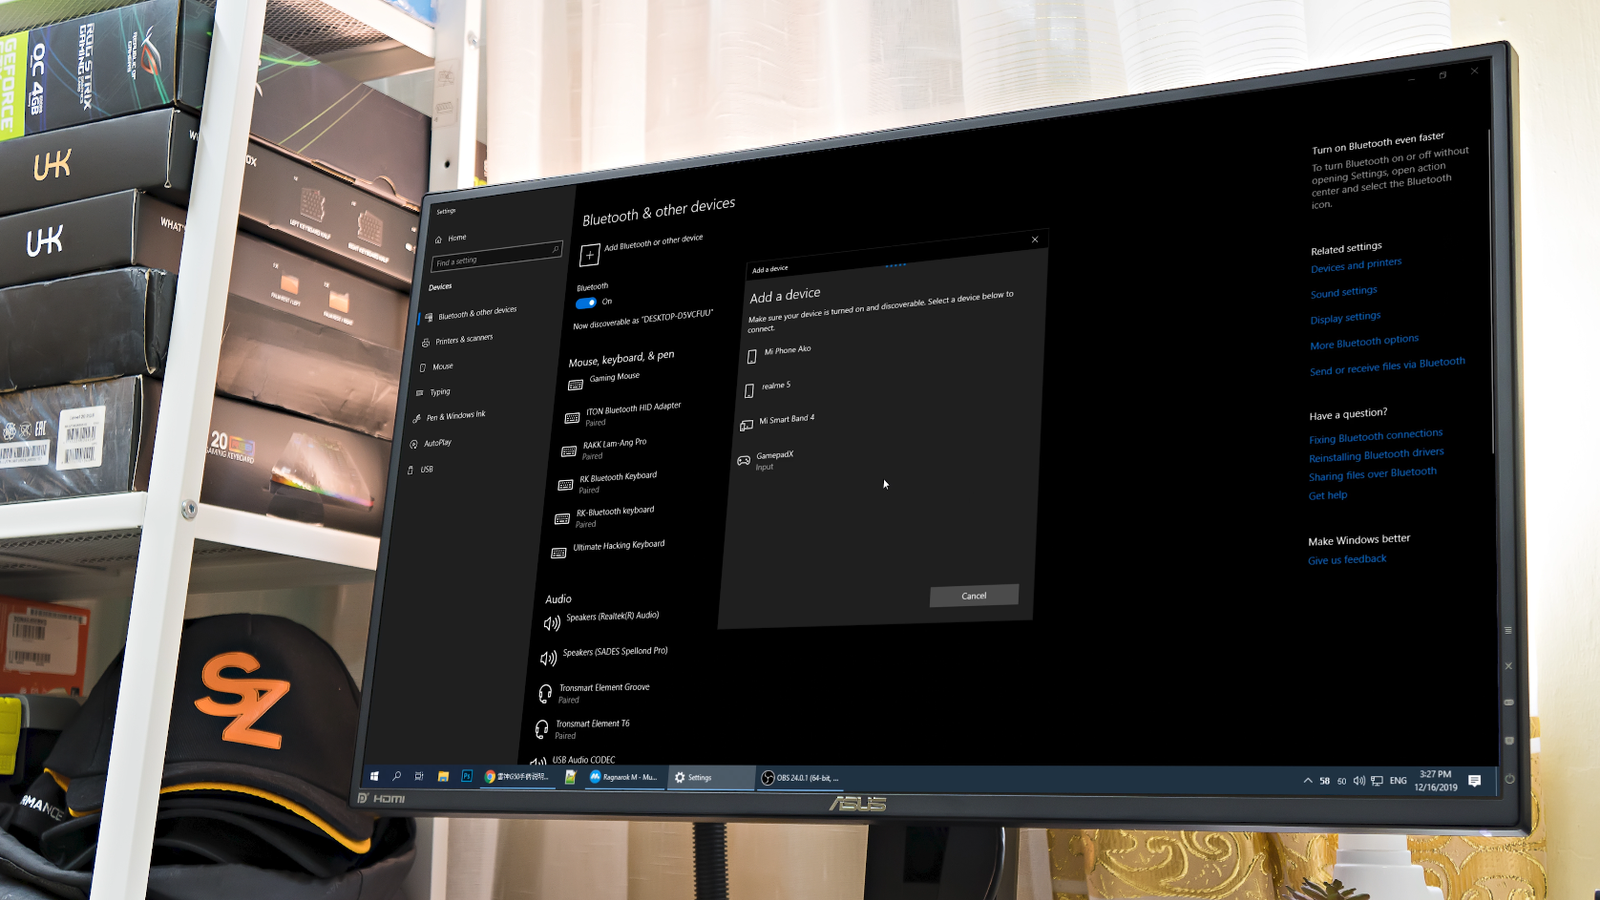
Now this will be recognized by Windows 10 as an X-Box controller and should work natively on all games that support it. You can also opt to change mode to Android’s Dinput mode for android simulators. Once the pairing process is done, the LED channel indicator will stop flashing.
Wired Mode
Now, what’s good about this is that you can also use this controller via wired mode, and once you connect the cable it should automatically detect the correct input mode, but you can also change it manually by pressing the mode button for 2 seconds if necessary depending on your application.
As you can already tell, at this point, it seems that the Thunderobot G50 is the only gamepad you’ll ever need across multiple platforms right? It actually doesn’t stop there guys so let’s continue.
Features
Let’s discuss about all the other awesome features of this controller.
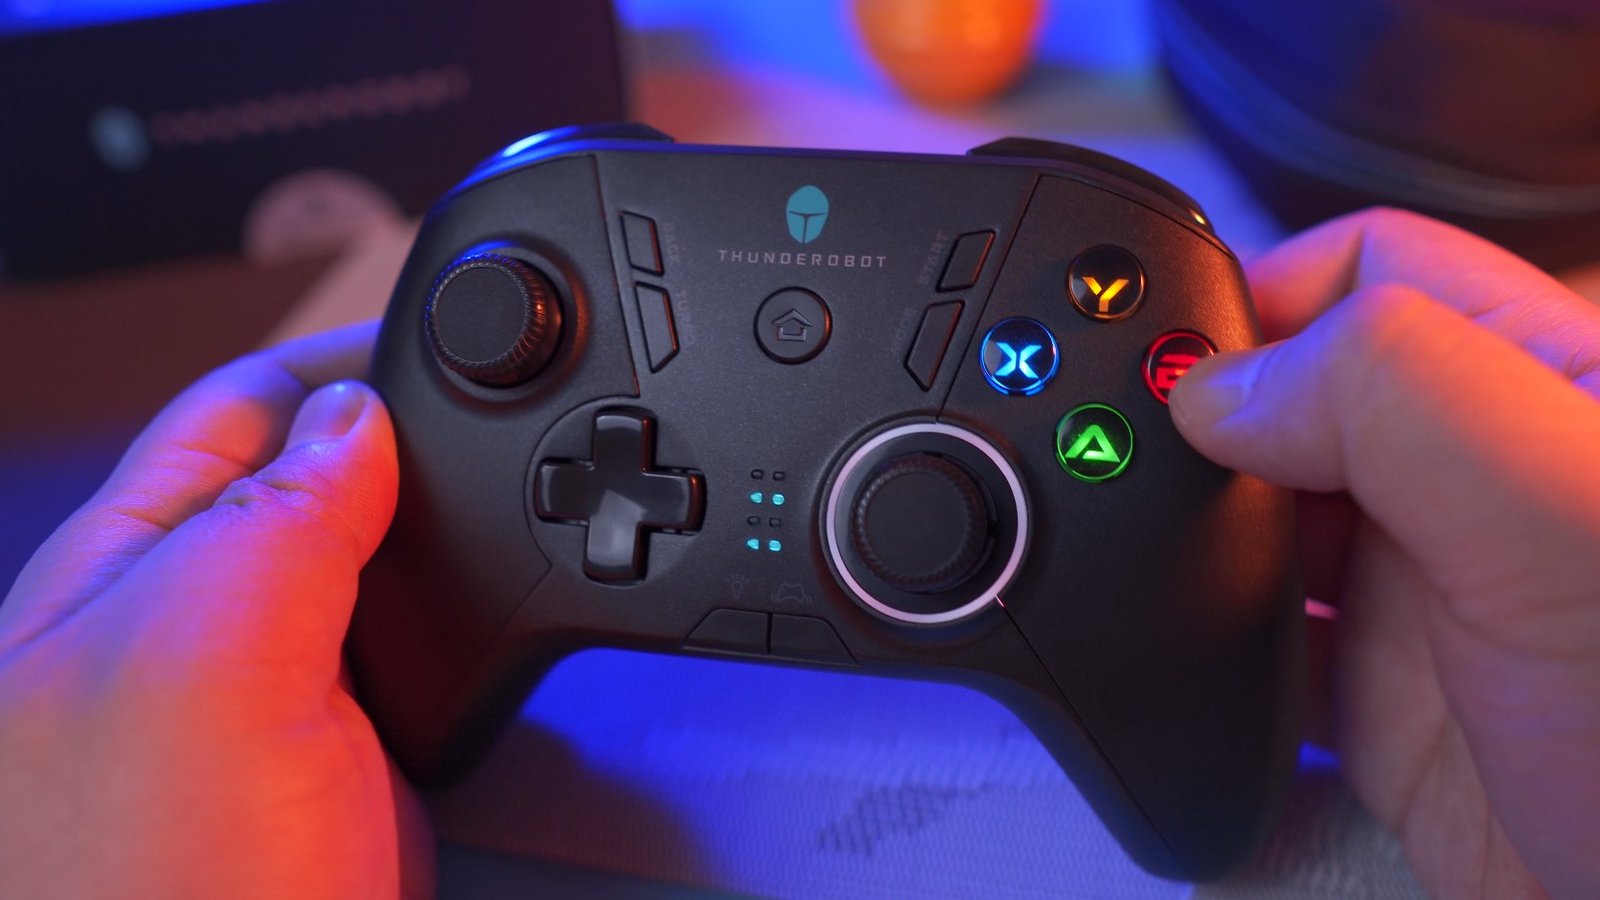
LED Illumination
First, let’s discuss the different backlight mode of this controller, as you can see there’s illumination on the face buttons as well as a ring light on the right joystick and the channel indicator.

We also have a small led indicator for charging at the backside.

You can actually adjust the brightness of the face buttons as well as the ring light using this button up to 4 levels.
You can also press the LB + RB for 5 seconds to turn off the lighting on the face buttons and then press the same combination to turn them on again.
Essentially you can also opt to only have illumination on the ring light and you can also adjust its brightness.
And now, here’s how the illumination looks like in dim environment. Honestly, it’s not a big deal because you really don’t have to look into your controller when gaming right? But still, a nice feature to have illumination anytime it is available for an added oomph to the aesthetics.

Vibration Feature
Another feature is the vibration, and we have a dedicated adjustment button for that at the lower center of the controller.
So when you press it for the first time, it will show you the current level of vibration and if you press it again, you can adjust the intensity of the vibration depending on your preference. The vibration power of this controller is actually pretty good, it’s tight and doesn’t feel cheap at all.
Turbo Mode
Next feature, we also have the turbo mode, and to configure it just press the turbo button and the key that you want to turn into a turbo button.

And every time you press a turbo button the ring light will also flash red.
You can also set other buttons to turbo mode at the same time and to clear them, just press the same button combination again.
4 Extra Programmable Buttons
In addition, we also have 4 extra buttons at the back that you can program to map key combinations or macros for easy toggling.
To record key combinations, you just have to press any of those 4 extra buttons and press start, the ring light will now turn to pink, after that, you can press any key combinations in sequence that you want across the entire controller to map to the extra key at the back. Once you’re done recording, press the same extra key to save it. To clear that, just press the extra key + start and press that extra key again.

Multimedia Controller Feature
Aside from those features, you can also use this controller as a multimedia mouse in D-input mode.

Essentially you can use it on your PC as a mouse, on an android smart TV, TV boxes, tablets and mobile devices as a multimedia remote control which I think is pretty awesome.
It works in Dinput mode and you just have to press the mode button to change it to mouse mode anytime.
Virtual Touch Control with Key Linker App
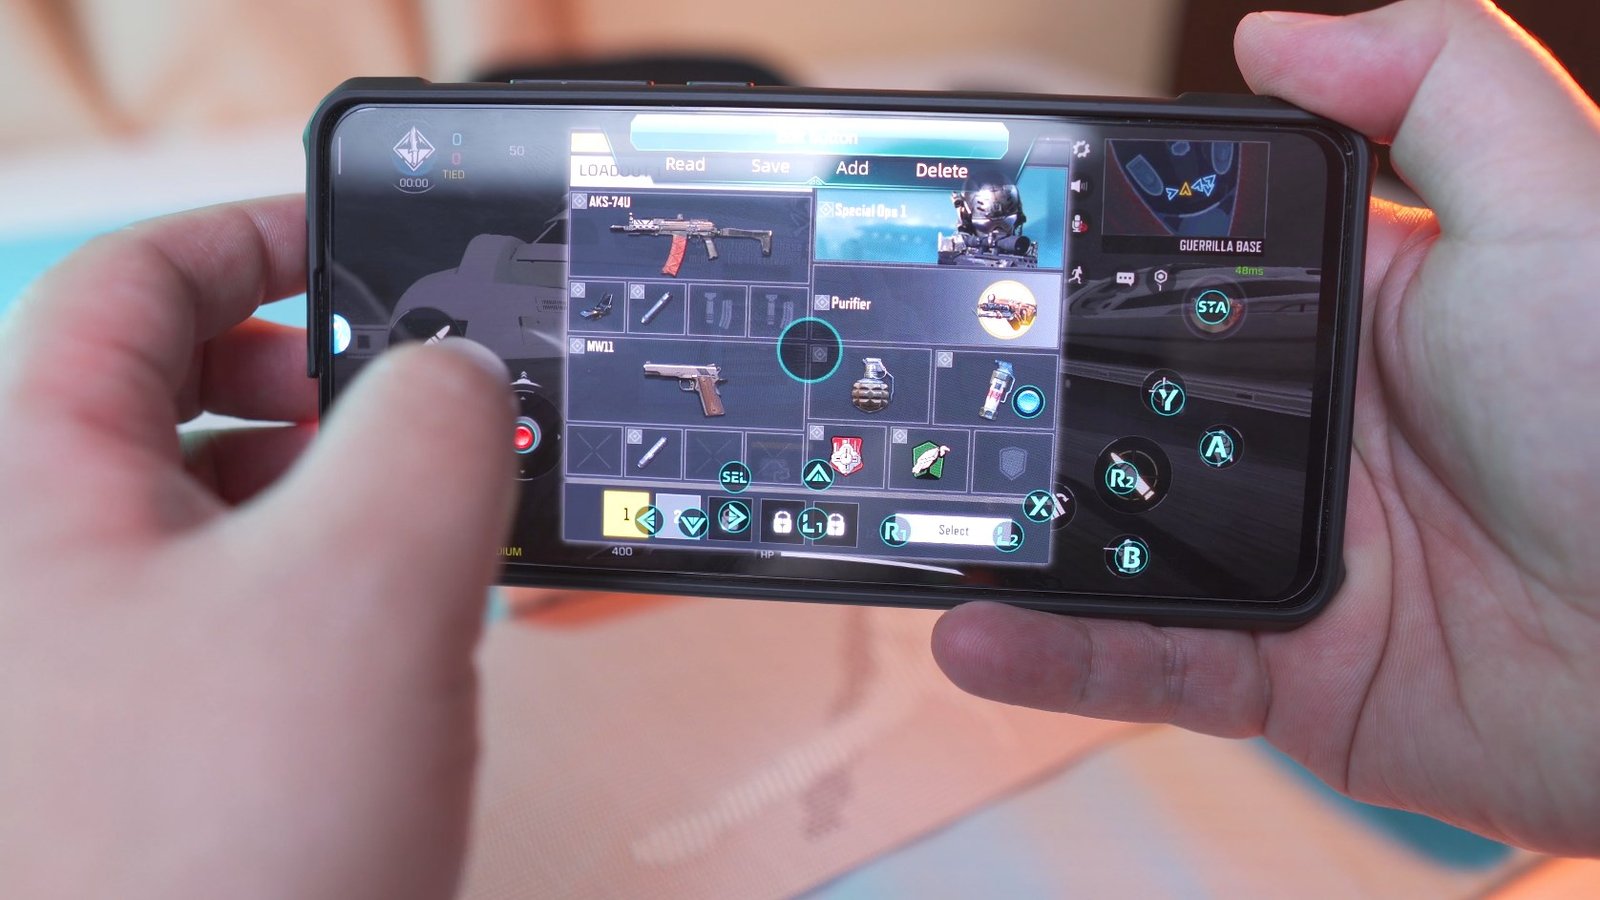
Now, let’s discuss about the virtual touch control and the key linker app that makes this controller usable on almost all mobile games that you can think of, even those who don’t support game controller natively.
First, you have to download the app called Keylinker,

Open it up and you should see this interface,
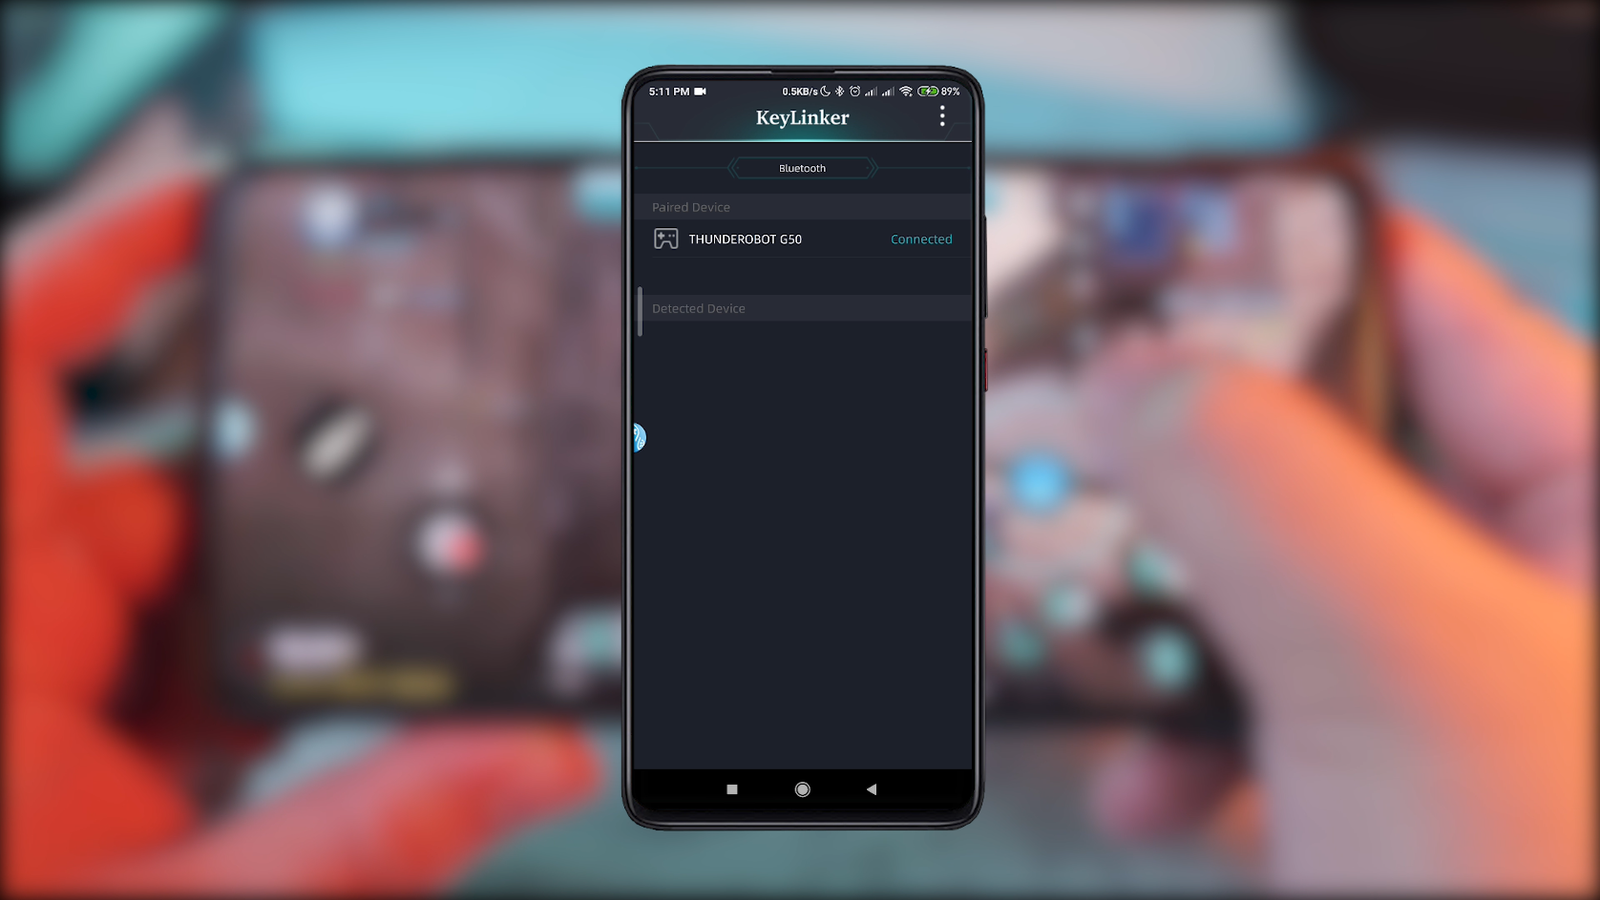
Basically, this app will allow you to map all the buttons of the controller including the joysticks anywhere around the screen so you can use the controller even if the game doesn’t support game controllers natively.
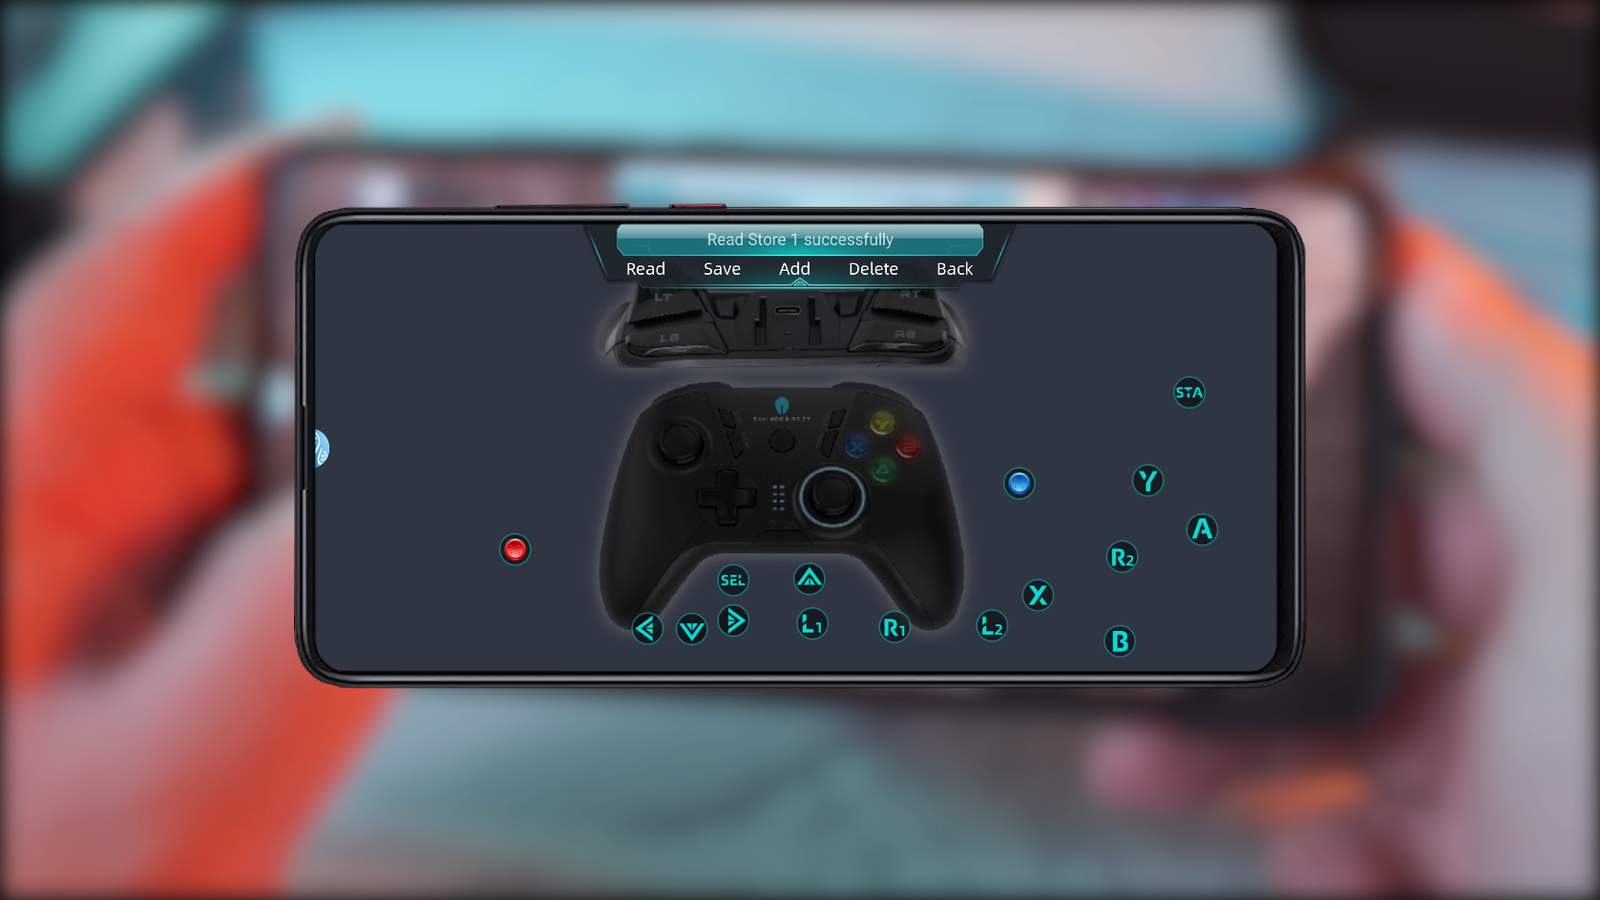
Now, this mode works in the android virtual touch input mode, so make sure you’re in that mode for the app to work properly.

As an example, since for some reason I can not get this controller to connect natively on Call of Duty mobile,
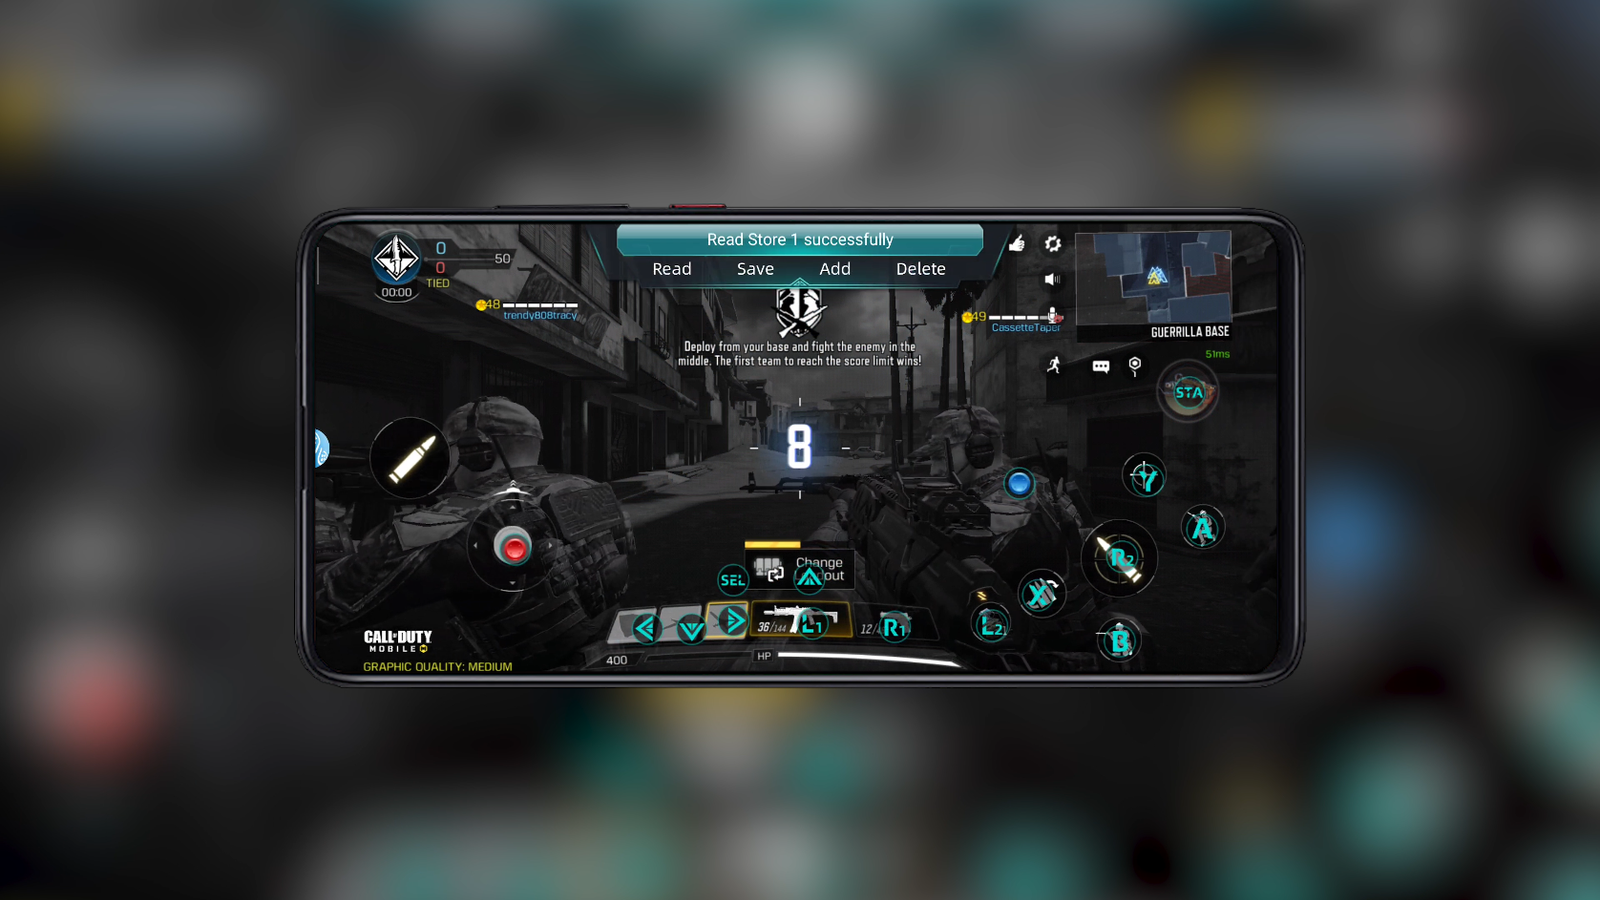
I use this app to map my preferred buttons on the screen as you can see here, all the functions on the screen has a designated button and you can also adjust the range of the left and right joysticks, and this is actually quite important especially with the right joystick where you control your aim’s sensitivity.
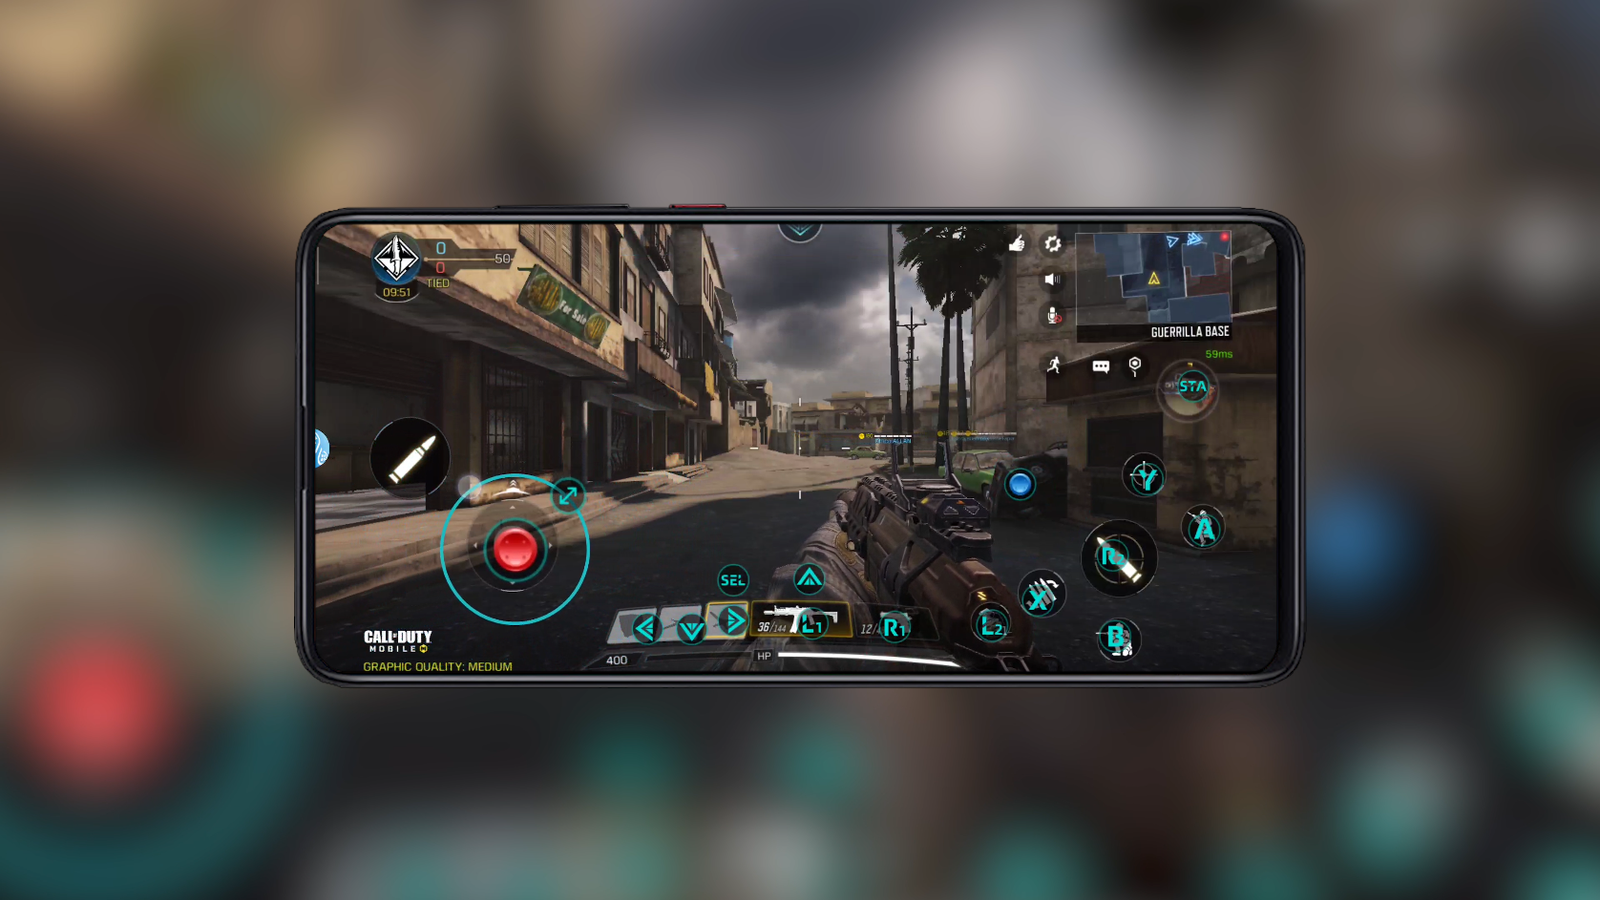
It took me a while to get used to it and did different key mapping but I was eventually able to get the hang of it and it made playing this game a lot easier as you have physical buttons to work with, you just have to practice more when it comes to aiming using the right joystick which is quite challenging actually, but for other movements like running, crouching, jumping, having a dedicated physical button for that is pretty awesome.
Gaming Experience
Other than Call of Duty mobile, this controller also worked with almost all the games that I have installed on my Xiaomi Mi 9T Pro including Street Fighter IV champion edition for mobile which actually worked natively with this controller, no need to configure anything else, and this is one of those instances that a controller is a must since this is a fighting game.

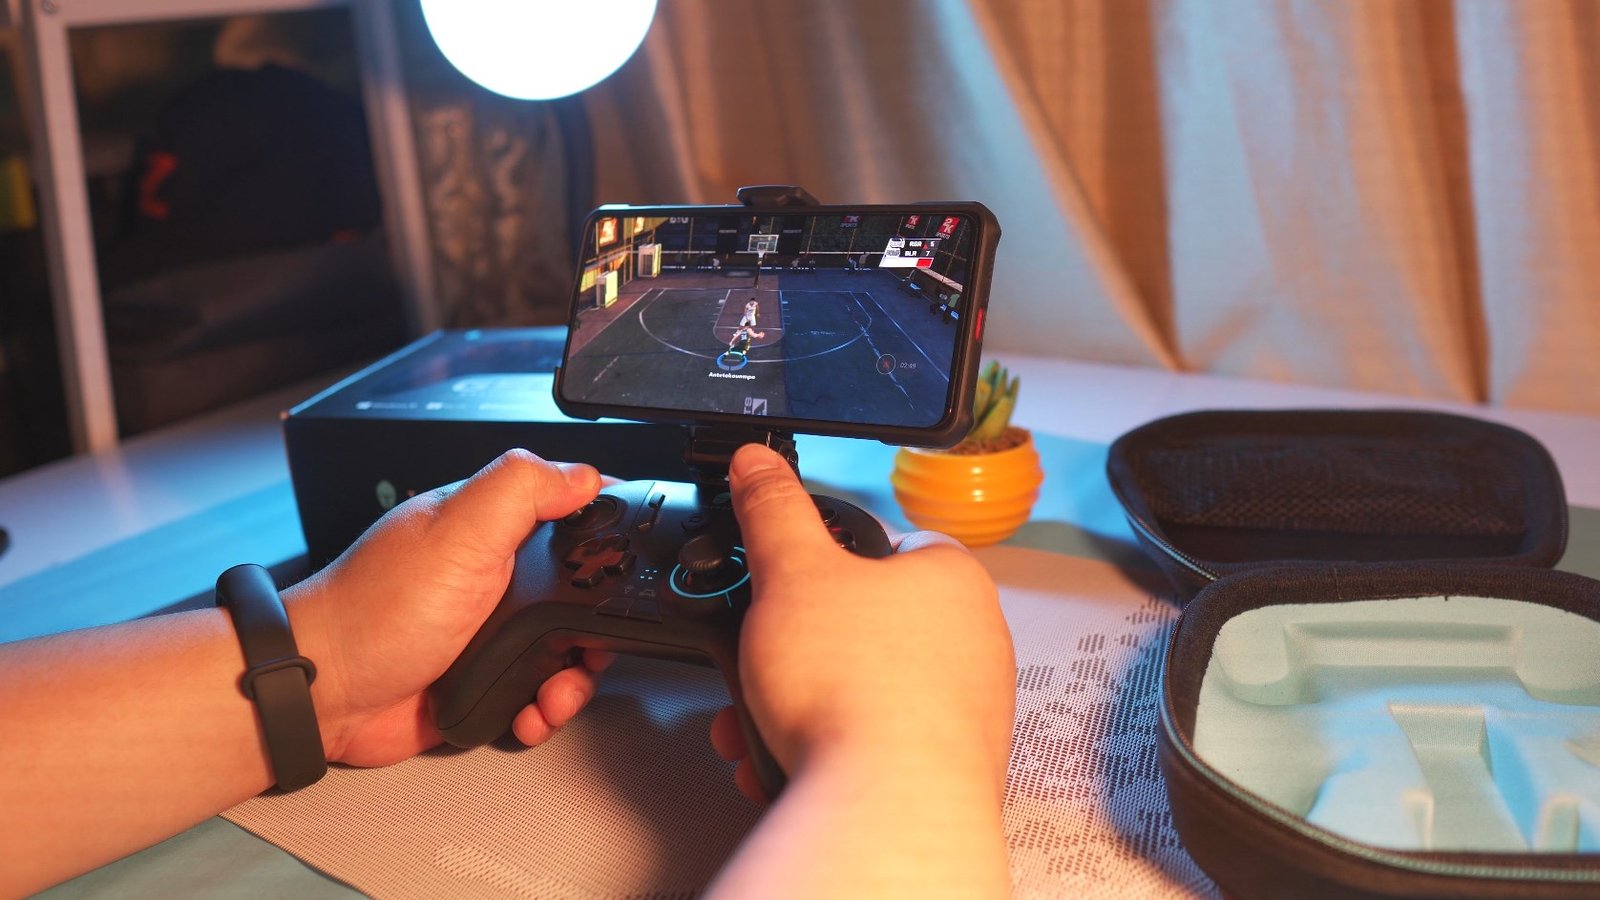
Another game that worked natively with this controller is NBA 2K20 for mobile, which is another game that needs a proper game controller for you to easily do spin moves, crossovers and things like that that you otherwise can’t do easily using just the touch controls.
It also worked with Darkness Rises which is another awesome adventure game for mobile.

For PC, under the native X-Box Xinput mode, this controller worked flawlessly on NBA 2K.

As well as with the Street Fighter V.

it also worked properly with Brawhalla which is a very awesome and free fun fighting game from steam.
Wireless Performance – No Latency
It’s really nice to play games like this with a proper wireless controller rather than using a wired one since you can pretty much move with unrestricted motion and makes the game a lot more fun. And as per my testing, I didn’t feel any perceivable latency on both mobile and PC platforms. Unfortunately, I don’t have a Nintendo switch and any iOS devices here so I can not test this controller on those platforms.

Battery Life
Now, in terms of battery life, as per specifications, charging the controller should take around 2 hours and a full charge should give you around 8 hours of continues working time, it does have a power-saving mode that will automatically turn off the controller after 5 minutes of inactivity. So ideally, it should last a few days depending on how long you play each day. The LED indicator will flash while charging and will stay lit when it is fully charged.
Now, before we finish this article, there’s actually one more nifty feature this controller has and that is the built-in gyroscope.

But to be able to use that, you have to update the firmware first via a PC.
Firmware Update
To do that, open the firmware app,
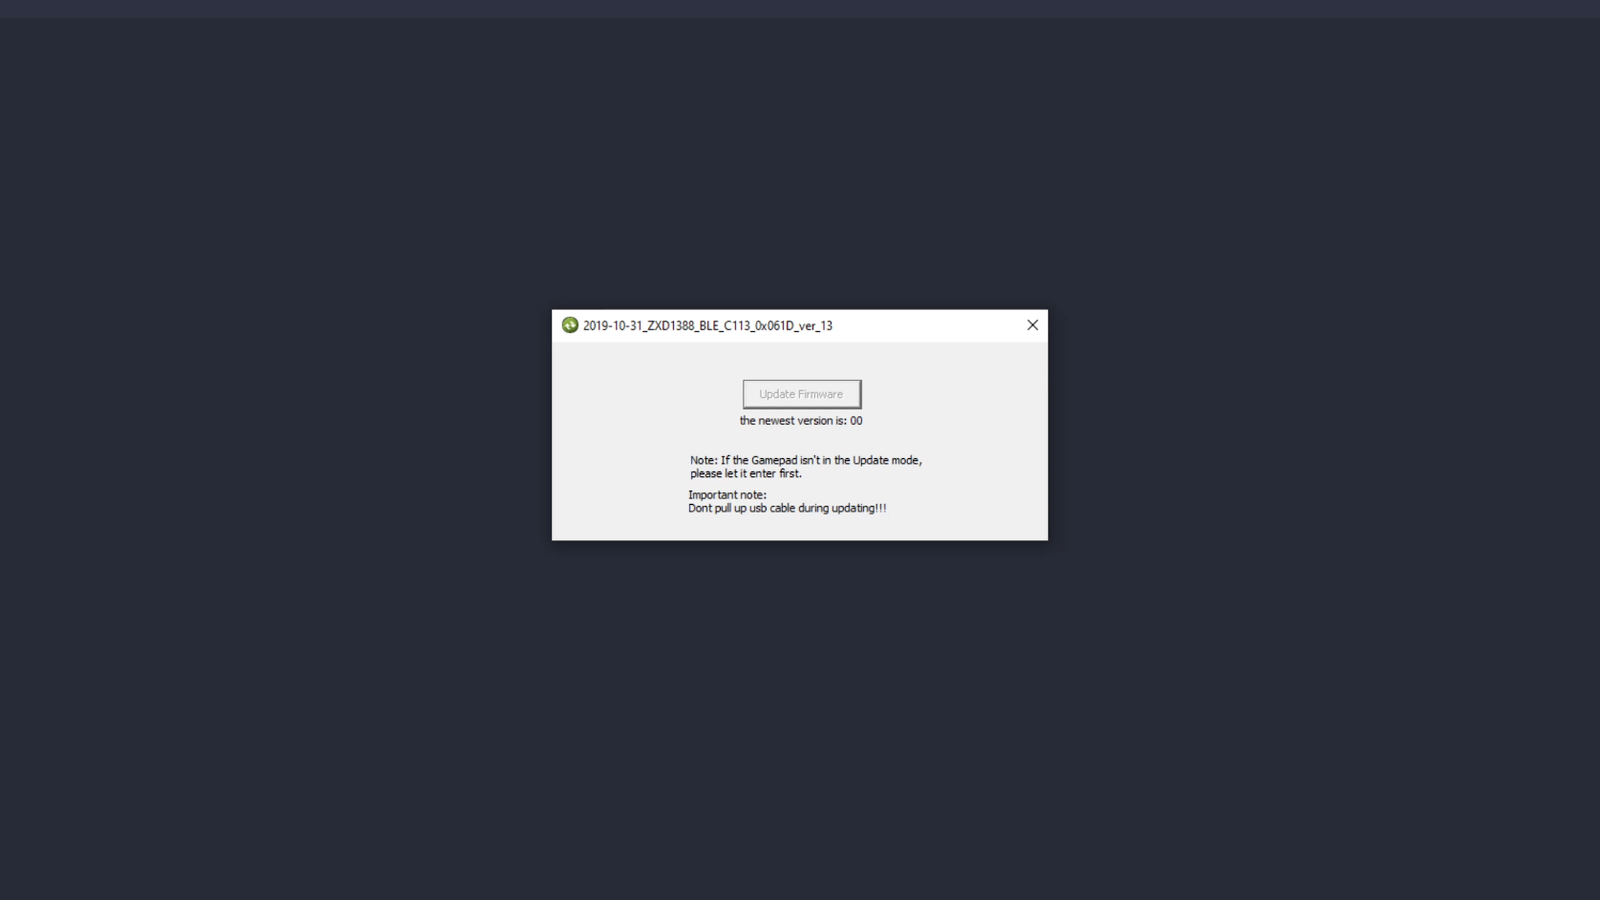
Then turn off the controller, press and hold the left joystick, and then plug the controller via wired to the PC,
Press firmware update, wait a bit and you’re good to go, make sure to not unplug the controller during the entire process.

After that you also have to update the firmware via the App, make sure you are on the correct input mode, go to settings and update the firmware.

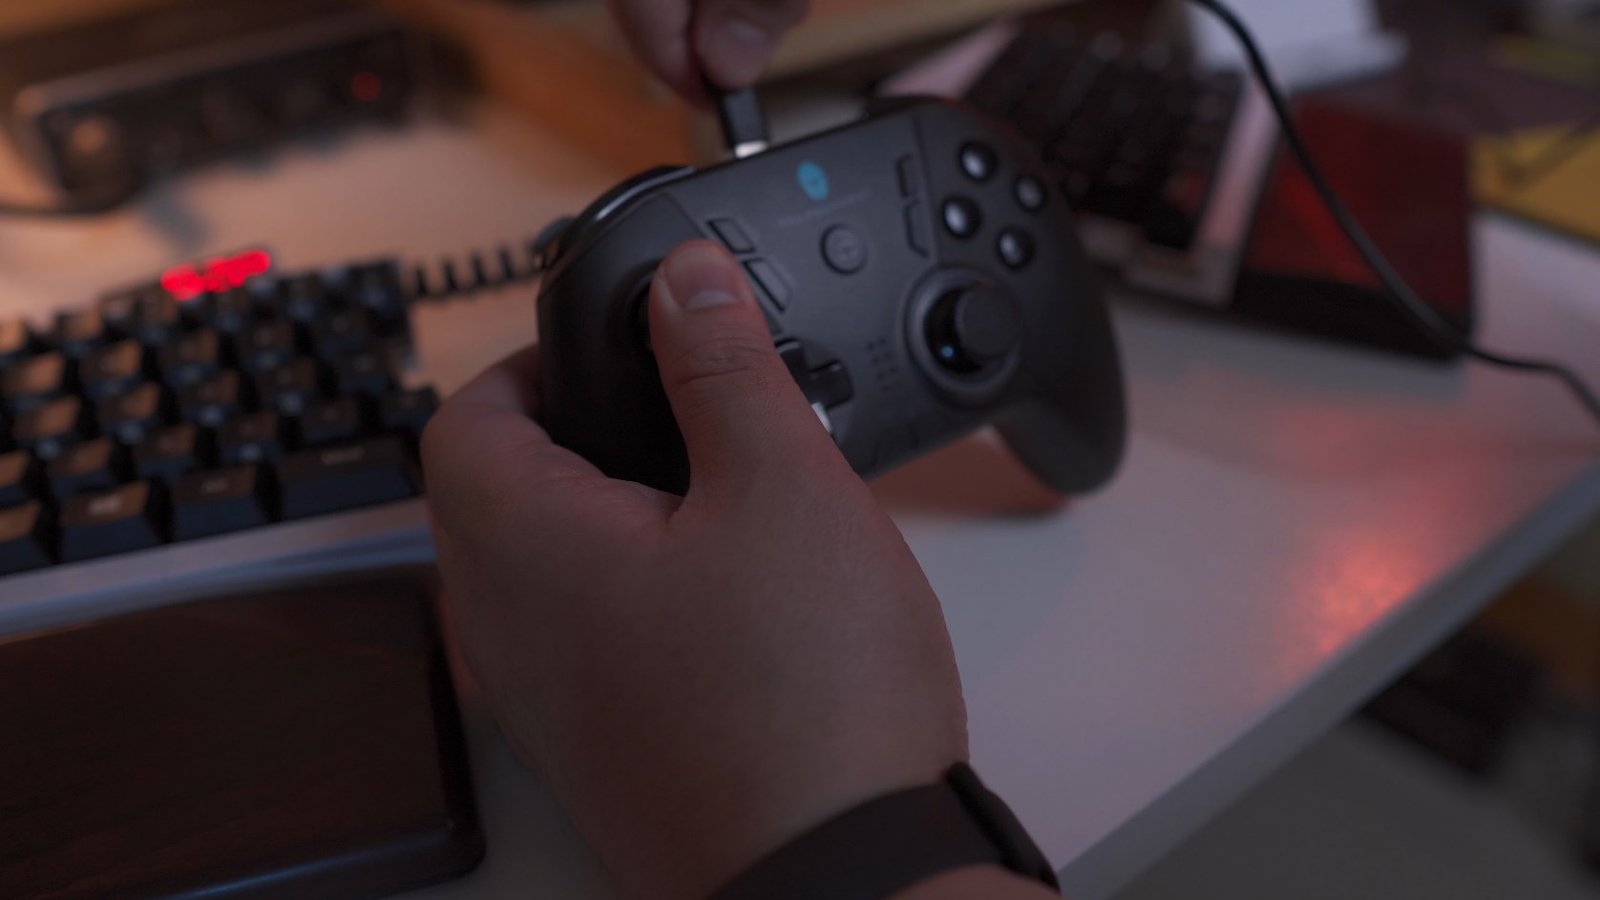
Gyroscope Feature
Once done, you should be able to map the gyroscope using the key linker app.
As an example, the perfect game to test that is Call of Duty mobile as it supports gyro movements.
To map the gyroscope using the key linker app, just add a button, then you have to choose a button that you should click while moving the controller, in my case I used the LB button,
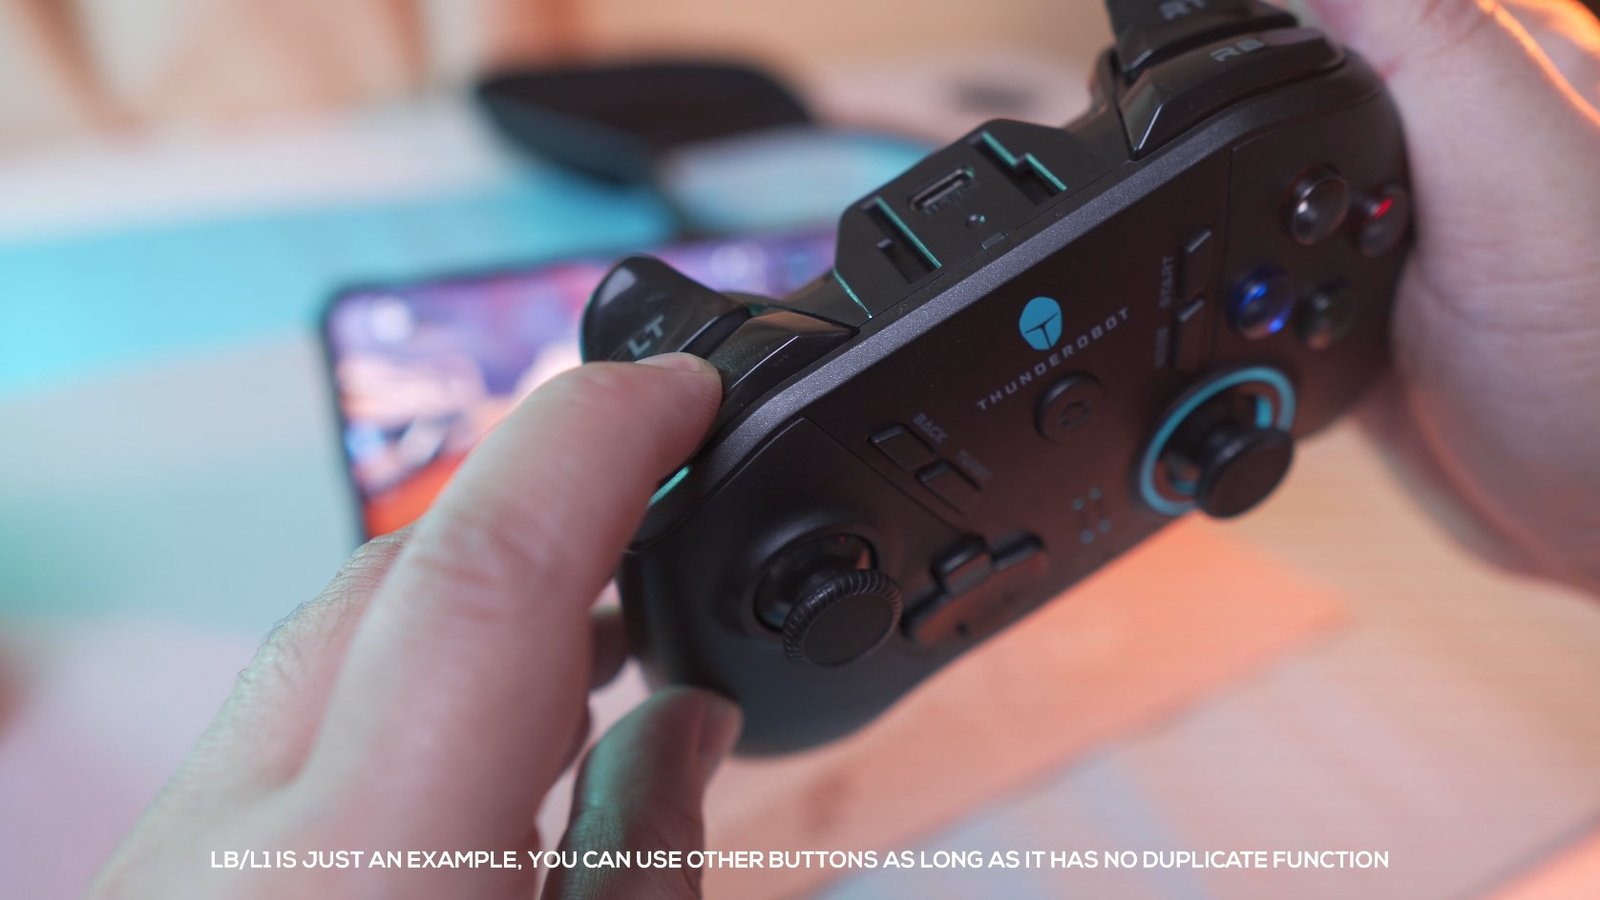
So I pressed LB and then I move the controller up and down real quick until the gyroscope icon appeared. Then you should also change the right joystick into view mode by long-pressing it, save it and you’re good to go. After that, you can use gyro with the controller by pressing LB while moving the controller. Pretty cool right? I’m not sure if that will help with your aim but you have that feature with this controller as well if you need it.
Removable Faceplate and some build quality issues
The Thunderobot G50 is not perfect, I mentioned earlier that there are some squeaking sounds on this controller when you really press hard on it, and that is because the left and right faceplate are actually removable for customization which I think is really awesome and I’m planning on spray painting mine.
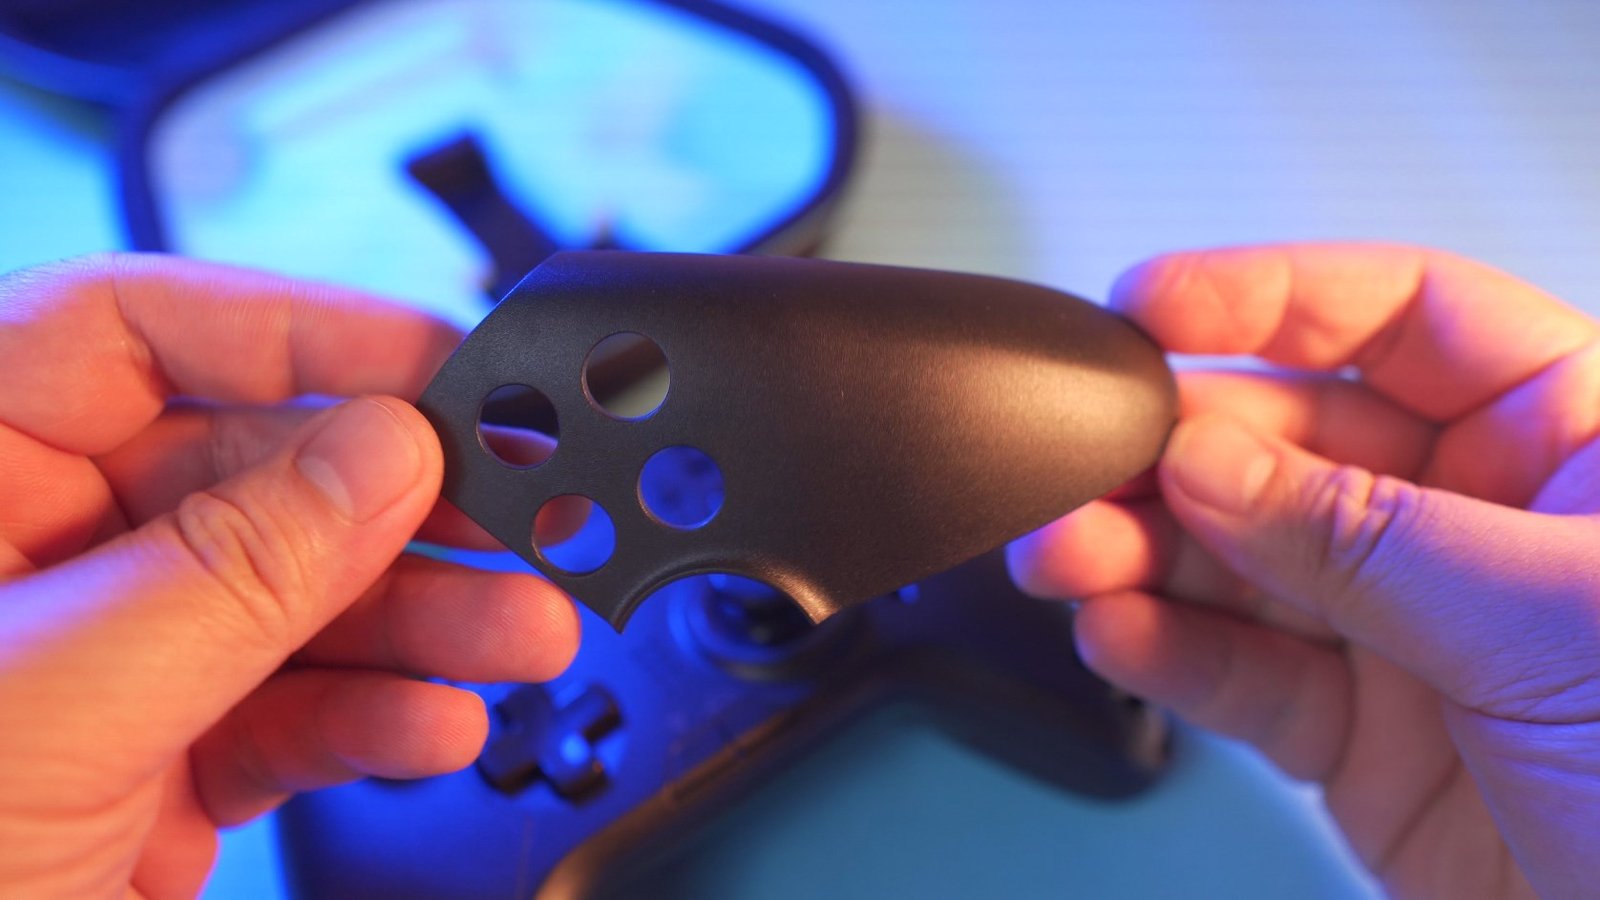
Don’t get me wrong, the squeaking sound is not that bad, I just have to inform you about that as part of the overall review.
Another quick thing that I noticed when it comes to build quality is that the left joystick grinds a bit on the edges of the cutout as you can see here.

It doesn’t look like it’s gonna cause some serious damage but there’s that and I’ve already reported this to them for possible future improvements.
Phone Holder
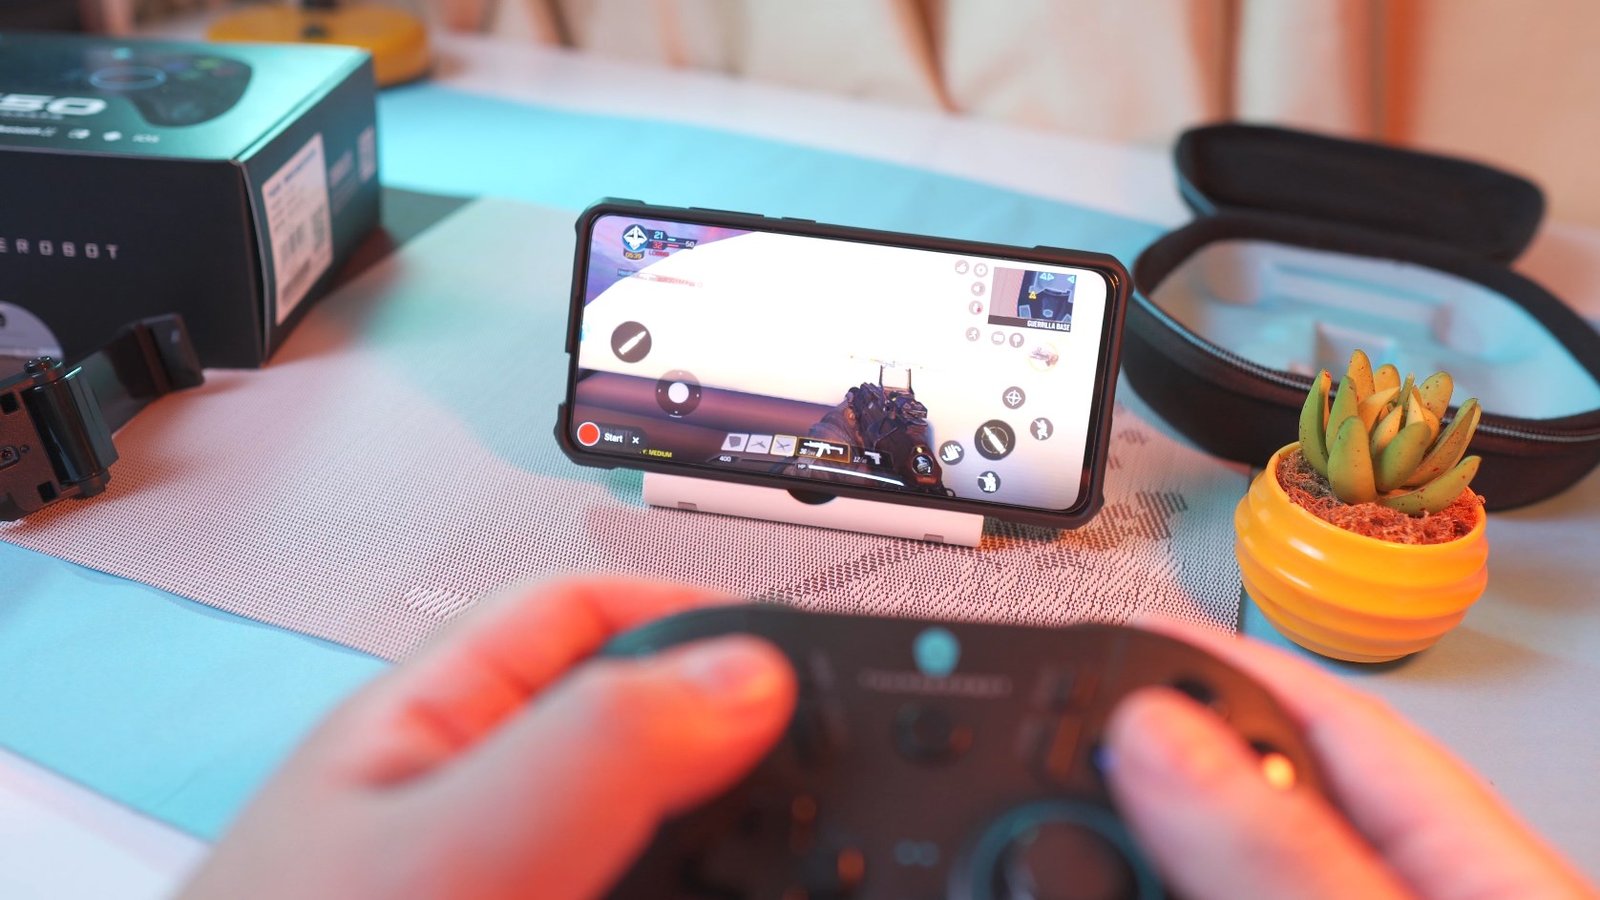
And last but not the least, and this will highly base on your personal preference but for me, I really appreciate the built-in phone holder but to be honest it’s not ideal for long period of gaming sessions. Because depending on the weight of your phone, it’s going be quite tiring in just a matter of minutes. So I still prefer to place my phone on a stand as you can see here so that I can play as long as I want in a very comfortable manner.
VERDICT
To conclude, the Thunderobot G50 lived up to its claim that it is the only game controller you’ll ever need. The build quality is not perfect but decent enough, It’s lightweight and comfortable to hold with a very familiar X-Box layout. All the buttons and joysticks are tactile and responsive and there’s no mushy buttons at all, all the other features such as programmable keys, adjustable brightness, and vibration levels, turbo mode and other features are very well appreciated and certainly good options to have. The multiplatform compatability works quite well though changing modes could have been easier but still, having a single controller for all your gaming devices is super convenient. But I think the icing on the cake with this one is the key linker app that allows you to use this game controller in any game that you can think of. At the end of the day, for just around 2000 pesos or 40USD, I think it’s a no brainer to grab this one or maybe two for multiplayer gaming.

Ultimate Hacking Keyboard Review – Best Split Mechanical Keyboard!
Royal Kludge RK61 60% Mechanical Keyboard Review – Best Budget 60% Keyboard!
Tecware Phantom Elite 87 Keys Review – Hotswappable Keyboard!
Tecware Phantom Elite 87 Keys Unboxing and Overview
Kailh Switches Review and Teardown – Kailh Switch Tester!
Best 60% Mechanical Keyboard Under $80
Cooler Master CK350 Mechanical Keyboard Review
Akko 3108 Tokyo World Tour Review – Five-Side Dye Sub!
Akko 3108 Dragonball Z Goku Review – Five-Side Dye Sub Spacebar
Rakk Lam-Ang Pro Mechanical Keyboard Review – Universal Socket Keyboard!
Thunderobot G50 Game Controller Review – Multiplatform Gamepad!

WHERE TO BUY:
LAZADA: http://bit.ly/ThunderobotG50
SHOPEE: http://bit.ly/2EKEeLl
NEWGAME+: http://bit.ly/34QTyk8
10% Off Code: SHOPZADAPH (Valid until Jan 31, 2020)
Thunerobot G50 English Manual 👉 http://bit.ly/35Mk67D
Thunerobot G50 Firmware Update 👉 http://bit.ly/2PQiAf9
Keylinker App Tutorial 👉 http://bit.ly/39bk5MP
- Price may vary depending on existing promos
- The views and opinions on this review are solely based on my own personal experience, your results may vary

The Broll who always got your back online!