Today, we’re going to find out if it’s really worth it to invest on an NVME drive if you already have a SATA SSD, were going to focus on real-world performance tests such as boot times, game load times, real-world file transfers, benefits for video editing and of course some synthetic benchmarks to give you valid information and justification should you choose to upgrade to an NVME drive. This is also the perfect opportunity to test the current bang for the buck NVME which is the XPG SX8200 Pro.
With that being said, let’s get into it.
MY EARLY BREAKDOWN
Pros: Great performance to price value, Great read and write perfomance, Comes with DIY Heatsink, and with SLC caching and DRAM buffer
Cons: Nothing significant
SPECIFICATIONS
Capacity: 256GB / 512GB / 1TB / 2TB
Form Factor: M.2 2280
NAND Flash: 3D TLC
Controller: SMI
Dimensions (L x W x H): 80 x 22 x 3.5 mm
Weight: 8g / 0.28oz
Interface: PCIe Gen3x4
Performance(Max): Read 3500MB/s , Write 3000MB/s
Maximum 4K random read/write IOPS: up to 390K/380K
Operating temperature: 0°C – 70°C
Storage temperature: – 40°C – 85°C
Shock resistance: 1500G/0.5ms
MTBF: 2,000,000 hoursV
WHAT’S IN THE PACKAGE
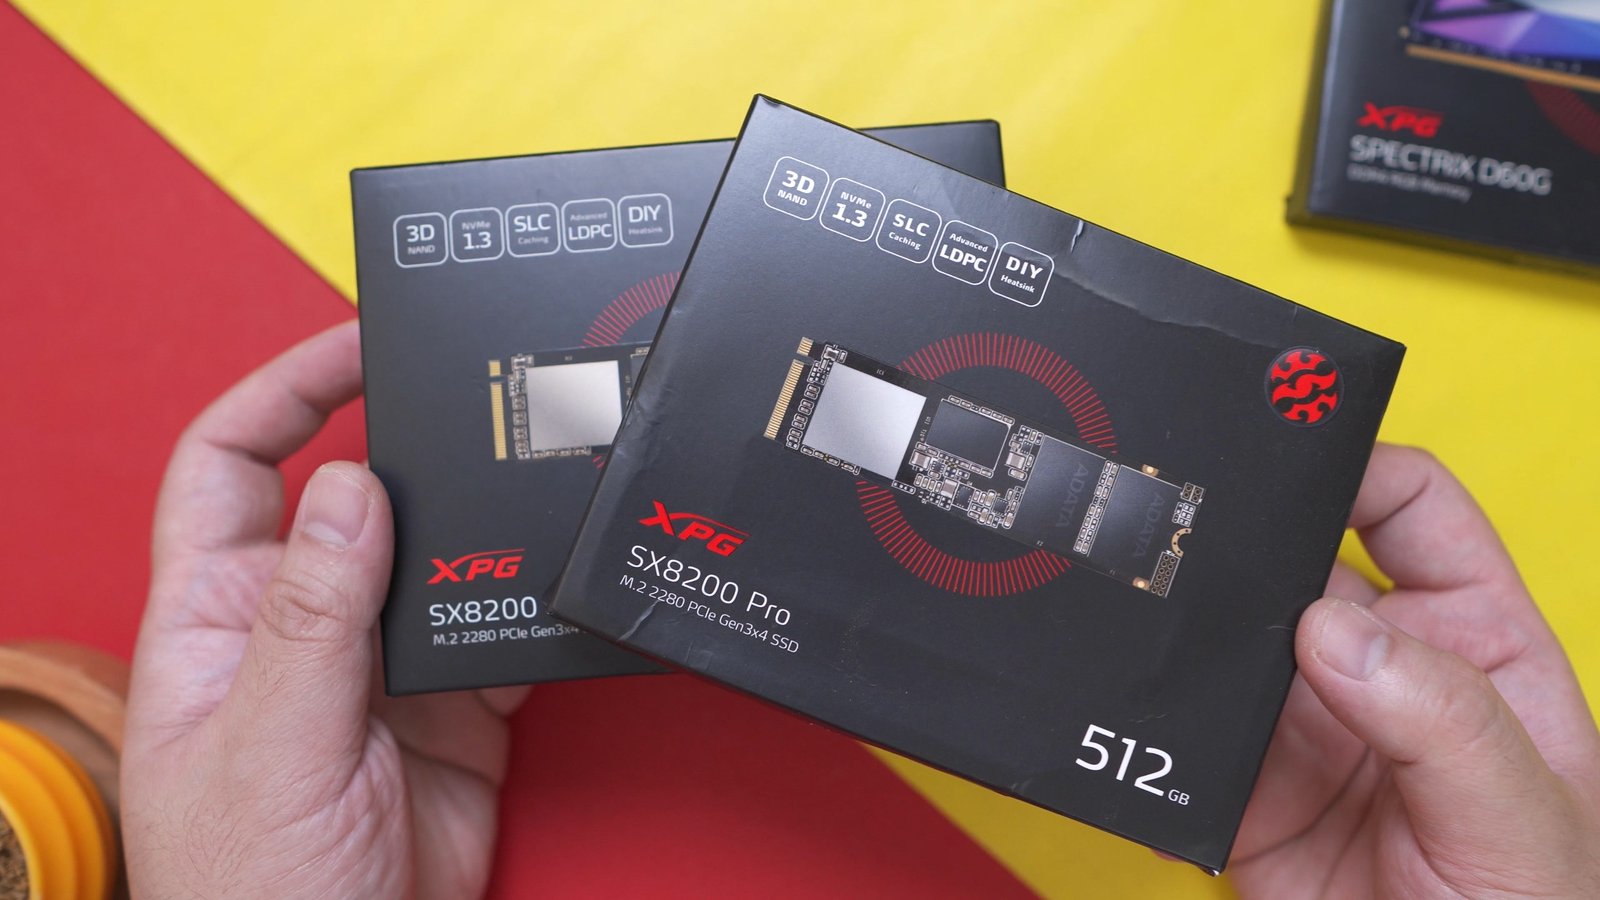
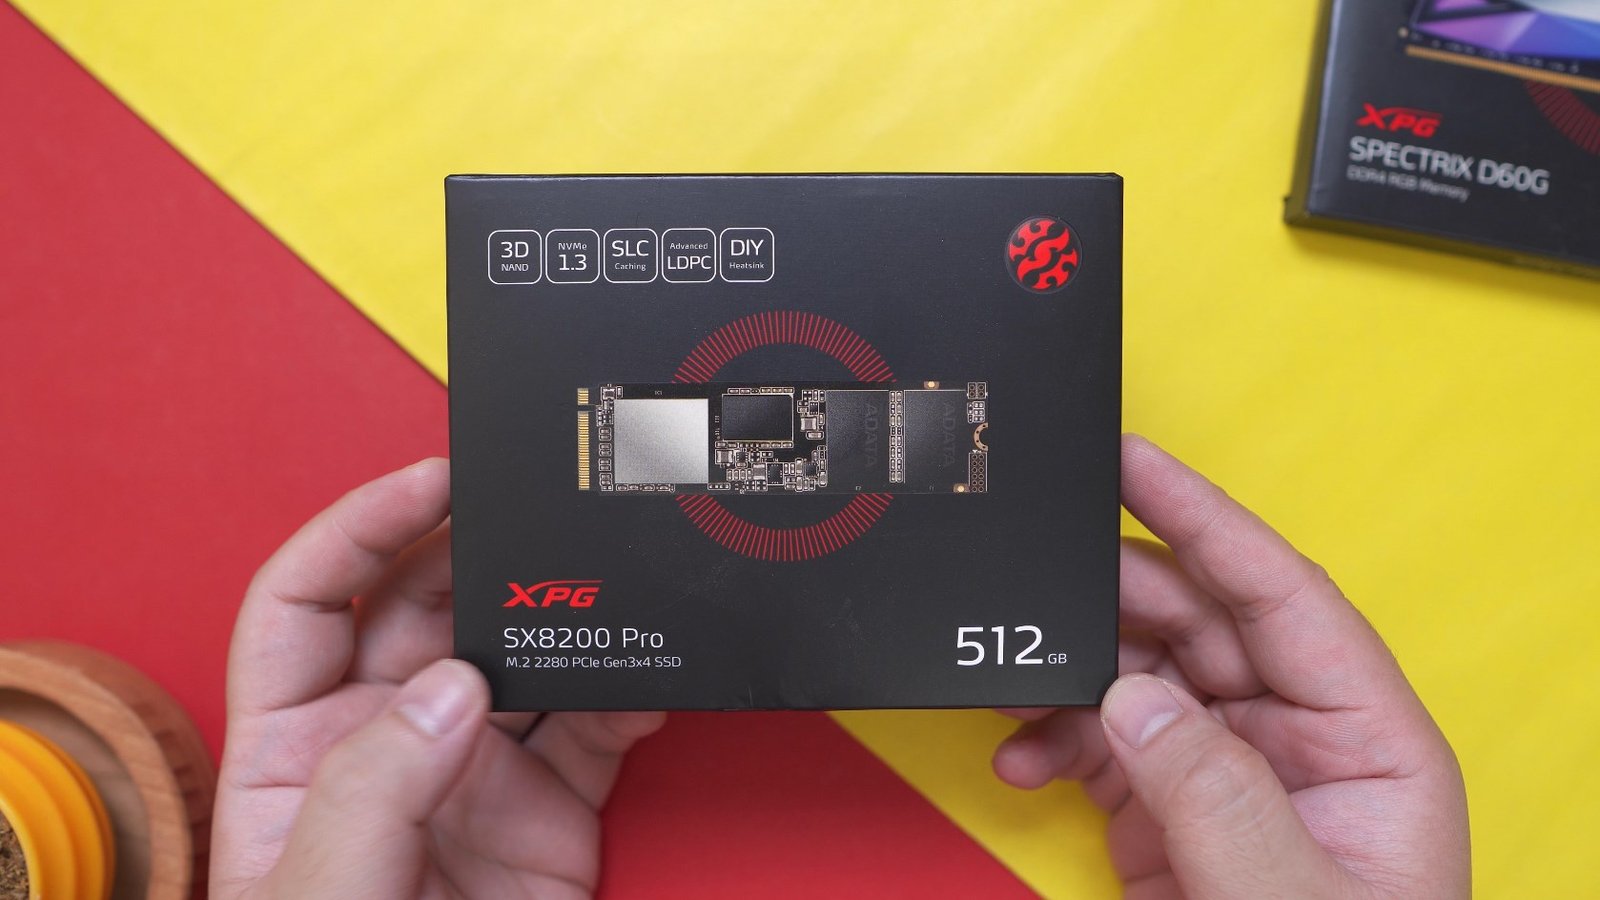
Alright guys, so first things first, let’s do a quick unboxing of the XPG SX8200 Pro NVME, and what we have here is the 512GB variant. It features 3D NAND flash, NVME 1.3, SLC Caching, Advanced low-density parity-check for better reliability, and it even has a DIY heatsink. And what I like about this is that it features a black circuit board which is quite neutral and should fit any PC builds when it comes to the aesthetic side of things.
At the back of the box, we have the rated read and write speeds of 3500 MB/s and 2300 MB/s respectively, and that is, considering its price of only around 5000 pesos or 100usd depending on where you look at, is just insane compared to its competitors.

I’m currently using two of these on my recent mini-ITX Build, One is provided by XPG and the other one I got from Shopee for only around 3600 pesos with a voucher. So yeah, for that price and with those rated speeds, this is certainly unbeatable right now.

Alright, so inside the box, we have the XPG SX8200 Pro NVME itself and the DIY heatsink.

This is actually a nice addition, especially for a fast storage device like this to help dissipate the heat.
And like I said, the XPG SX8200 Pro looks really good with this black circuit board that complements well with the black NAND flash memories and the silver SM2262ENG controller.

So with the unboxing and key features out of the way, let’s proceed to our in-depth testing, let’s start off with the obvious advantage of getting a fast NVME drive, which is the system boot time. But before that, let me share with you my methodology for the rest of our testing here, so that you can have a better understanding of how I came up with my results, so that you can also replicate the process on your own system, and of course, for complete transparency as well.
FULL REVIEW
Methodology
So for all our testing here, especially those that require time difference, I shot it using an external camera, first to avoid introducing human error for things like using a stopwatch or built-in screen capture softwares that can possibly affect the performance as well as the results. After capturing the data, I let my editing software handle the timecodes for a more accurate result.
System Boot Time
With that being said, as you can see here, there’s definitely an improvement on system boot time when using an NVME drive compared to a SATA SSD.

Moving on for our next test, let’s find out if there’s a significant improvement to our game load times when using an NVME drive against a standard SATA SSD.
Game Load Times
Again, I used an external camera and then I specifically look frame by frame on when I click the play button up to a certain frame at the end when the load screen is finally finished rendering. I also did an initial load test to make sure there’s no pending update or any prompt that will pop up. By this, we can make sure that all the timecodes are as accurate as possible since it is frame by frame.
With that being said, here are all the game load times results. As you can see, some of the games don’t benefit much from an NVME like Assassins Creed Odyssey and Battlefield V,

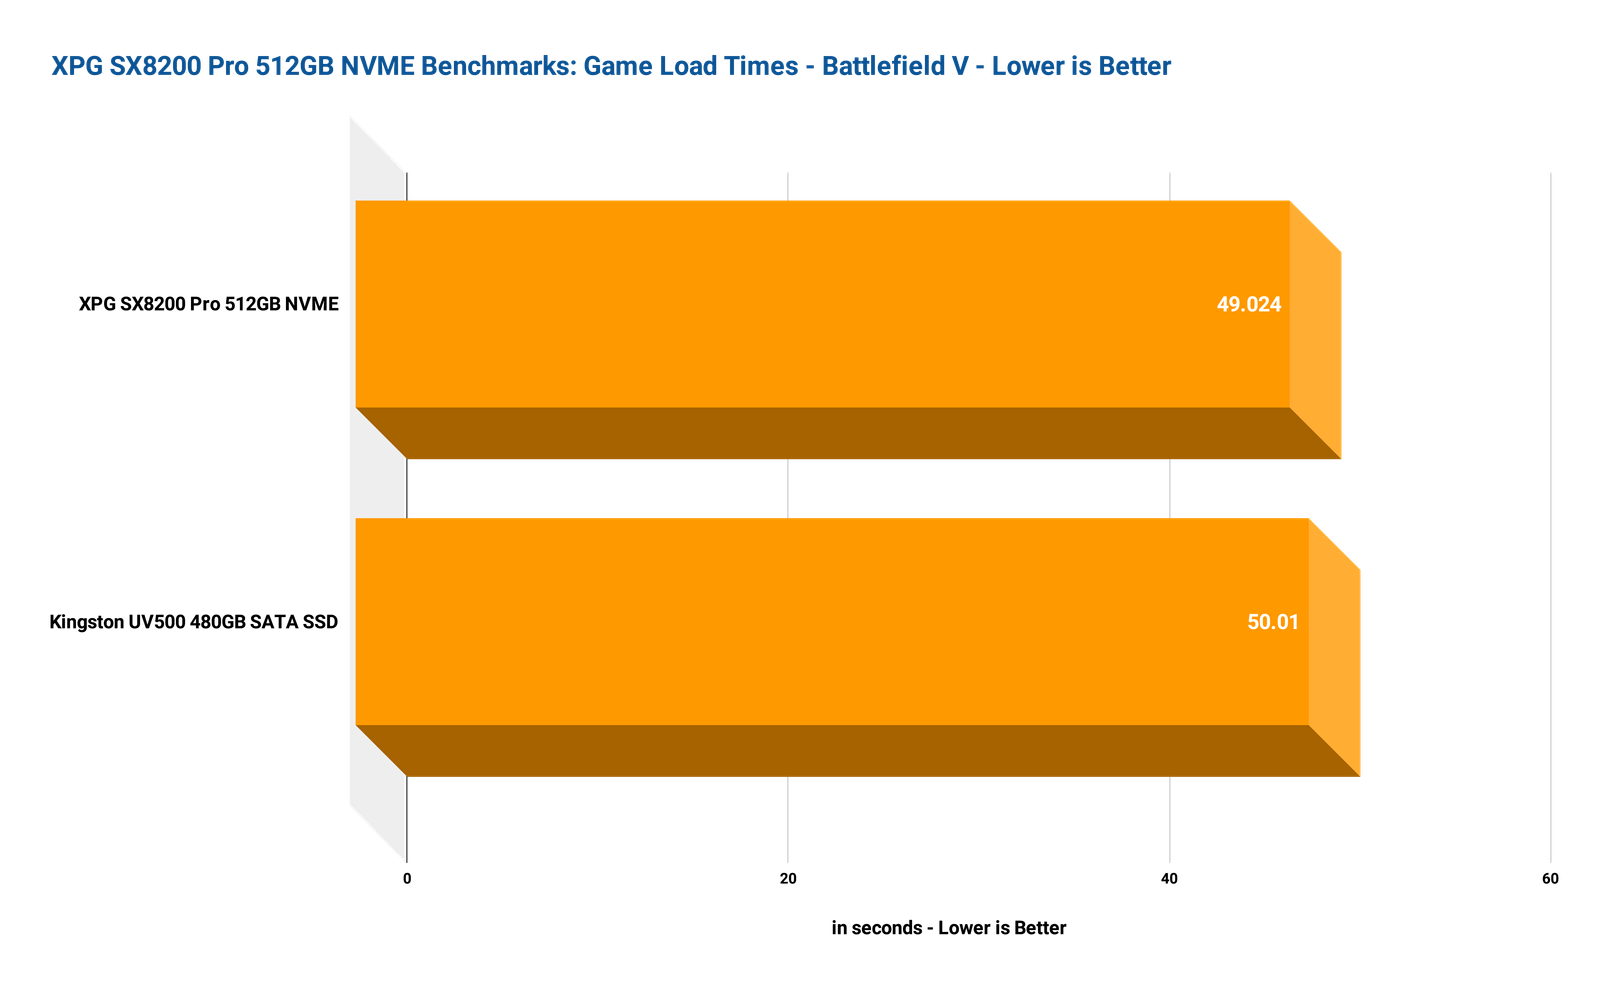
But mostly got a significant boost like Apex Legends, Rainbow Six Siege, Street Fighter V and Shadow of the Tomb Raider,


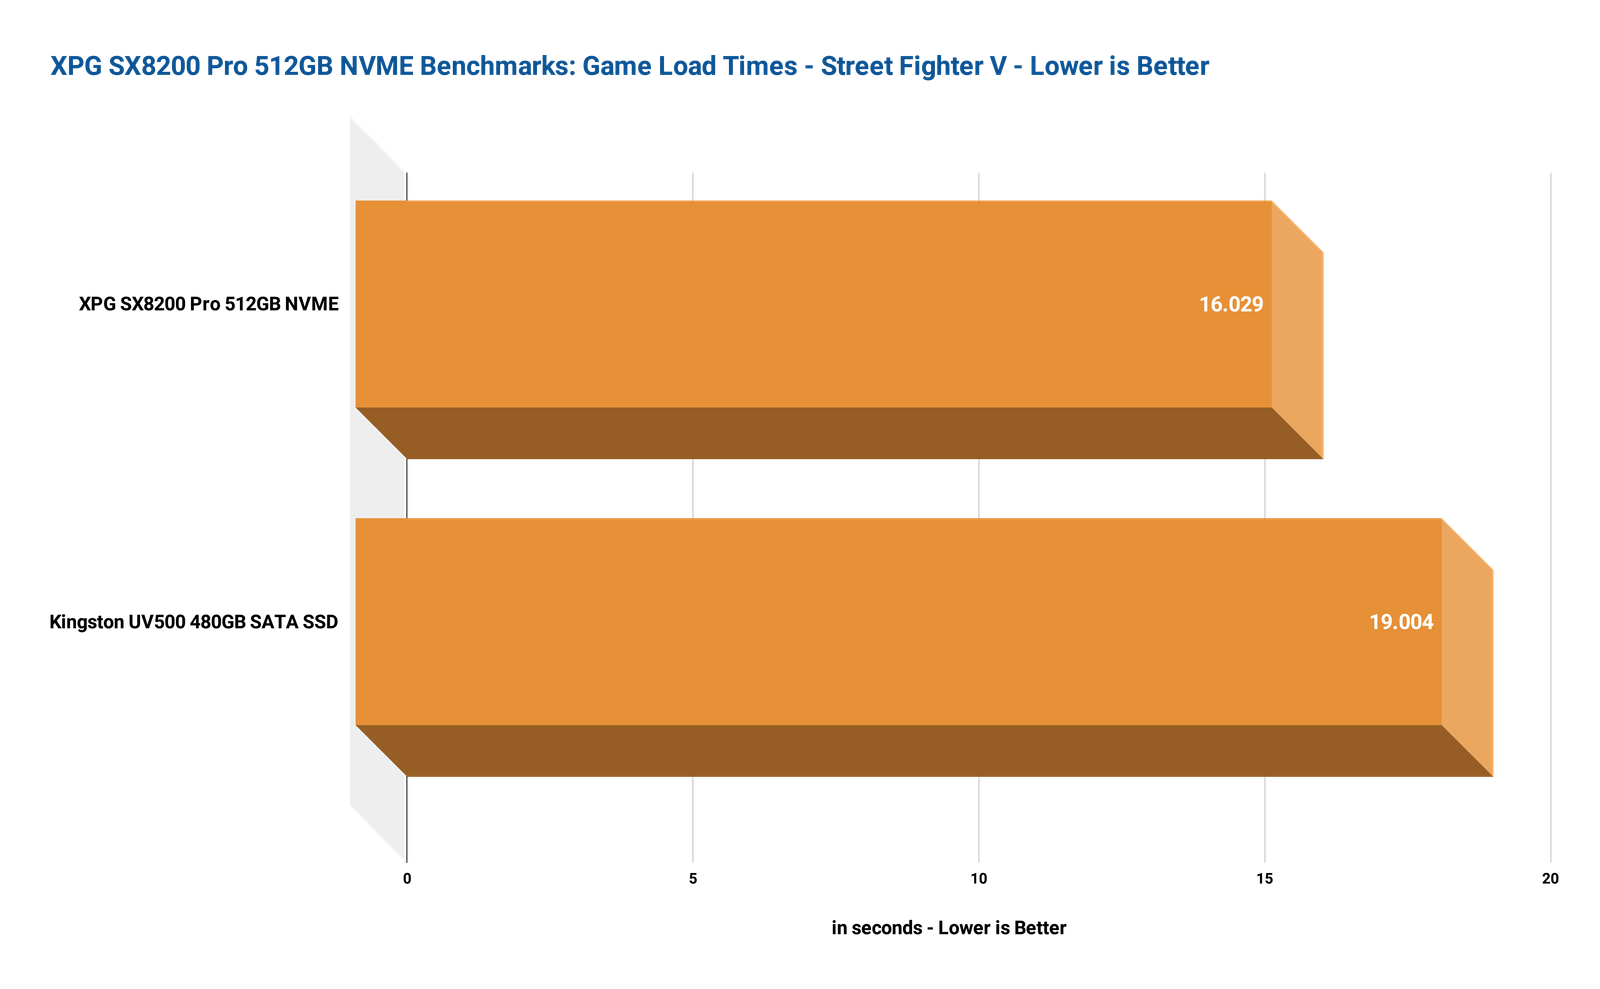

While a couple of them here doesn’t give a crap like CS: Go and Call of Duty Warzone.


So yeah, the results are quite interesting but for the most part, using an NVME drive definitely helps speed up game load times.

Video Editing
File Import
Now, for our next test, this is for our fellow content creators out there, we’re going to test the benefits of using an NVME drive for video editing.
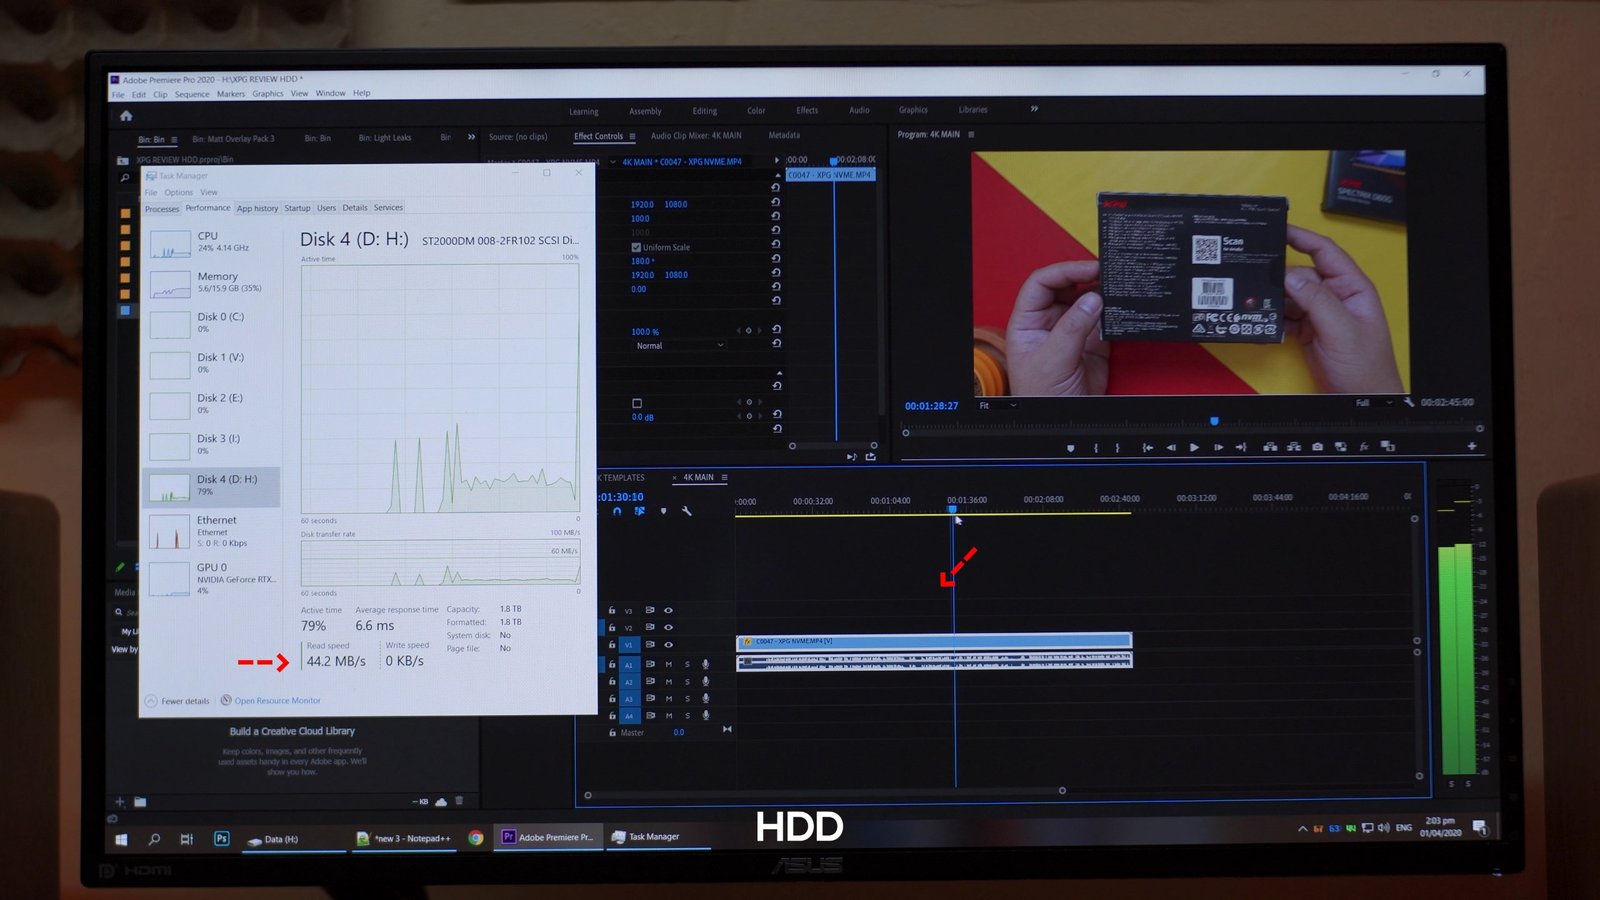
Alright, so the first test is file importing, but before that, I made sure that my files are located on the drive being tested and my scratch disk is also set on the same drive. Ideally, you would want to have a separate drive for your raw files and your scratch disk but for the purpose of this test, were going to use the same drive. Again same procedure, external camera, and frame by frame comparison.
As you can see on these results, upgrading to a SATA SSD over a spinning 3.5″ HDD gives you a significant boost, but upgrading from SATA SSD to an NVME drive gives you just a bit of improvement, still an improvement nonetheless.

Generating Thumbnails
Next is for generating thumbnails after you import your files into your project. What I did here is I just simply open the folder and see how fast the thumbnails will be generated. And as you can see on these results, this is where we can see a very significant advantage of using an NVME drive compared to a SATA SSD and a spinning 3.5″ HDD. And for me, this is quite important especially if you have a ton of RAW video files that you need to sort for your project. The sooner you can see the preview, the faster you can work.

Timeline Scrubbing
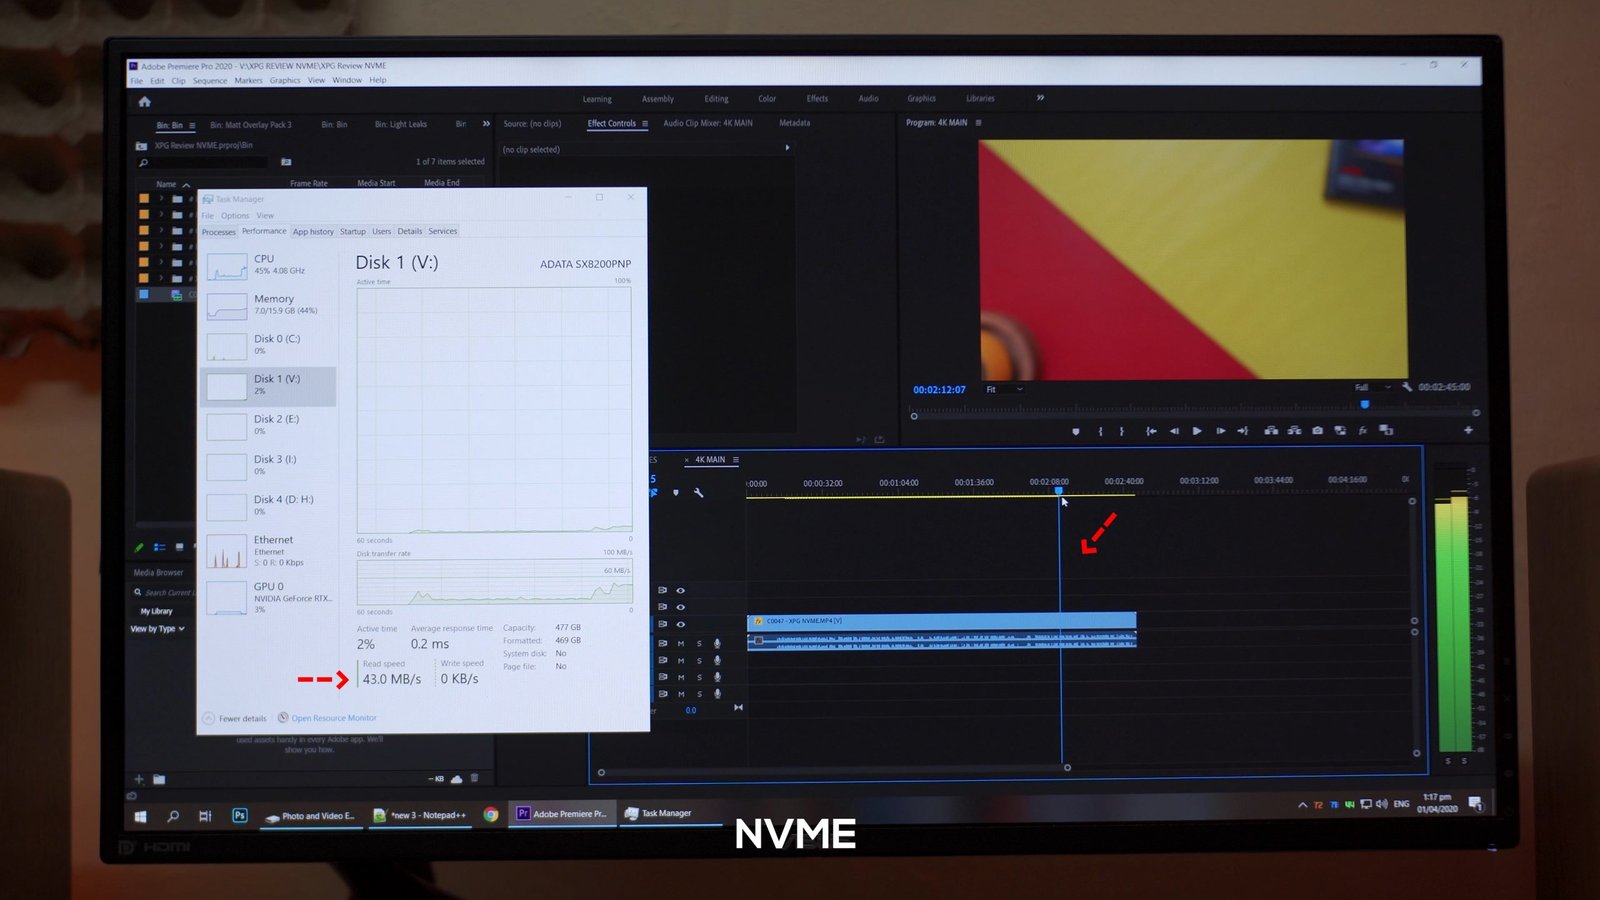
The next test is for timeline scrubbing which is one of the most important parts of the video editing workflow. And as per my testing, to be honest, I didn’t felt any significant difference when it comes to timeline scrubbing between all the drives I’ve tested here.
Because as per checking, our raw video file here doesn’t saturate the read speed of any of these drives whether I am just playing back the footage, scrubbing fast forward, and even skipping back and forth, the drives are just running around less than 100MB/s which is far from what these drives are capable off.

But for sure, there are some differences especially when it comes to access times but essentially, judging by how it feels scrubbing through the timeline, there’s not much of a difference. Your mileage may vary of course depending on the size of your RAW files and your project files.
Export Time
And lastly, and this is the most interesting part of the test when it comes to video editing, is export time. To be honest, I wasn’t really expecting any difference here because technically, what’s working hard here is the processor and the graphics card, not so much for the storage device, but apparently, there is a difference especially during the part where the export process is about to end and the file is being written on the disk. So with this test, I made sure that each export is exporting to the drive being tested, and as you can see on these results, there is quite a bit of difference from these three storage devices that we have right here. Pretty interesting results indeed.

Overall, upgrading to an NVME drive like the XPG SX8200 Pro still provides better performance when it comes to video editing especially if you’re coming from a standard HDD.
Moving on, let’s proceed with our real-world file transfer tests.
Real World File Transfer Tests
Alright, so instead of showing you graphs and whatnot, I’ll show you the actual screenshots of the transfer tests, so that you can have a better understanding of how the drives perform throughout the entire transfer process.
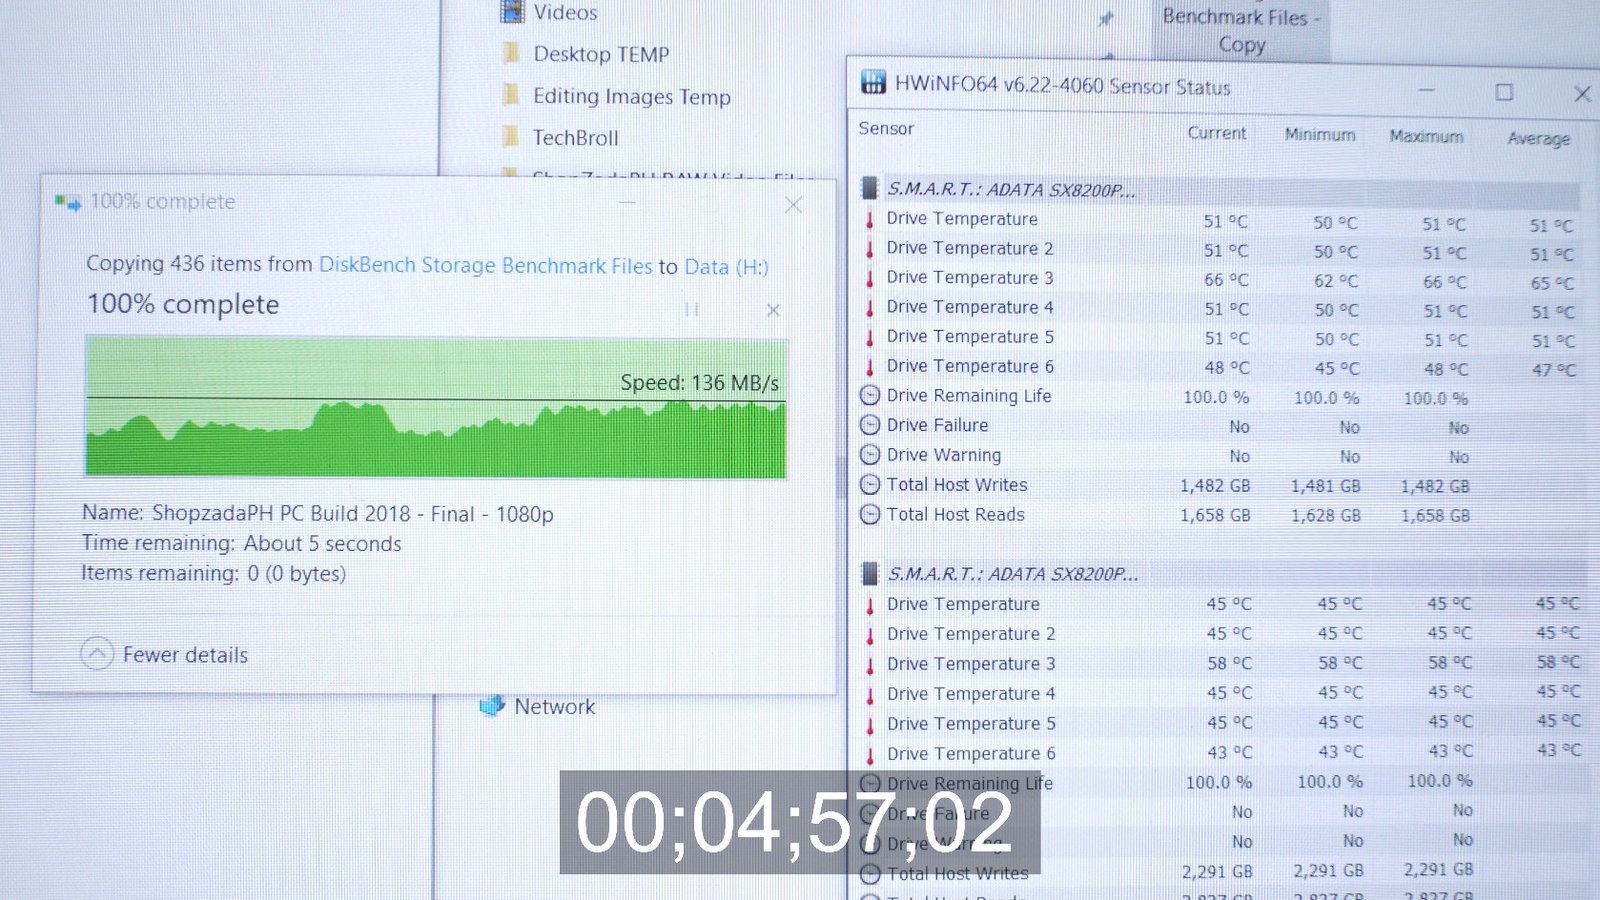
30GB File Transfer from one XPG SX8200 Pro NVME to a 3.5″ HDD
The first test is a 30GB file copy from an NVME drive to a 3.5″ HDD inside a USB 3.0 dock.
So as you can see we are being bottlenecked by the write speed of the HDD. And this is actually one of the important things to note when dealing with different drives, you should not only consider the drive’s read and write speed but also the read and write speed of the other drive your transferring files to. So the file copy took about 4 minutes and 57 seconds.
I also copied the file back to the NVME and it took around 4 minutes and 37 seconds again bottlenecked by the hard drives read speed.

30GB File Transfer from an XPG SX8200 Pro NVME Drive to the same NVME Drive
The next test is a 30GB file copy from an NVME drive to the same NVME drive, this should simulate both read and write operations and as you can see here, the file copy took only about 28 seconds.

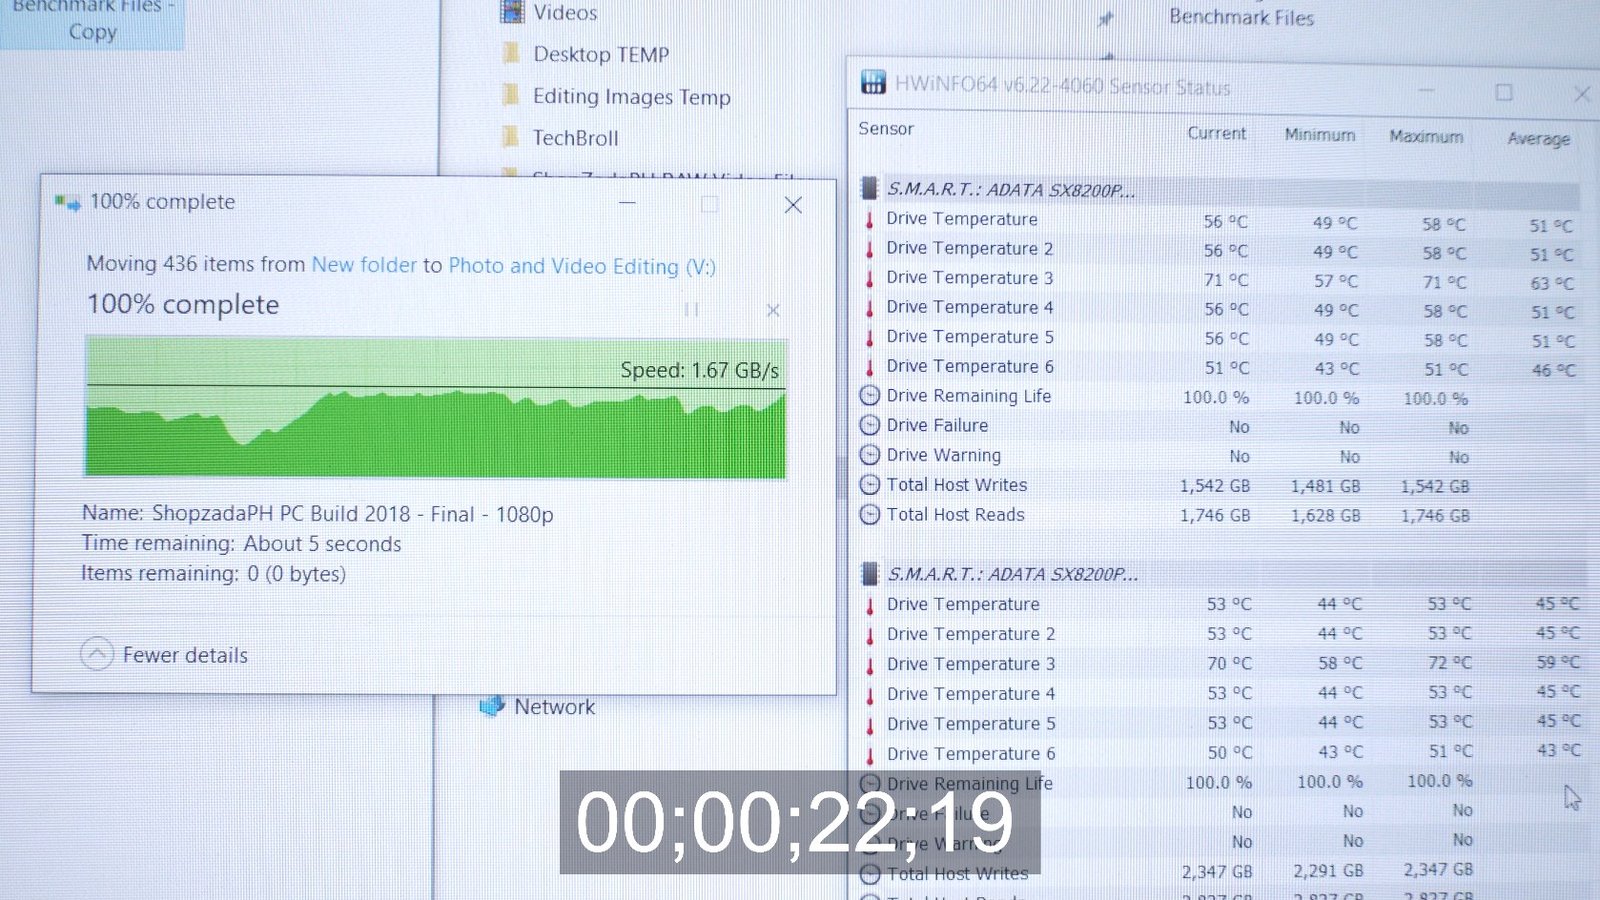
30GB File Transfer from an XPG SX8200 Pro NVME Drive to another XPG SX8200 Pro NVME Drive
The next test is a 30GB file copy from an NVME to another NVME, so this is from one XPG SX8200 Pro to another XPG SX8200 Pro. This should simulate a proper file copy with in theory, no bottlenecking since they have the same rated read and write speed. So as you can see, were transferring files almost around 2GB/s throughout and the entire process and there is a possibility that we’re still using the SLC cache since we’re only transferring a relatively small file right here. So the copy took only about 17 seconds which is really fast.

The next test is just the same but this time we’re actually going to move the files, just to see the difference between copy and move operation. As expected the transfer is a little longer at around 22 seconds.
60GB File Transfer from an XPG SX8200 Pro NVME Drive to another XPG SX8200 Pro NVME Drive
Moving on we’re now going to increase our file size to 60GB and were going to copy it from one NVME to another NVME drive just to check if we can overload the SLC cache. And as you can see here, we’re still copying files quite fast at around 1.7GB/s and the process took around 36 seconds.

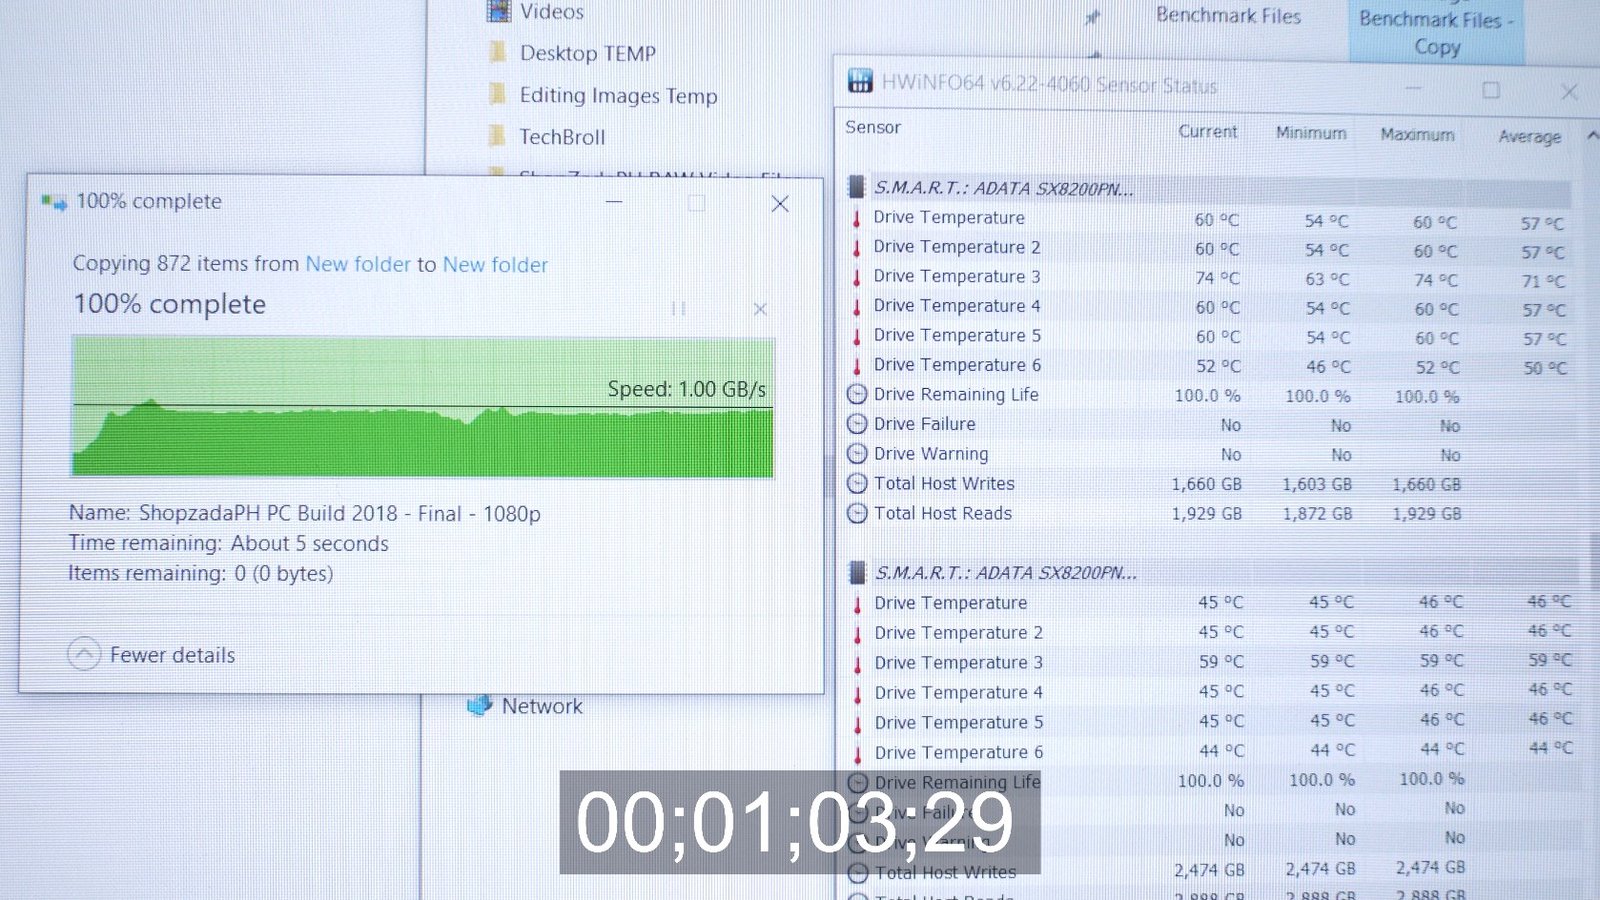
60GB File Transfer from an XPG SX8200 Pro NVME Drive to the same NVME Drive
The next test is the same 60GB file but we’re going to copy it on the same drive to again simulate both read and write operations. And as you can see, this time we’re running a bit slower at around 900MB/s and the process took around 1 minute and 3 seconds which is significantly longer. This means, the larger the file size the more tasking it is on the drive especially during simultaneous operation.
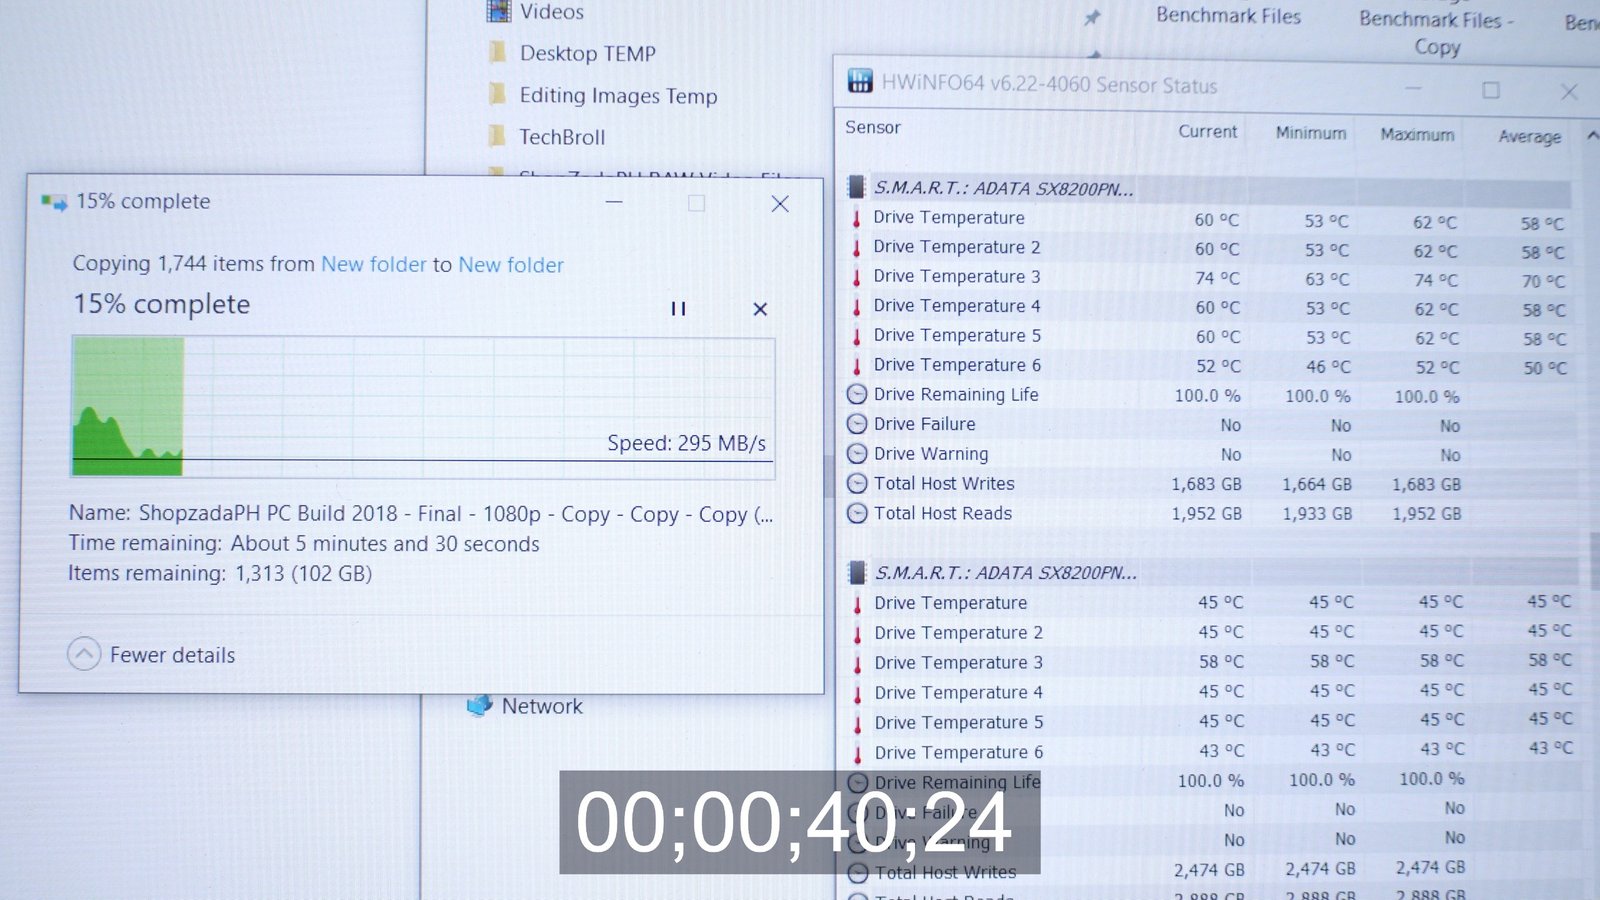
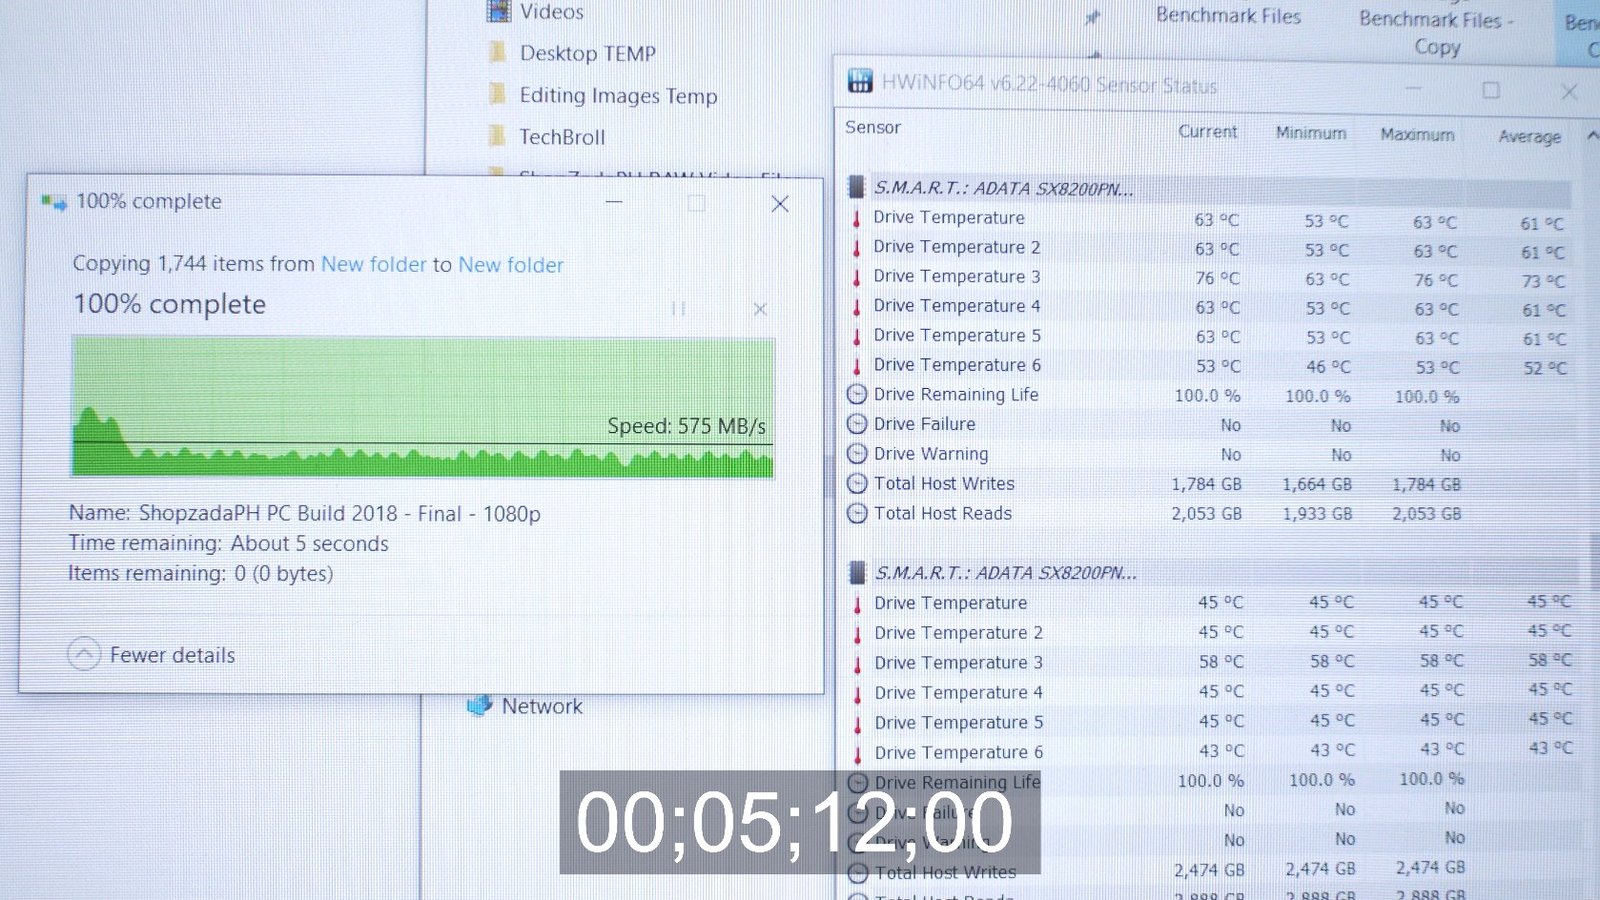
120GB File Transfer from an XPG SX8200 Pro NVME Drive to another XPG SX8200 Pro NVME Drive
Alright, so for our last test when it comes to NVME to NVME real-world performance test, were going to copy a whopping 120GB file to the same drive, again for both read and write operation. This will simulate prolonged usage of the drive for the SLC cache test as well as the thermals.
At the start of the process we’re running around 1GB/s but immediately dip down to around 200MB/s, and if I understand it correctly, we’re now experiencing SLC cache overflow or we’ve maxed out our SLC cache and now it is just using the native TLC flash. So again if I understand it correctly, fast NVME drives are good for quick file transfers thanks to the SLC cache but also have some limits when it comes to large and sustained file transfers like this.
Thermals
Now, when it comes to thermals, at the start of the process, our NVME’s temperature is around 53 degrees and this is with the prior load as well earlier, and our max temp is around 63 degrees which is still far from the 70 degrees max operating temperature.

As for the idle, you can take a look at the other NVME here which is sitting around 45 degrees.

The process for our 120GB file copy took around 5 minutes and 12 seconds.
Alright guys, we’re almost done here, but of course, we have to test it with a SATA SSD as well.
60GB File Transfer from an XPG SX8200 Pro NVME Drive to a Kingston UV500 SATA SSD
The next test is a 60GB file copy from an NVME drive to a SATA SSD again to simulate bottlenecking in between drives. So as you can see, where being limited by the write speed of the SATA SSD which is the Kingston UV500. The whole process took about 6 minutes and 7 seconds.

Now, we’re going to copy the same file back from the SATA SSD to the NVME drive, and now we’re being limited by the read speed of the SATA SSD which as expected, is faster than the write speed so we’re copying faster now and the whole process only took around 2 minutes and 41 seconds.

60GB File Transfer from a Kingston UV500 SATA SSD to the same Drive
And finally, last test, which is SATA SSD to SATA SSD again to simulate read and write operations on the same drive. And as expected, it is running slow due to simultaneous read and write operation and the whole process took around 9 minutes and 37 seconds
And if we compare that to the same process but for NVME to NVME that took only around 1 minute and 3 seconds, that’s where we can say that upgrading from a SATA SSD to an NVME Drive is really worth it in real-world performance test, because that difference is quite huge.

Alright guys, before we finish this article, of course, we have to take a look at some synthetic benchmarks to make this review complete.
Synthetic Benchmarks
CrystalDiskMark
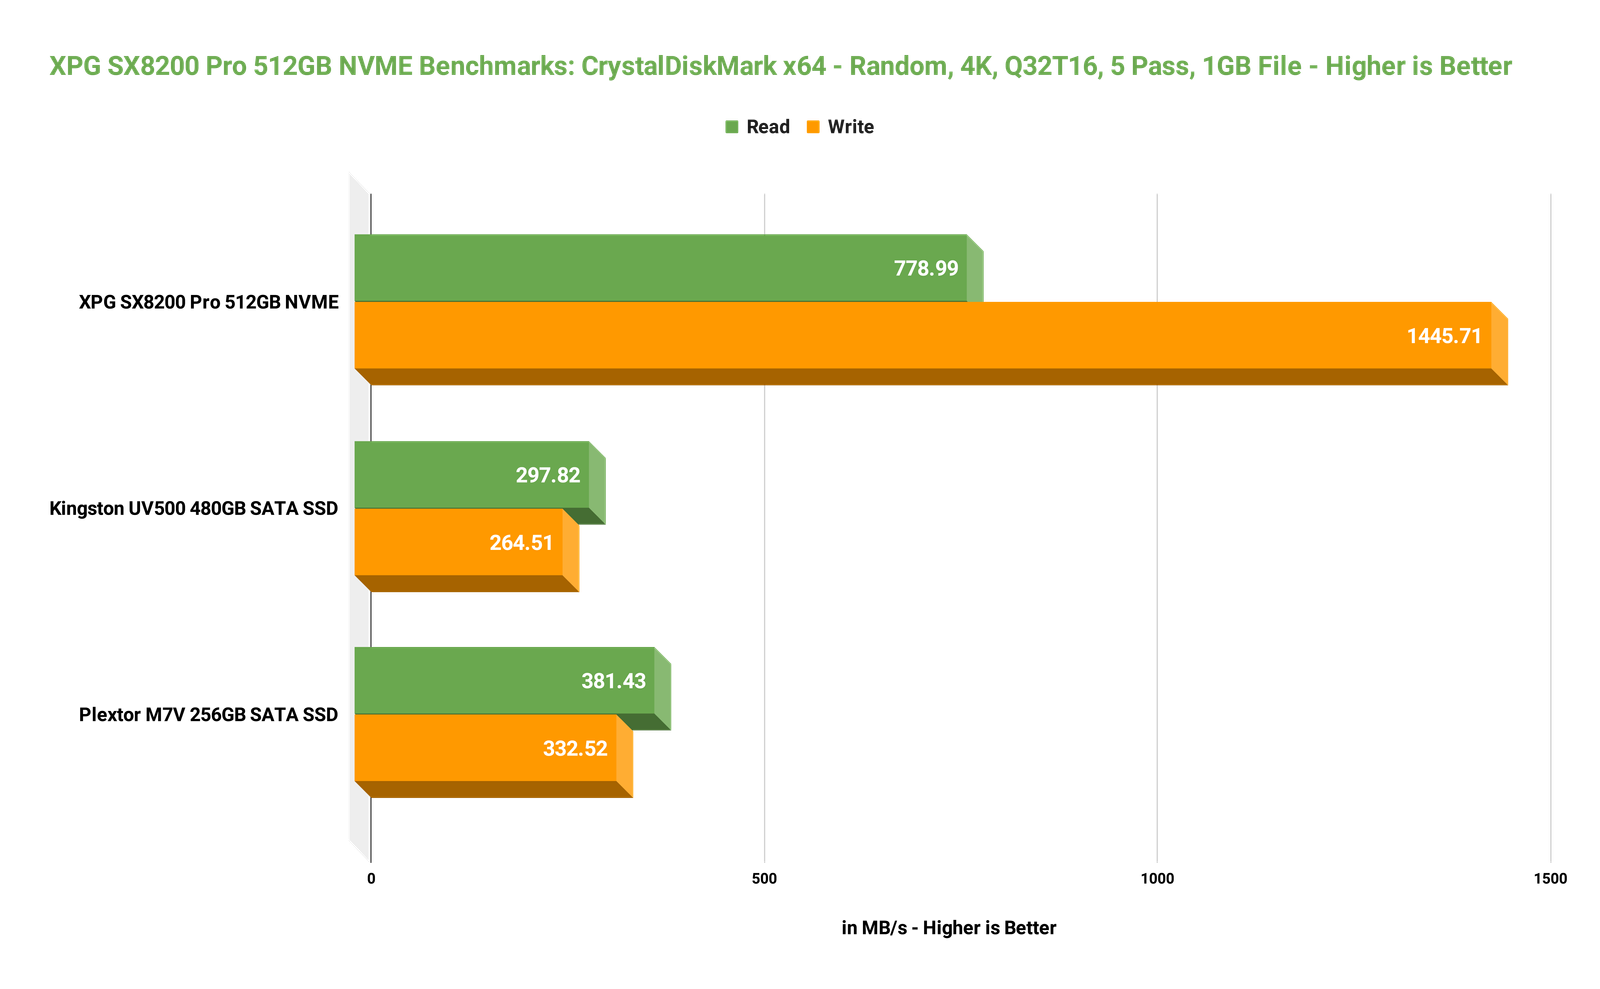
On CrystalDiskMark, which is one of the most reliable benchmarking tools that I use to measure sequential read and write speed, with a 1MB block size, 5 passes and 1GB transfer file size, the XPG SX8200 Pro NVME performed well around its rated speed with 3516.19 MB/s of read speed and 2549.79 MB/s of write speed. This basically simulates large file transfers such as ISOs, Movies and things like that or when streaming movies directly from the storage device. This is usually the benchmark some companies use to measure the read and write speed of their product because it is the one with the highest result, because all the data is in one place allowing the drive to easily gather them. Although it is not the best way to measure the real-world performance of a drive, it is a nice standard that anyone can use to see if their drive is on par with the specifications.

Next is random 4K read and write performance with a random 4KB block size and the same 5 pass and 1GB transfer file size, the XPG SX8200 Pro NVME also performed quite well. This one simulates small random file size transfers such as images, text files, and other fragmented data which utilizes more computing resources than a sequential test, hence the slower results in read and write speed.
Other than the sequential and random read and write speed tests, it is also important to test a drive’s latency when it comes to accessing data. In this test, I used the AS SSD Benchmark Tool.
AS SSD Benchmark (Access Times)
As you can see, the XPG SX8200 Pro NVME performed really well compared to a couple of SATA SSD on this test.

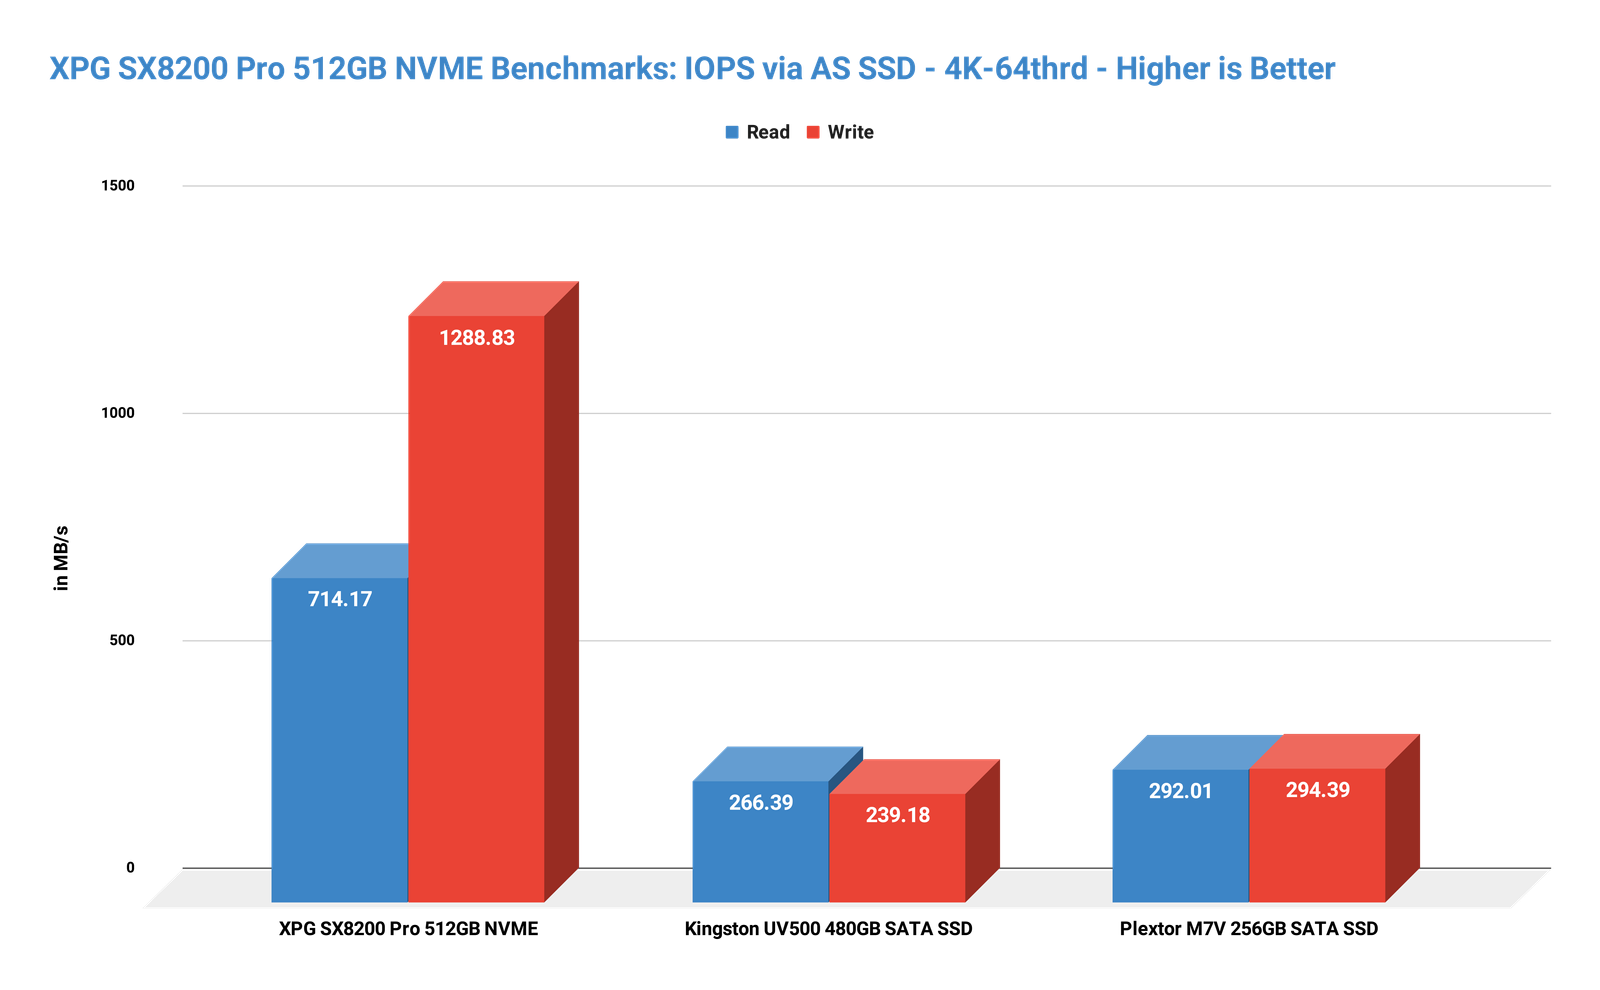
AS SSD Benchmark (IOPS)
Alongside the access times, we also captured the data for the 4K-64thrd which gives us an idea about the input and output operations per second performance of the drive on high queue depth. This was measured using a random 4KB block size with a 1GB file size transfer on a 64 thread request. The XPG SX8200 Pro NVME performed quite well significantly against the others on this test which is expected since the other two are slower non-NVME drives.
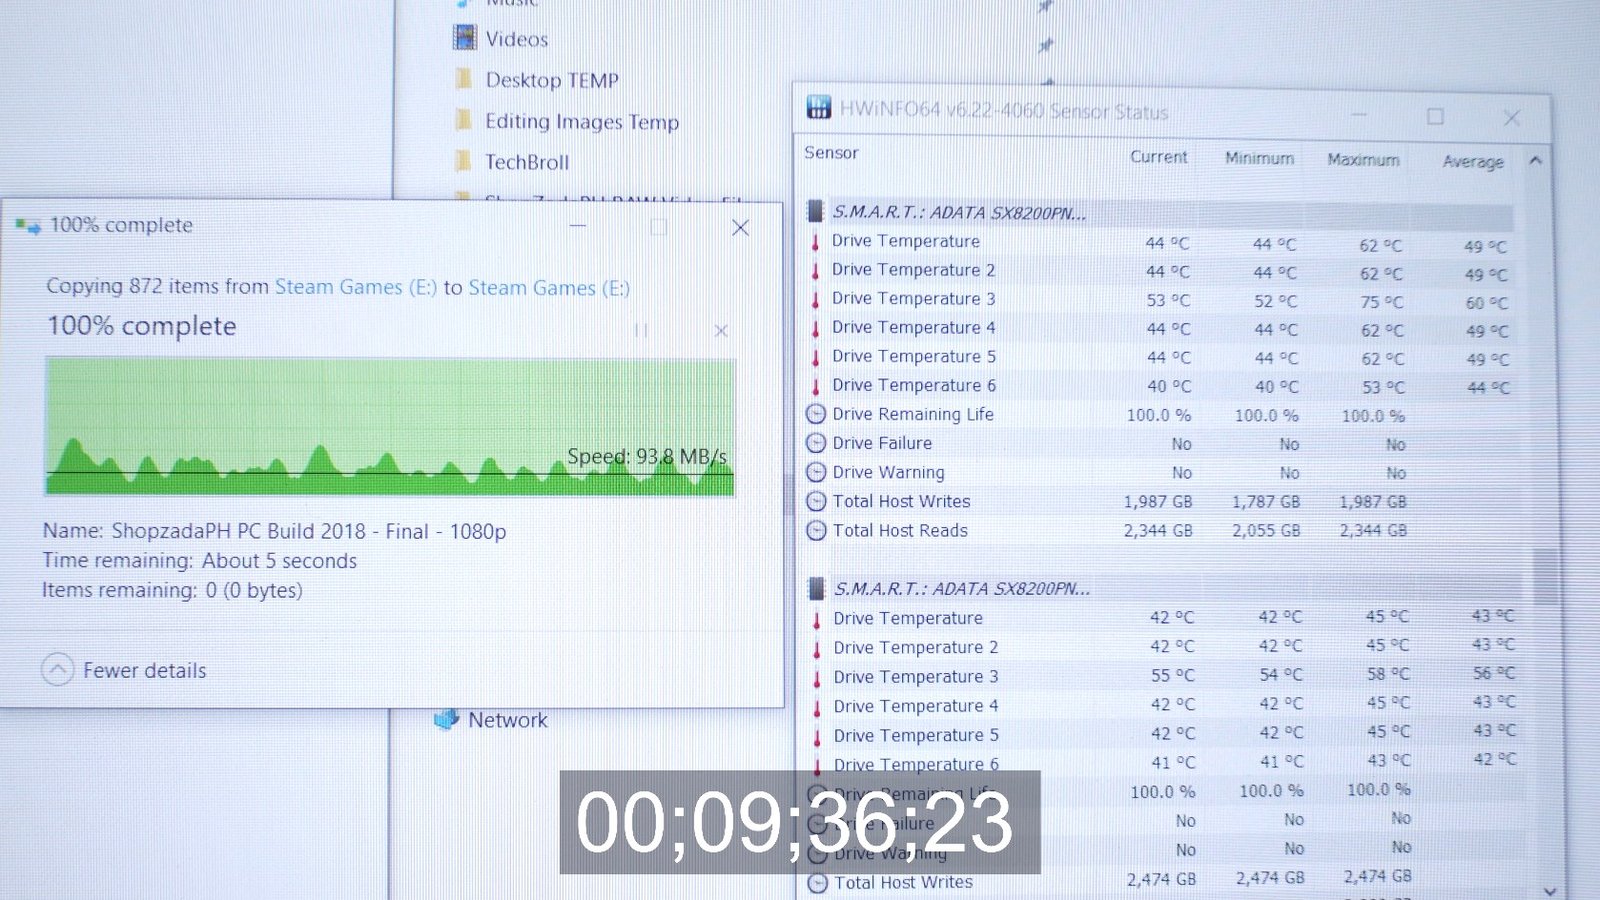
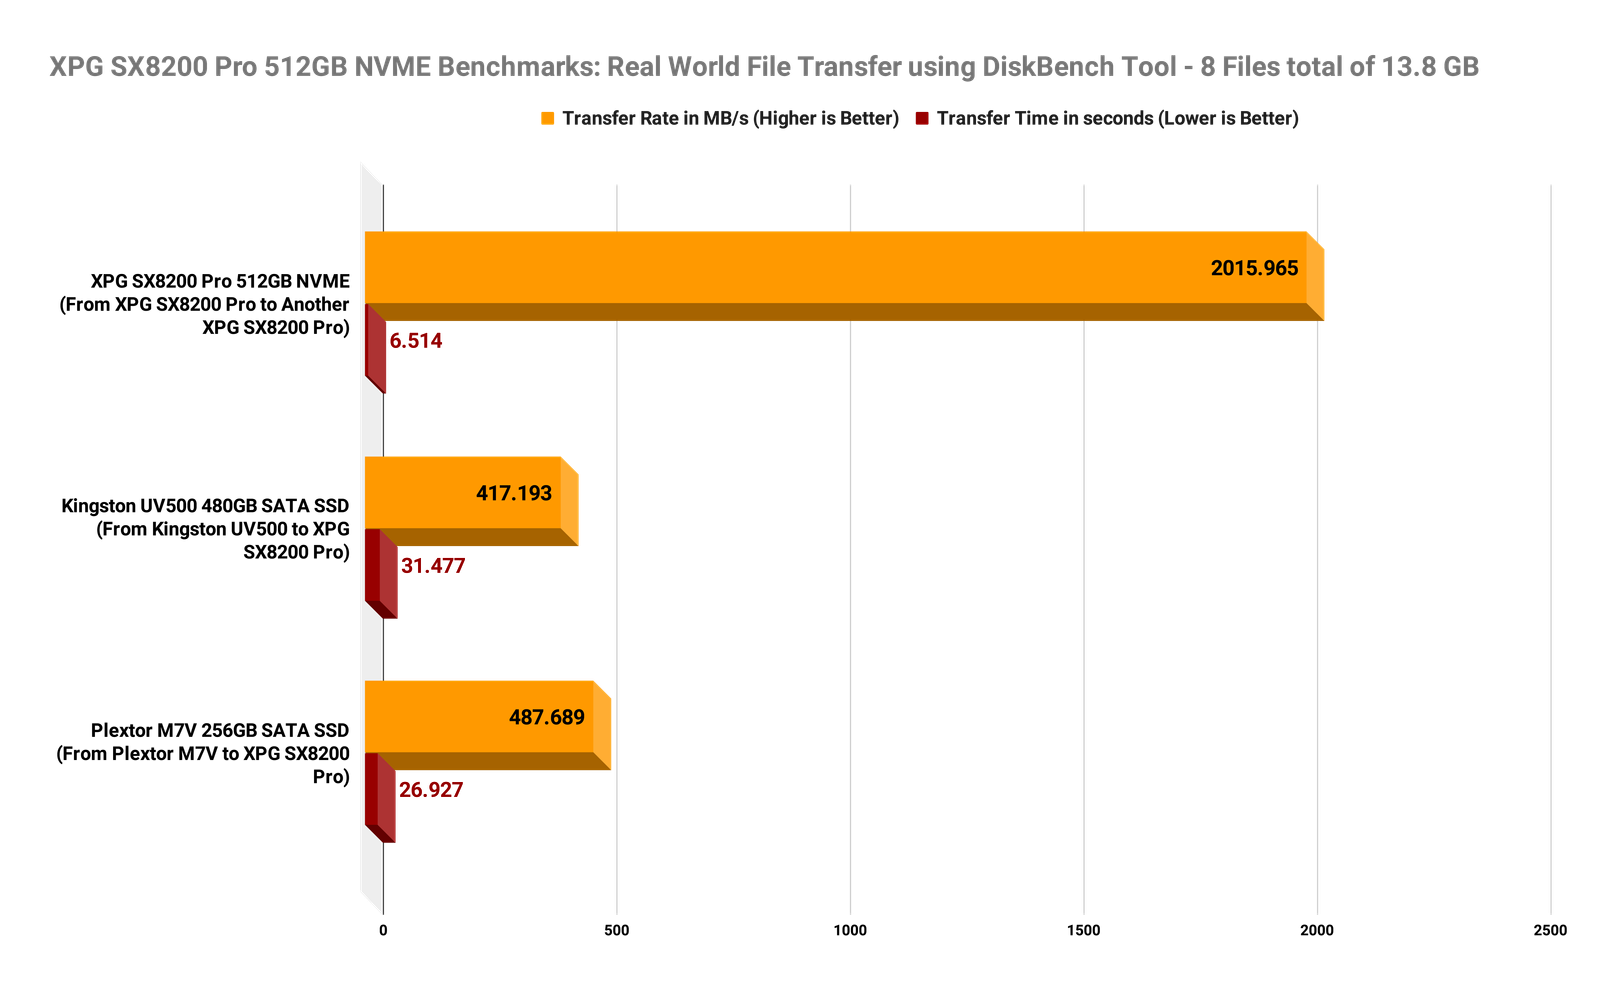
Now, even though we’ve already tackled an in-depth test when it comes to real-world file transfer tests, I still ran the XPG SX8200 Pro NVME on our standard Disk Bench Real World File Transfer test here.
DiskBench Tool – Real World File Transfer

And there you have it guys, I hope you get a thing or two in this article, especially those things that you won’t usually see on storage devices reviews and I hope I was able to explain everything clearly to you. And lastly, I apologize if I wasn’t able to compare this with another NVME like the Samsung Evo plus and others because quite frankly, they are expensive and I don’t have a budget for that for now.
VERDICT
To conclude, if you’re coming from a spinning Jurassic hard drive, upgrading straight to NVME will provide you a tremendous boost in performance and overall better experience when it comes to system boot time, game load times, video editing and even on normal day to day file transfer tasks. On the other hand, upgrading from an SSD to an NVME still has some benefits but not as dramatic as I thought it would be. As for the XPG SX8200 Pro, like I said, it is currently the best NVME price to performance ratio wise that you can get out in the market right now, and it is a no brainer to get this one compared to its more expensive but almost similarly specced rivals.
Transcend StoreJet 25CK3 2.5” SSD/HDD Enclosure Kit Review
NVME Tested in Real World Performance featuring XPG SX8200 Pro 512GB


Thanks to XPG for making this review possible, You can get this NVME Drive from the button below.
XPG SX8200 Pro 512GB NVME
Php 5,000
Pros
- Great performance to price value
- Great read and write perfomance
- Comes with DIY Heatsink
- With SLC caching and DRAM buffer
Cons
- Nothing significant

The Broll who always got your back online!